

Claude Code for People Who Don’t Code
Forget the jargon, I'll break Claude Code down step-by-step so you can go from confused to comfortable without needing a coding background.

I avoided Claude Code like a kid saying no to vegetables growing up. You know it’s good for you, but you still avoid it because of how scarily bad it tastes.
Claude Code was my bitter melon for 5 whole months. I knew it would help me, but I kept telling myself, “Claude Chat + Projects” are more than enough.
Lies.
I was really 1) procrastinating because I was in a new country and in my first months at my first full-time job and, more importantly, 2) intimidated by it.
I have a master’s in Computer Science, and I’ve been dealing with code for the past 6 years. Yet I still felt intimidated.
If that happened to me, what about everyone who has no tech background at all? It’s scary and overwhelming to even think about.
That changes right now.
Most Claude Code tutorials are built for the technical engineer/developer who knows how to code. This one is built for the person who doesn’t.
In this article, I will:
Demystify the workings of Claude Code by showing you what the “terminal” it runs on is and why it’s actually simpler than it looks.
Walk you through installing Claude Code and running your first session.
Cover the fundamental components of Claude Code, from permission modes to memory to skills to MCP in a lingo that doesn’t assume a coding background.
Give you real use cases you can immediately apply.
Hand you a couple tips and tricks at the end once you’re comfortable with the basics.
Before we start, remember that you'll need at least the $20 Claude plan to access Claude Code. It’s definitely worth it if you use AI in your work/hobbies for at least 1 hour everyday. Or if you genuinely want to learn more about AI. Otherwise, I’d recommend sticking to the free model, and using the Chat functionality first.
The 3 ways to use Claude Code
This isn’t the full walkthrough yet, but I will show you the three different setups for Claude Code, and tell you why I’m focusing on one.
Claude Code Web
The online web application found at here is the easiest way to get into Claude Code’s features without needing a setup. I would not recommend the web application because all your files are stored on the cloud, rather than the local system.
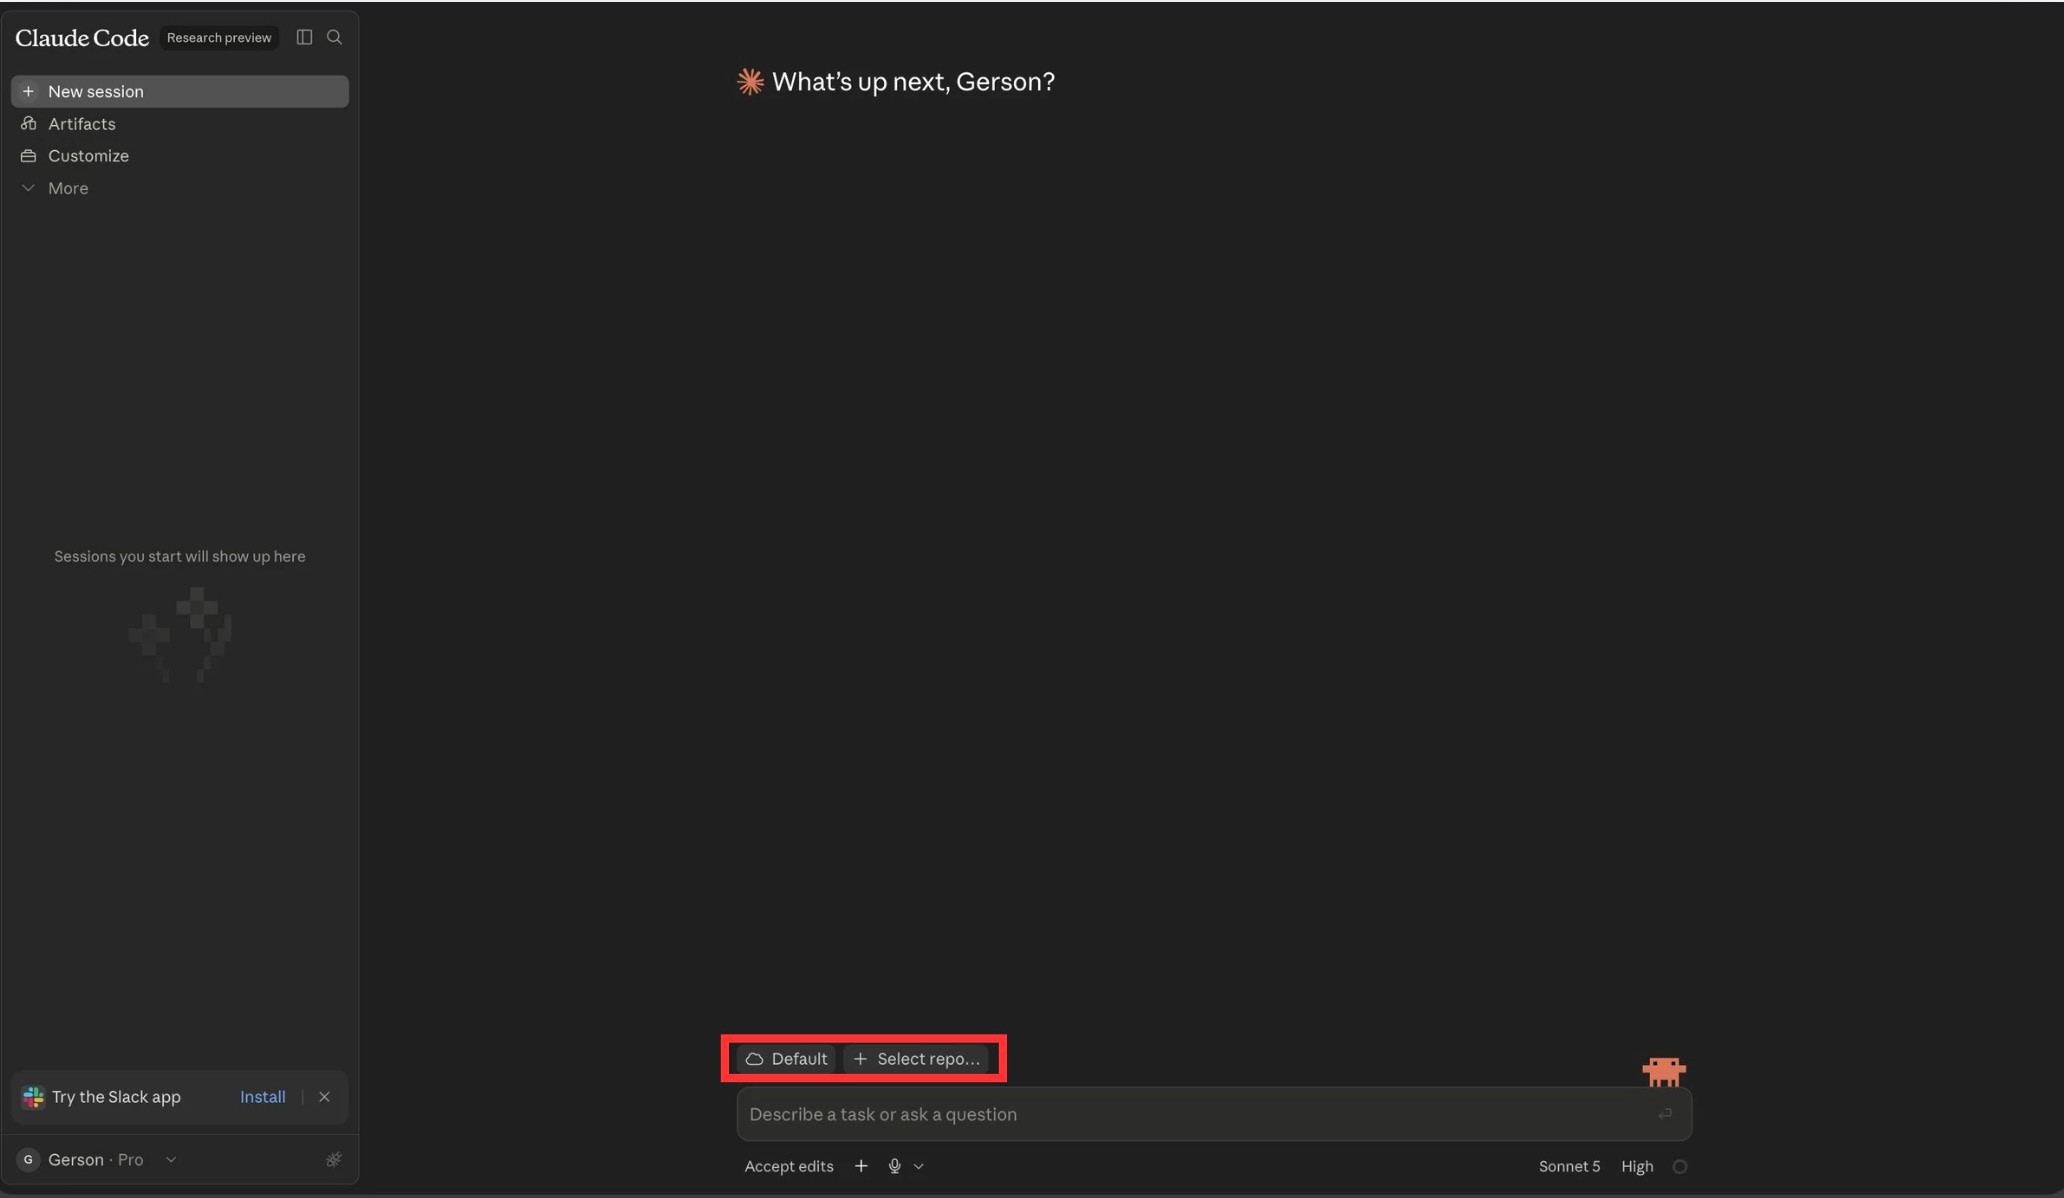
It makes it harder for you to organize and understand the workings of Claude Code if you’re not able to see the files you’re working with easily.
Claude Code Desktop
The desktop application, on the other hand, is an awesome way to learn Claude Code because it gives you access to your local file system plus all the necessary commands to learn.
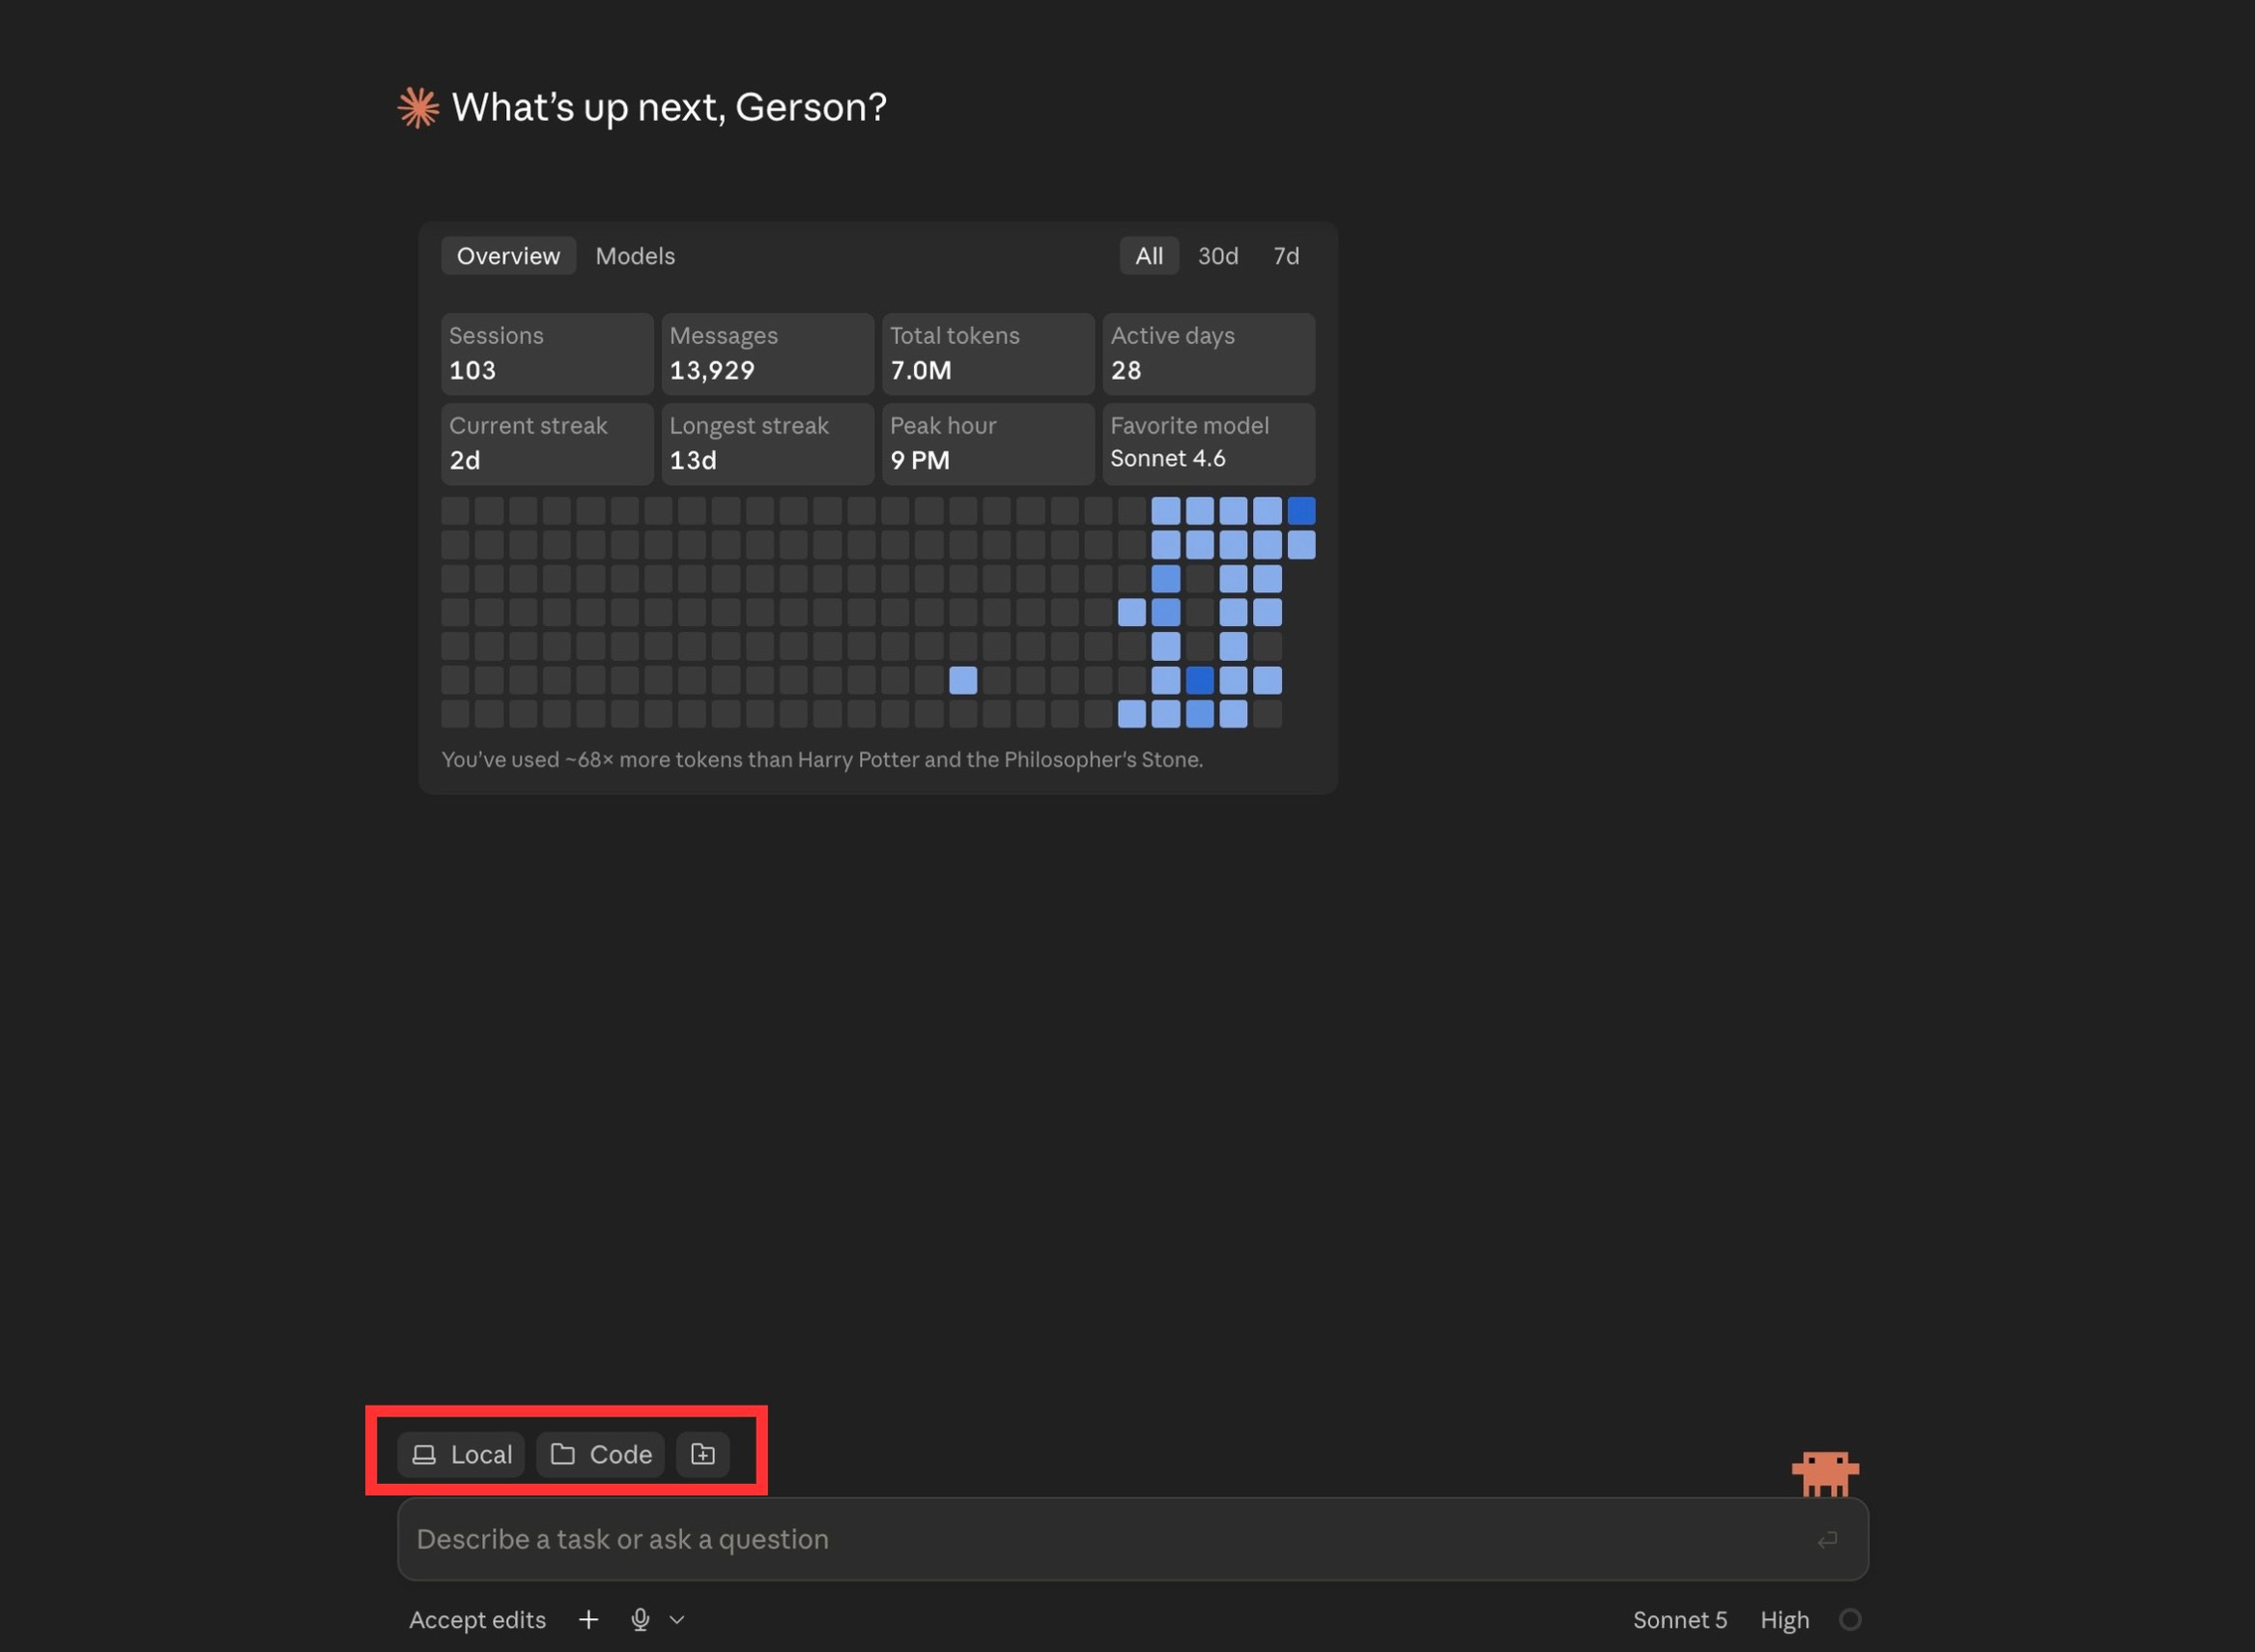
This is fantastic already, I’m not going to lie, but I will teach you the last method because it’s the method that I find gives you most “Eureka” moments and demystifies the fear of coding because it’s dealing with …..
the terminal.
Claude Code Terminal
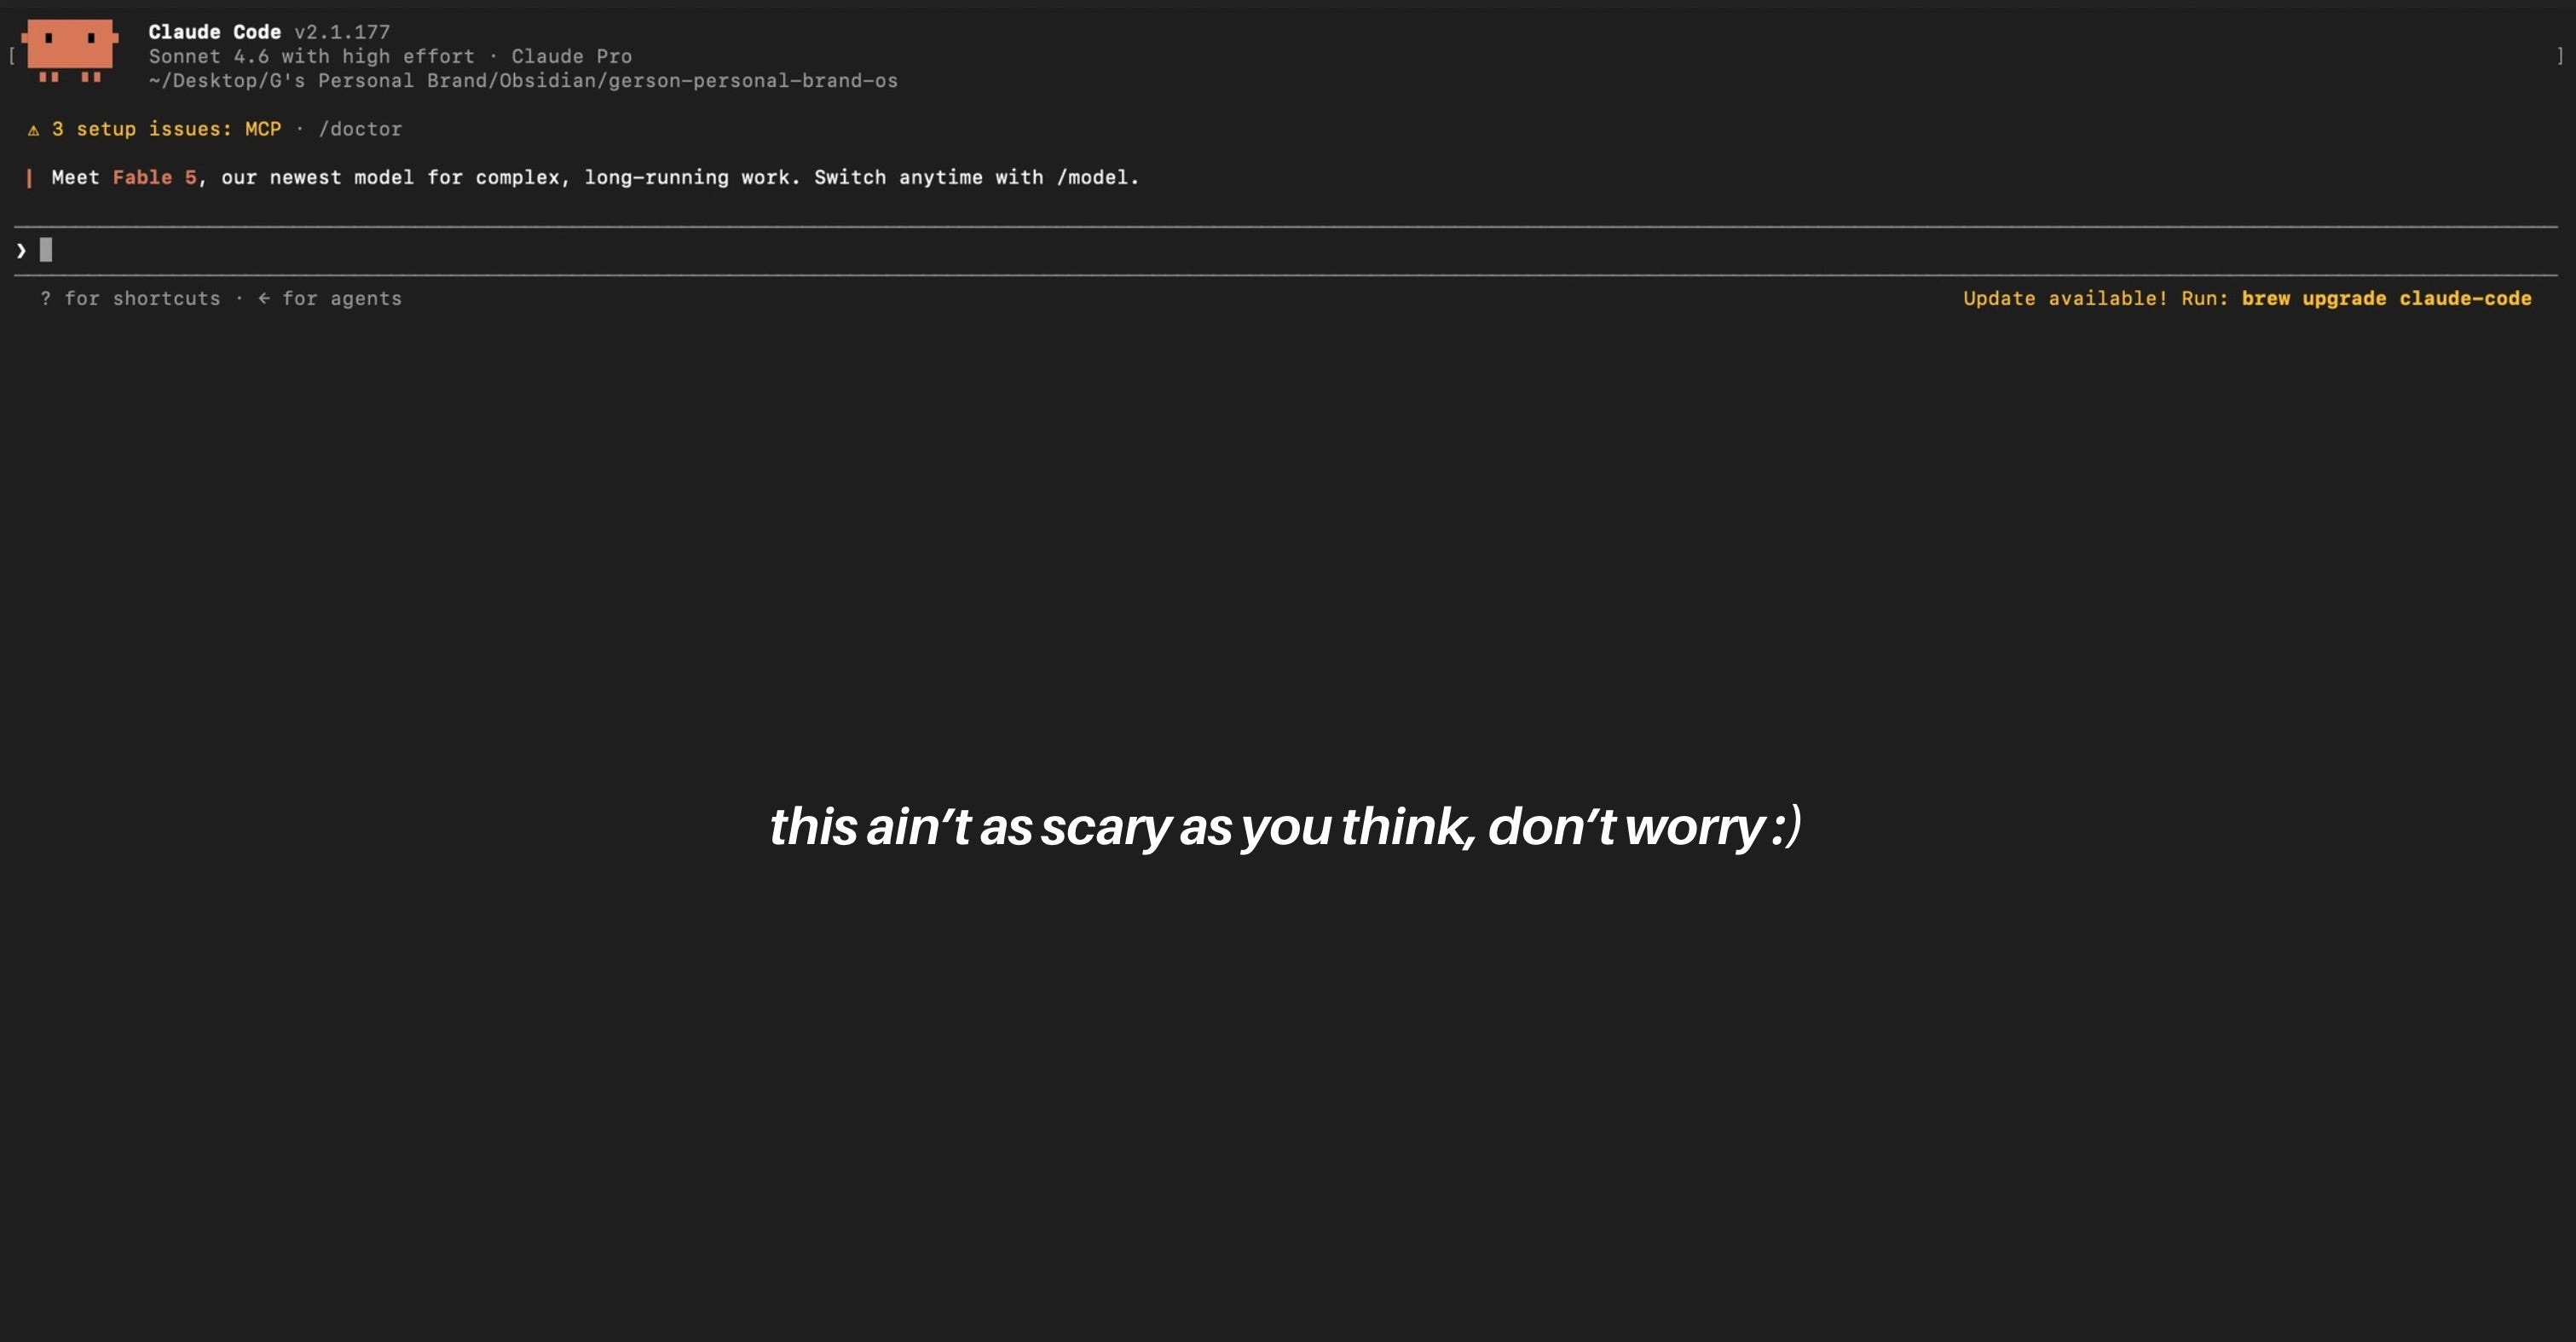
This looks scary right? It’s like just a piece of colored text on a black screen and nothing more.
But don’t worry, it’s gonna be simpler to understand! I’m teaching you the terminal for a couple reasons:
The terminal gives you more flexibility. In my opinion, it gets easier to work on the terminal when you get a hang of the lingo, and it gives you more control on your sessions, giving you an easier transition to multiple interconnected sessions down the line.
Claude Code is optimized for the terminal. It started off as a terminal app, so it’s less buggy than the Desktop application.
Claude Code in the terminal just seems cooler. Wouldn’t you want to be like the pro-hackers who go “type type type type type” in their computers and see cool things happen on screen? This is a purely objective suggestion.

Anyways, if you do not find the terminal appealing after this walkthrough, you can definitely stick with the Desktop app. Everything I’ll teach is transferable from the Terminal to the Desktop because, as you will see in the next section, they’re actually more interconnected than you think.
What even is the terminal?
The answer is embarrassingly simple. Ready?
The terminal is just a folder system expressed in a different lingo.
Even simpler, the terminal is doing everything you do manually through clicking folders, right-clicking to select new, double-clicking to enter, just expressed in a different lingo, aka “code”. Same folders. Different language.
What kind of language? Well, it’s called commands. Think of commands like what you tell your pet dog to make it perform a specific action.
Sit means to sit down, roll over to roll over, and walk means a 1 hour 30 minute escapade throughout your entire neighborhood.
In the terminal, you type these set commands and you magically get a response. But in truth, it’s just the system following a set process.
For example, the first command I ever typed in a terminal was whoami. I was teaching myself to code, alone, about six years ago. I typed it, pressed Enter, and the terminal returned my name: gersongerardcruz.

I thought: whoa, that’s so cool. It’s like I’m talking to the computer. And it is! With its own language at that.
Then I started learning more commands and eventually it became part of my memory. Learning on my own and discovering things bit by bit really helped me enjoy the process. That moment was a big part of why.
And we haven’t even gotten to the cool part yet.
To do that, it’s your turn.
Disclaimer: I am using a Mac environment for this. If you’re using Windows, you can follow along by opening the terminal by going to the Windows menu icon, clicking it, and typing Terminal to open it.
Open your Mac’s Finder right now. Go to your home folder. You’ll see Desktop, Documents, Downloads sitting there in a familiar grid.
Now open your terminal. Spotlight search, type “Terminal,” hit Enter.
Put both windows side by side.
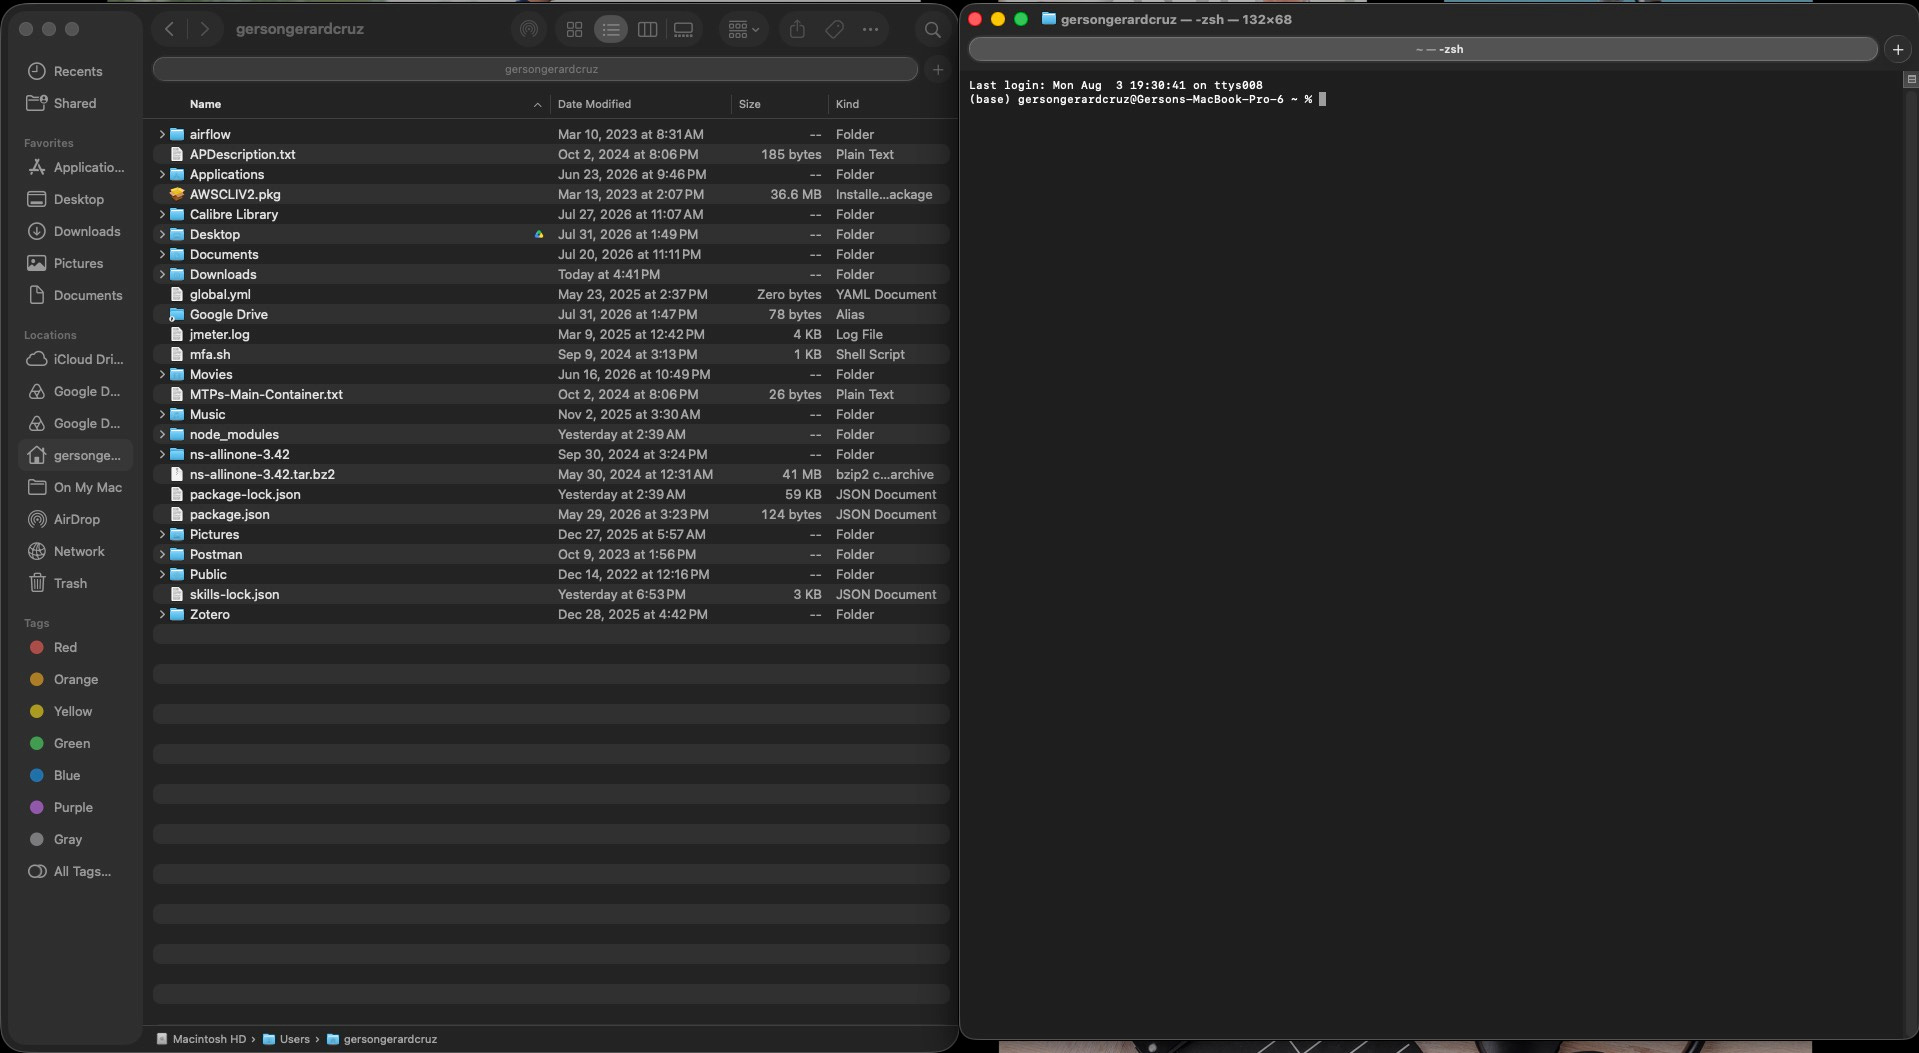
Here’s the coolest thing:
Your terminal and finder are showing the exact same thing right now.

It may sound crazy, but hear me out. Let’s start using commands.
The five commands you actually need
A command is just a form of syntax the machine knows to execute what you’ve been doing by hand through clicking and moving your mouse. It’s just a different representation of the more manual work you’re doing so that you’re able to communicate to the computer in a different way. They mean the same thing. Just expressed in different formats.
I’ll show you 5 commands. Each one maps to something you already do in Finder.
ls -- your quick check of a folder
We use ls when we want to see the contents of a specific folder. If your Terminal is in the Desktop folder and you type ls, everything that’s inside Desktop will be shown to you in a list. That’s why it stands for “list files.”
Try typing out ls in the terminal now.
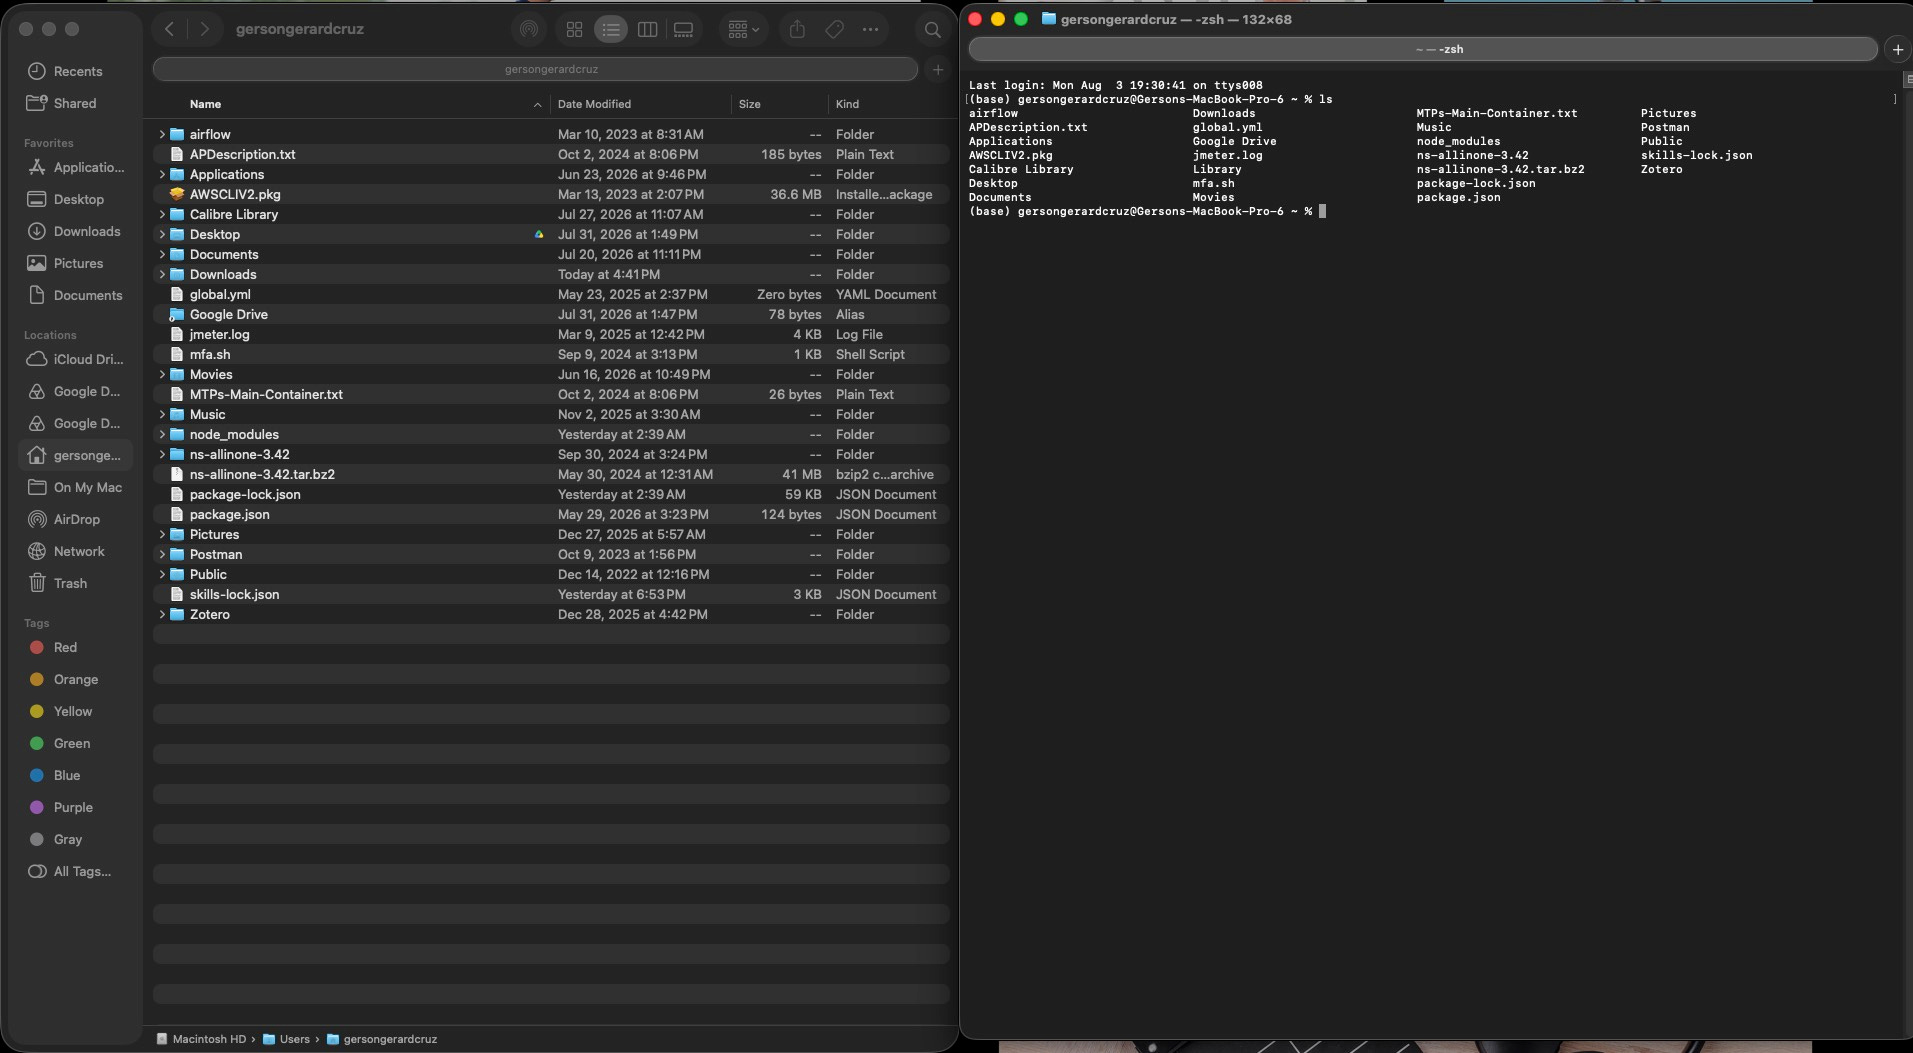
They’re showing the exact same thing now, just in different views. Your terminal is simply your filesystem expressed in a different language.
ls is your quick check of a folder. Instead of clicking through multiple folders just to get to the subfolder you want, type ls -- and you can combine it with other commands like cd (in the next sections) to quickly get to where you want to go.
By the way, some files are naturally hidden. They’re the files that begin with a . like .claude. Why? Because these iles are contained within the actual system itself. For all your skill files (you’ll know what a skill is in this walkthrough) are contained in the .claude file.
We hide these files because, guess what? It’s for safety and security. Some files, when edited, hold important configurations that may change the way your applications or computer works. That’s why by default these are hidden -- but if you want to see them, use ls -a.
To show them in Finder, click command + shift + .
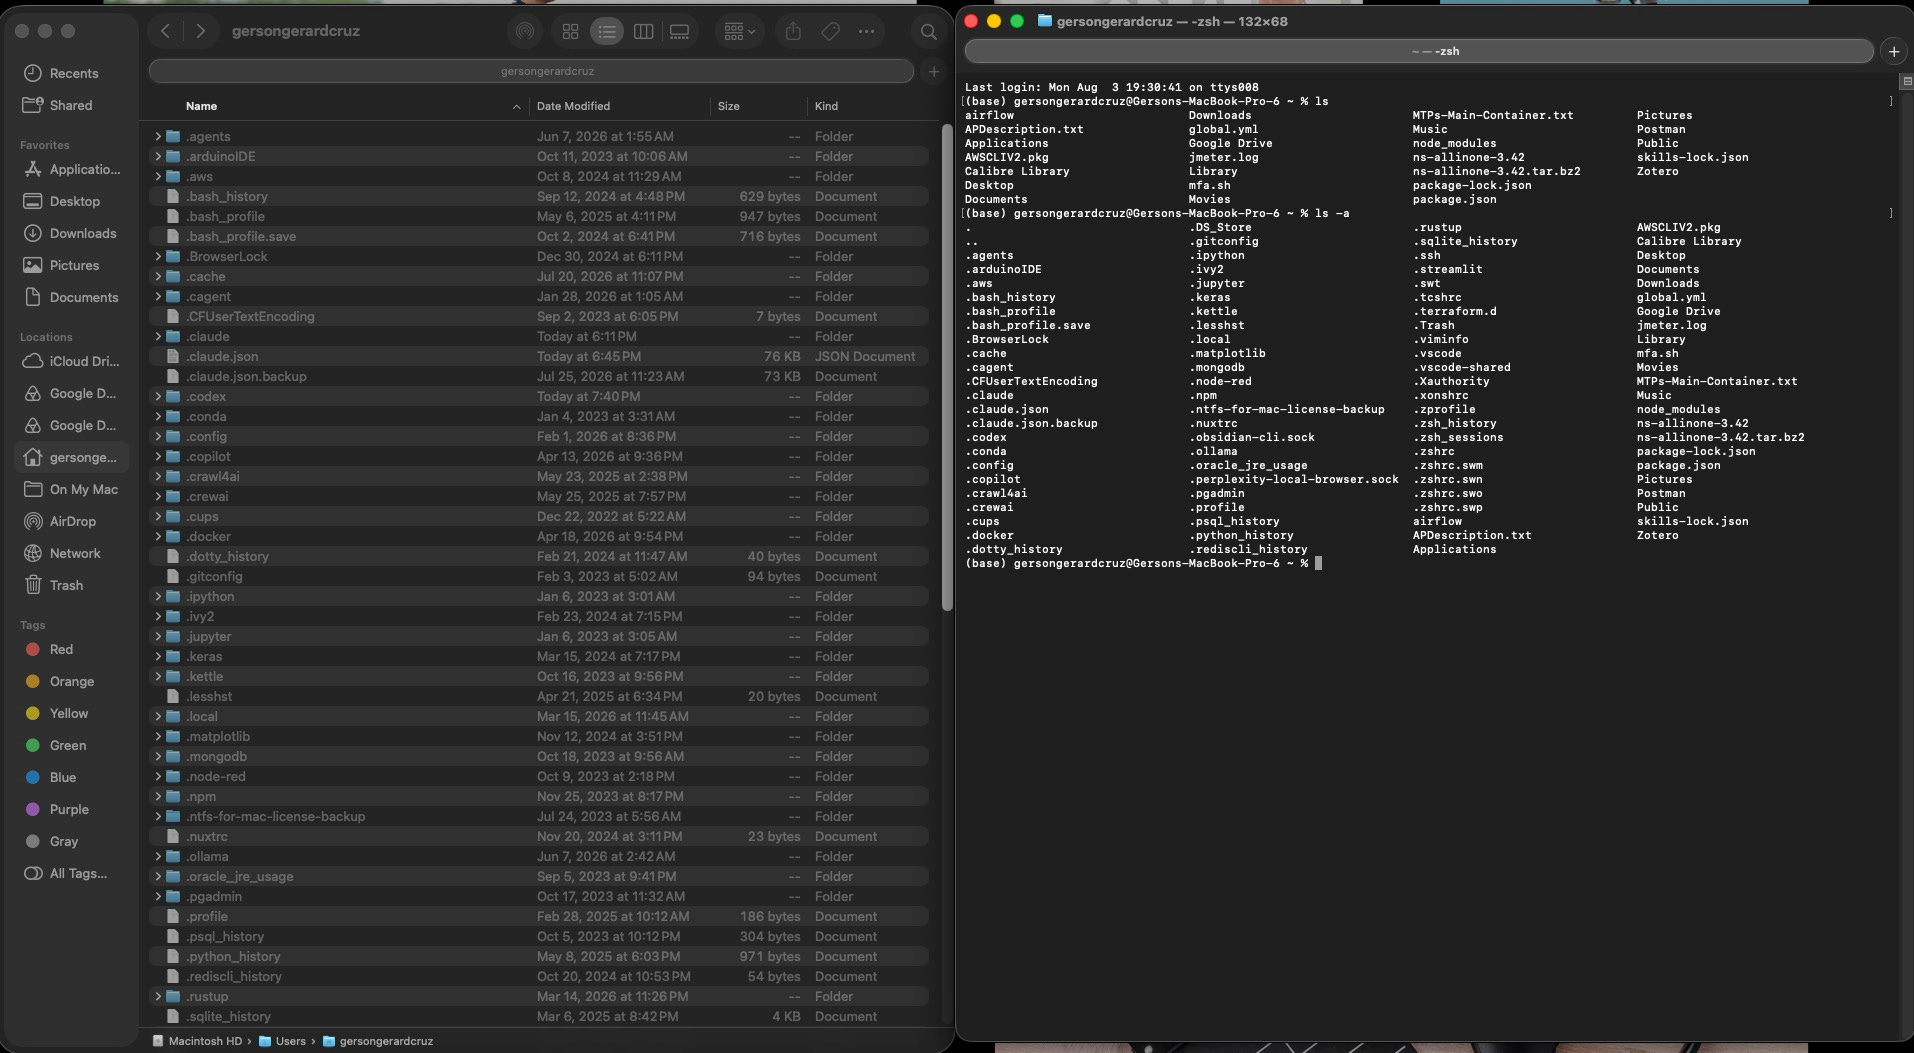
Terminal’s getting less scary now that you see it’s just a folder right?
Even I was amazed when I did this, because I kept telling myself: it’s as simple as this?!
I’d only ever used the terminal and Finder separately. I’d never thought of connecting them until I asked myself a simple question: why does Claude Code always ask me to select a folder first?
And then I realized: it’s because it needs somewhere to work on.
The terminal is sitting inside your home folder. The exact same one you just had open in Finder. Same folders. Same files. Just two different ways to look at them.
pwd -- a quick sanity check
If you get into a new terminal and you don’t know where you are, you use pwd to check if you’re in the correct folder. It’s just a quick sanity check to situate yourself in the entire folder system.
It’s like checking where you are on Google Maps when you’re walking somewhere. You’re not lost, you just want to confirm you’re still going in the right direction.
Type pwd and press Enter. The terminal prints your current location.
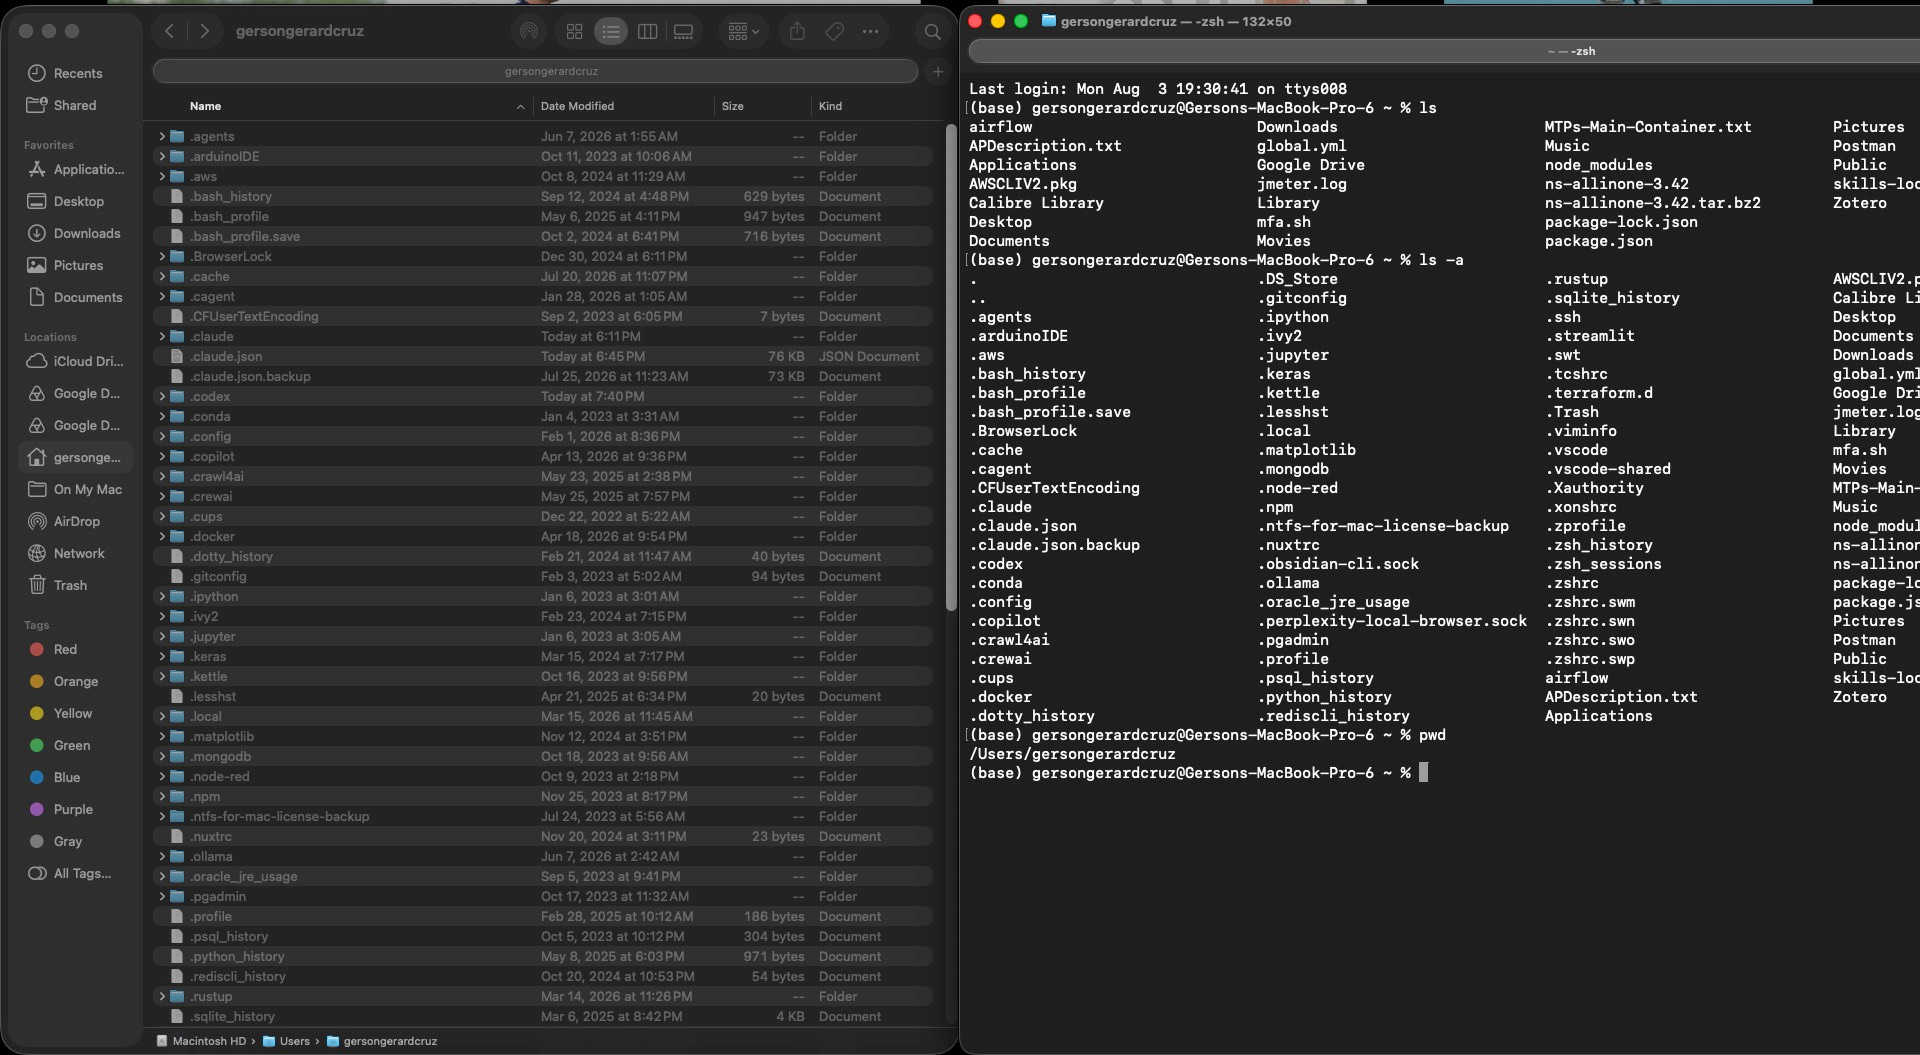
You see how you’re in the /Users/your-name folder? That’s exactly where you are in the Finder.
cd -- eight clicks versus one line
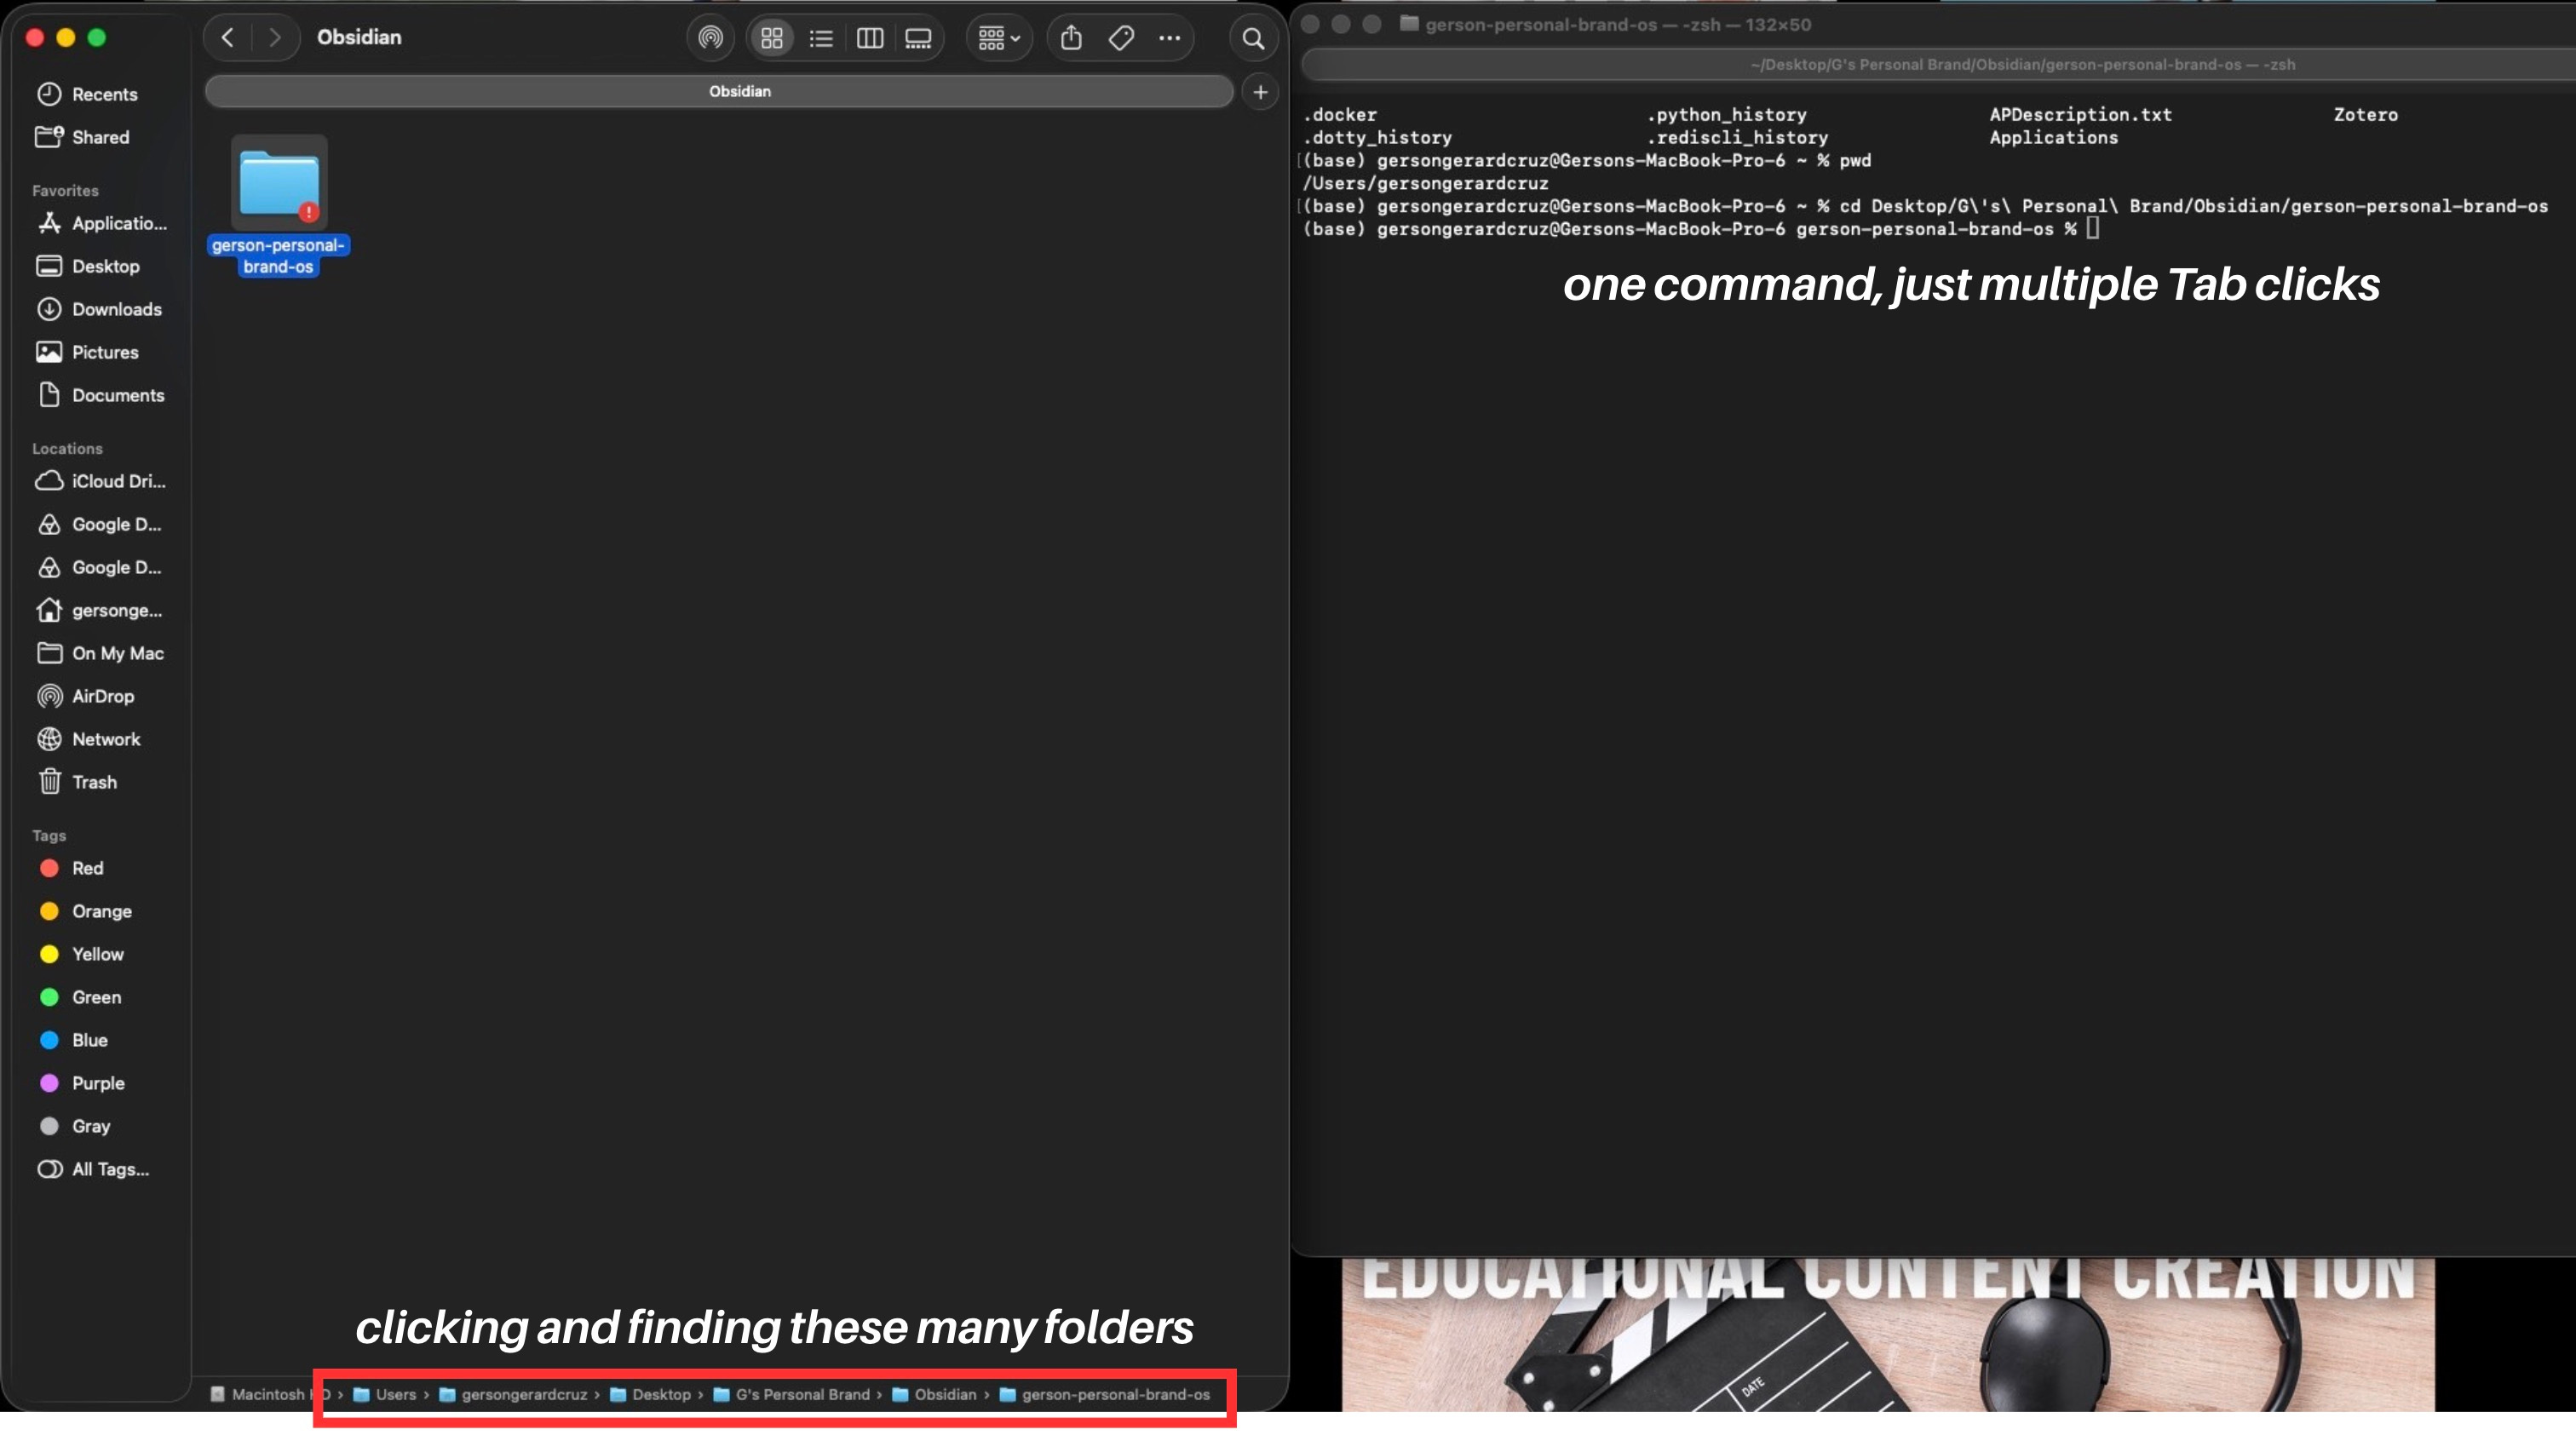
Here is the setup I used to do before. If I wanted to get to my LinkedIn Claude Code folder, I would open Finder, click Desktop, click G’s Personal Brand, then click LinkedIn, then click Claude Code, then find the folder that contains whatever I want to check -- infographics, writing -- and then in that folder there are more folders.
It’s like eight or nine clicks just to get to the folder I want, and it takes at least thirty seconds to one minute every time I do it because there’s no instant way to get from one folder to another.
So I use cd instead. It stands for change directory or in simpler terms, change folders.
What I do is type cd Desktop, then type the first letter of the next folder and hit Tab (this will trigger the autocomplete function of the terminal), type the first letter of the next folder, Tab again.
It saves me about thirty to forty seconds every time and because I do it so many times, it ends up saving at least five to ten minutes in a working session.
To go back one level (previous folder): cd .. The two dots mean “go up one folder.”
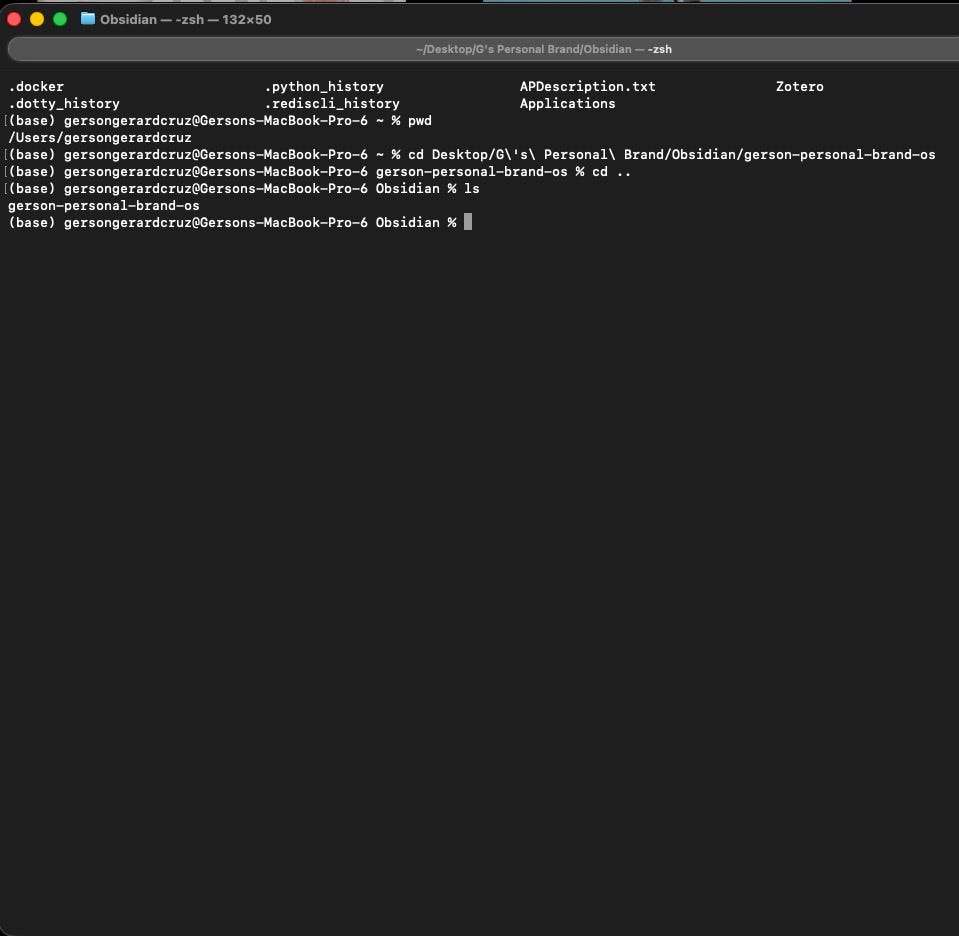
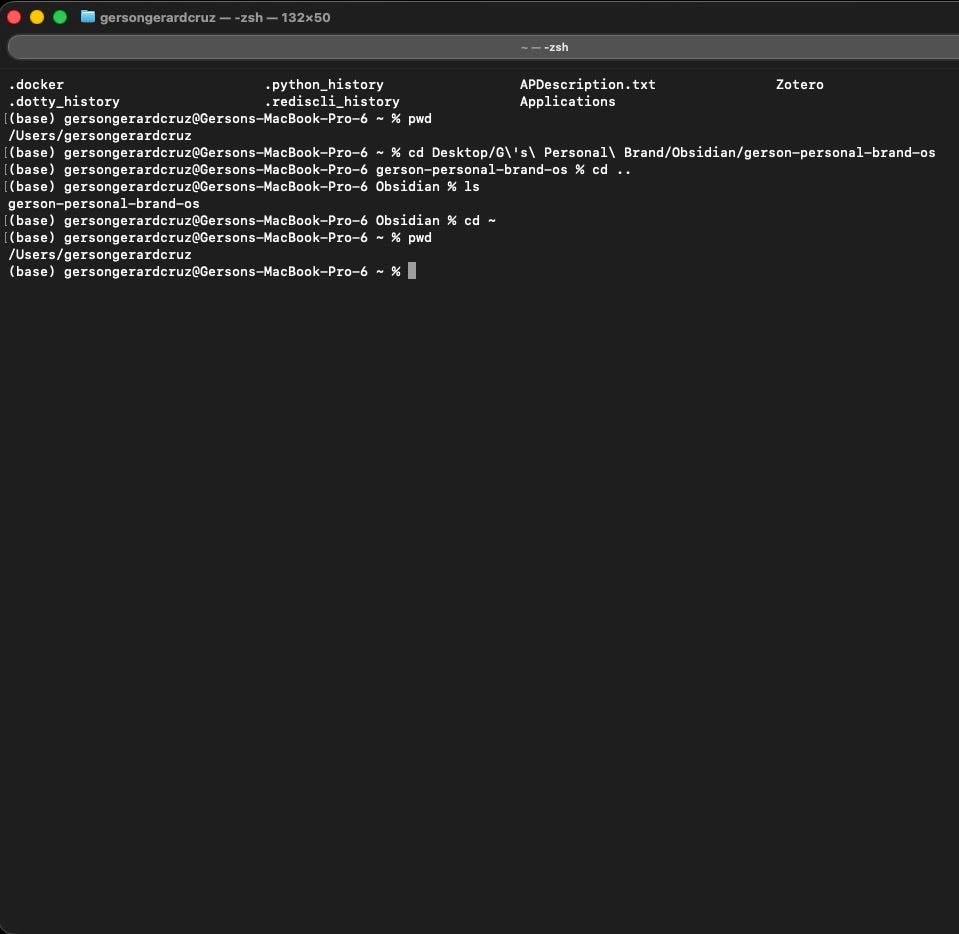
To jump home (gersongerardcruz or yourname) from anywhere: cd ~
mkdir -- create without leaving where you are
This is what I do when I quickly want to create a folder and I’m already working in the Terminal. Instead of clicking through Finder again and going through all those folders to get to the correct place, I just type mkdir folder-name and it’s already there.
Let’s test this out by creating two folder: test-finder and test-terminal.
Create a new folder normally from the finder by going to the folder and right-clicking ‘New Folder’.
Then use the mkdir command in the terminal.
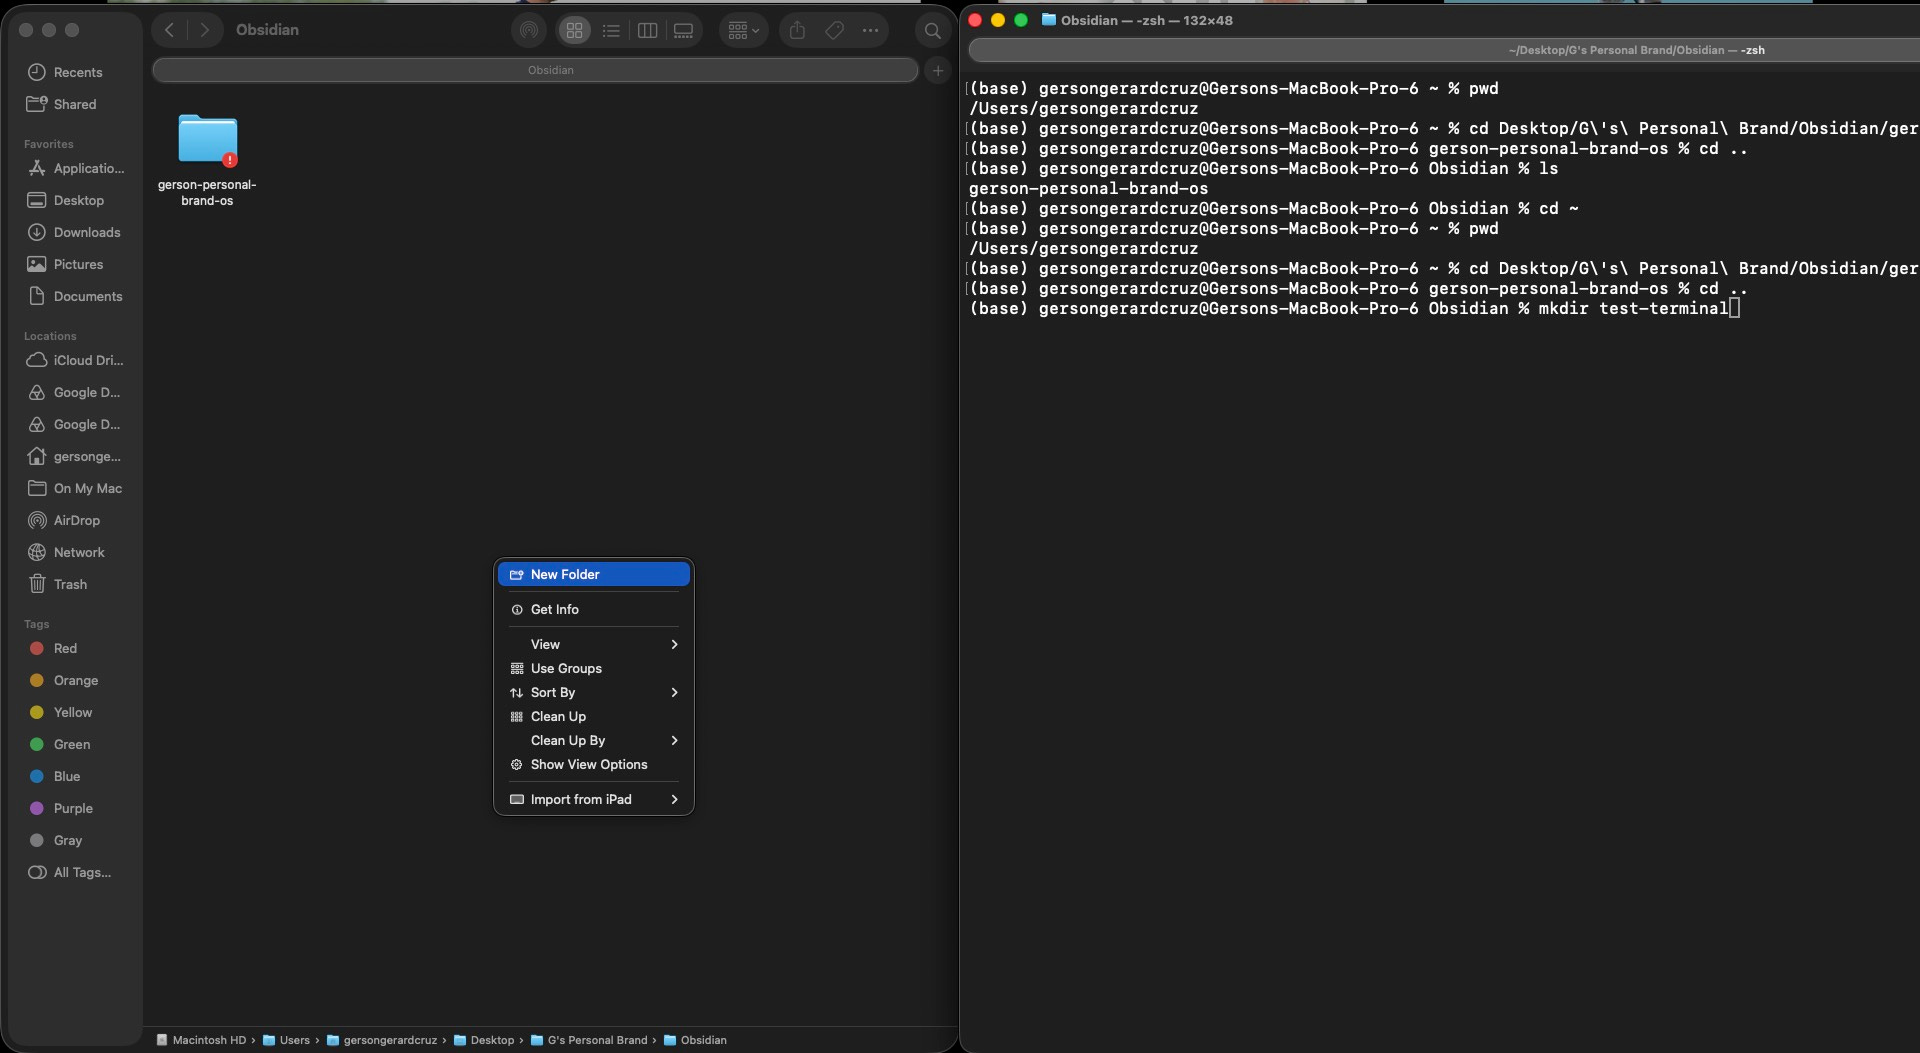
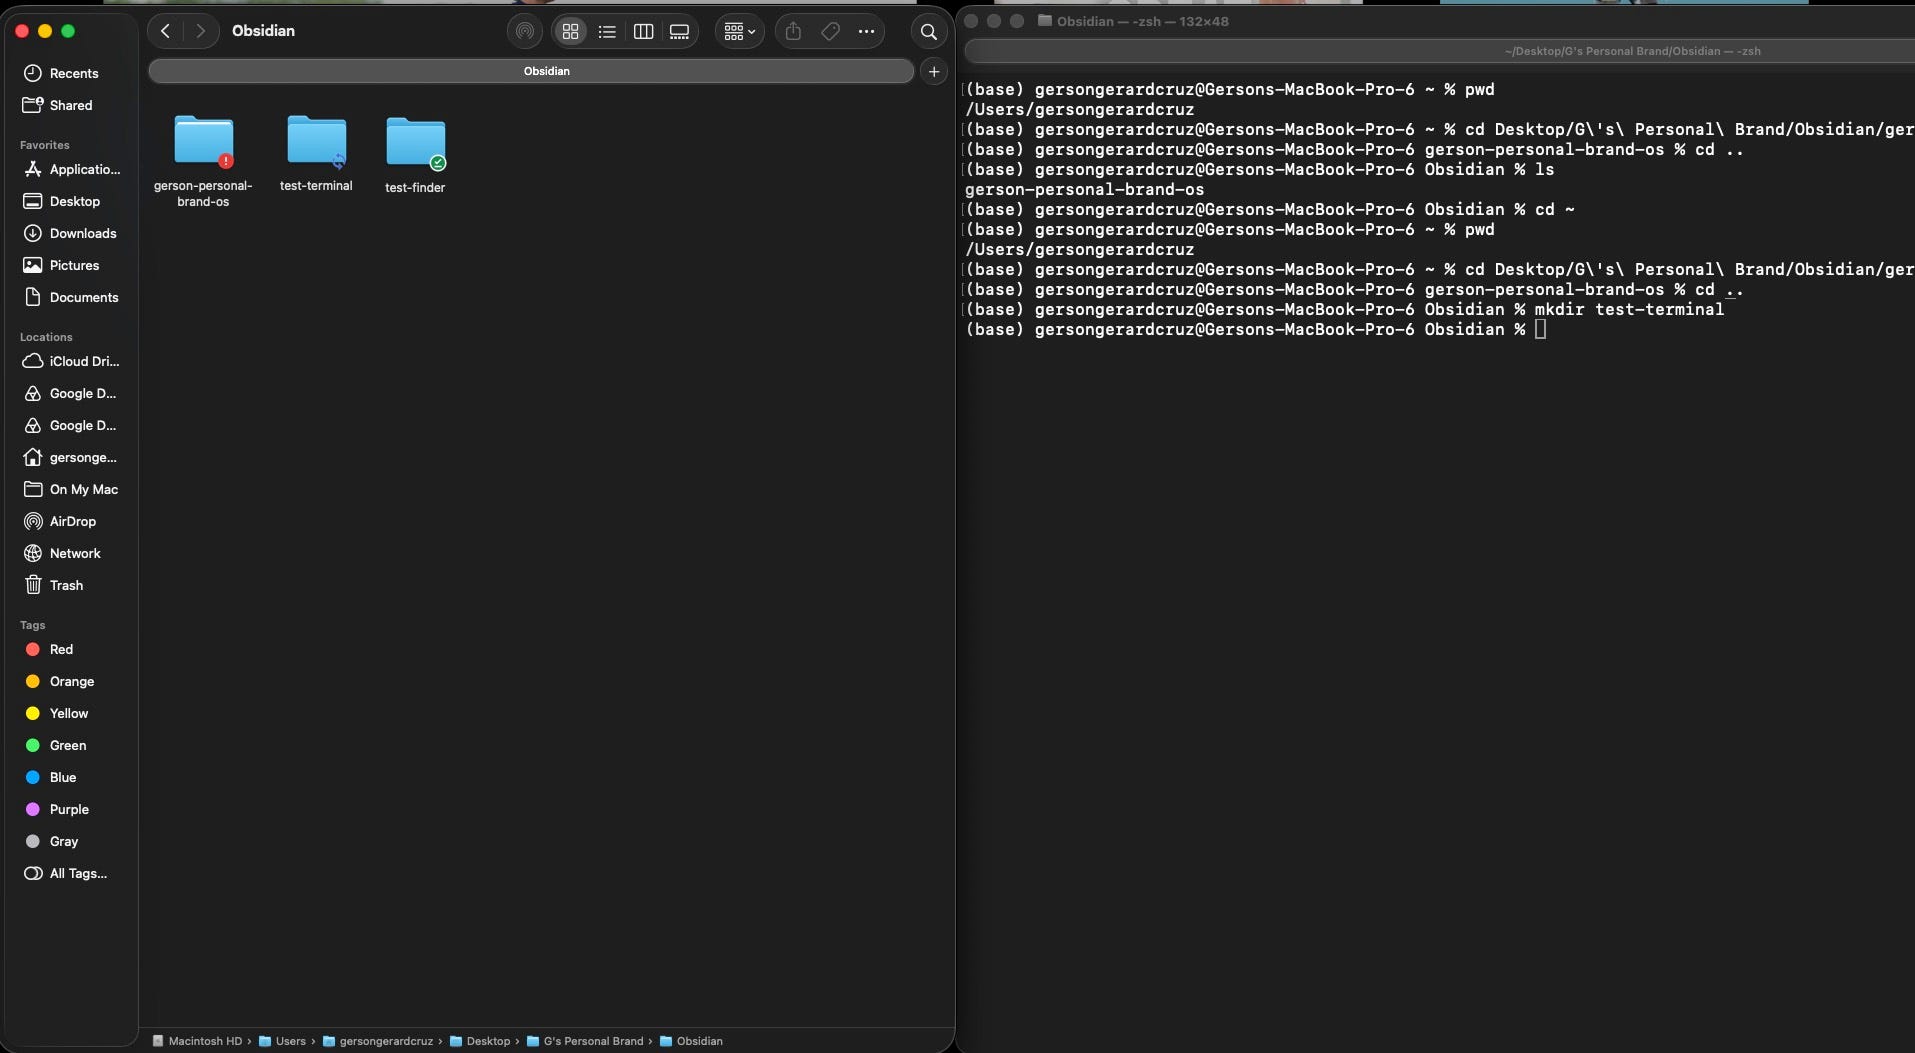
See? It gets created in the same folder. Your terminal acts on the folder you are in. This is the same concept in Claude Code for future sections.
You’re already getting more used to this “scary” terminal.
open . -- when you need to go back to Finder
I use this when I’m sick of the terminal and I want to go back to Finder.
If there’s something specific I’m looking for and I can’t find it in the terminal, I type open . -- and what it does is move me from the terminal back to Finder, exactly where I am. If I was in a Desktop folder, it opens that Desktop in Finder so I can see everything more visually.
It’s not always everything to the terminal. Sometimes you need to get a look at Finder to actually get what you’re looking for.
Try this. Go back to one folder before in the Terminal by going cd .., then type open .
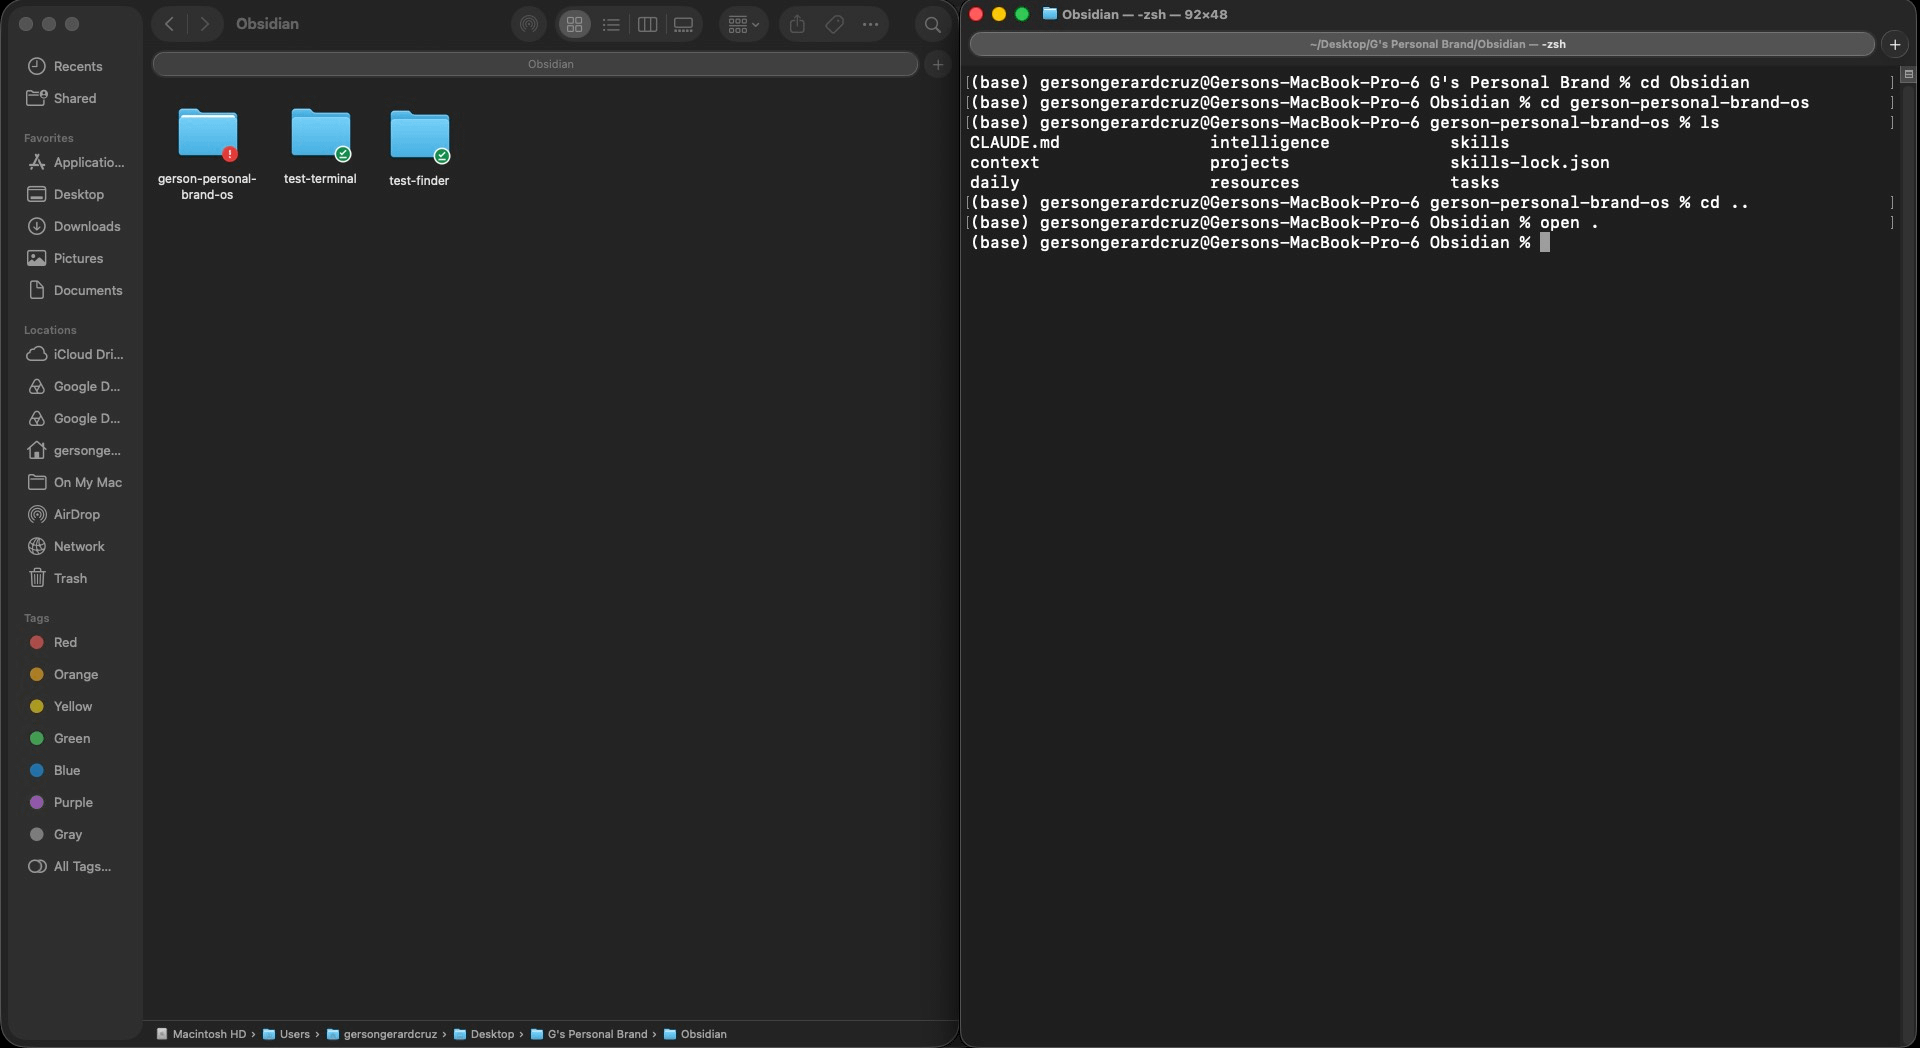
The open . commands open up the finder to where you currently are. This is helpful is you’re having trouble finding things in the terminal.
The moment you type something wrong
When I typed in a wrong command, my first thought was: “oh no, what’s going to happen?”
The terminal just said “command not authorized.”
Don’t be afraid of typing anything wrong. You will be guided to the right lingo, or told if you typed the wrong one. From there, you can do a Google Search/ask AI to know which command to use.
Nothing really breaks 99% of the time.
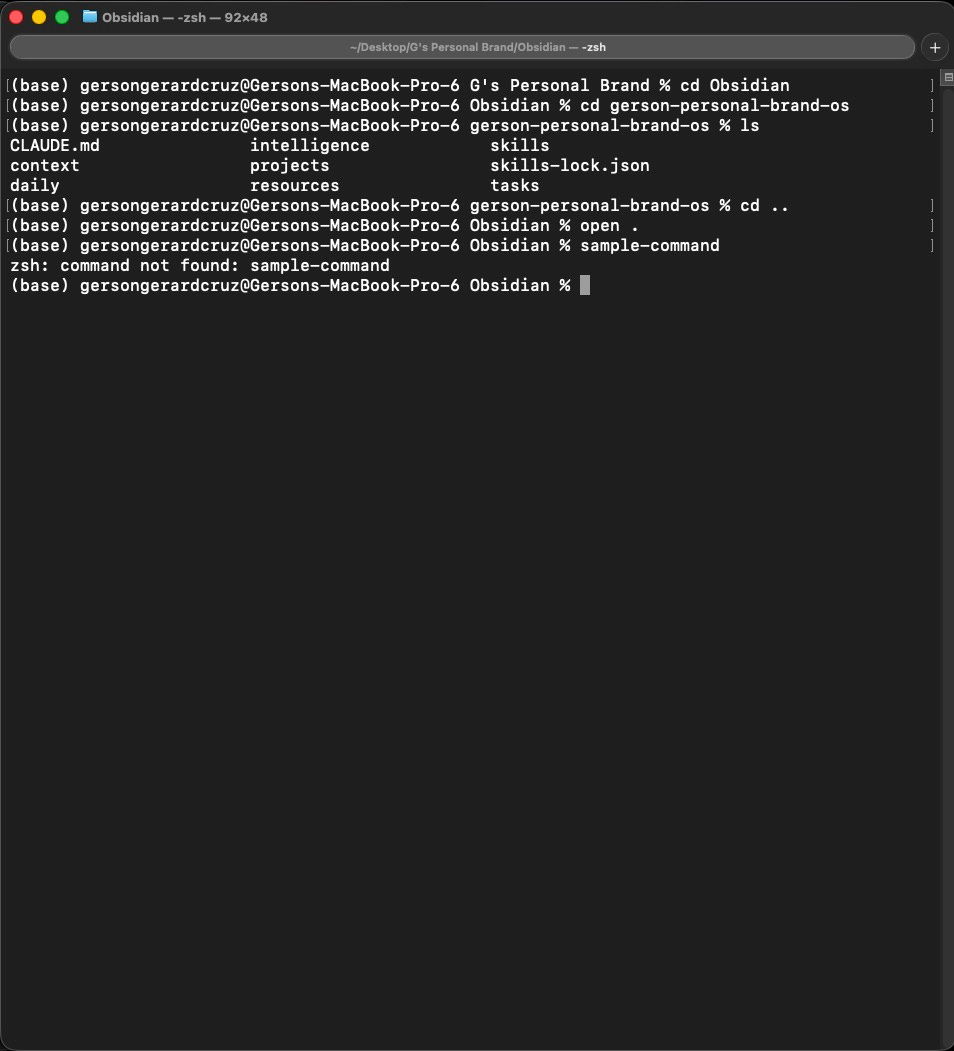
Tab autocomplete
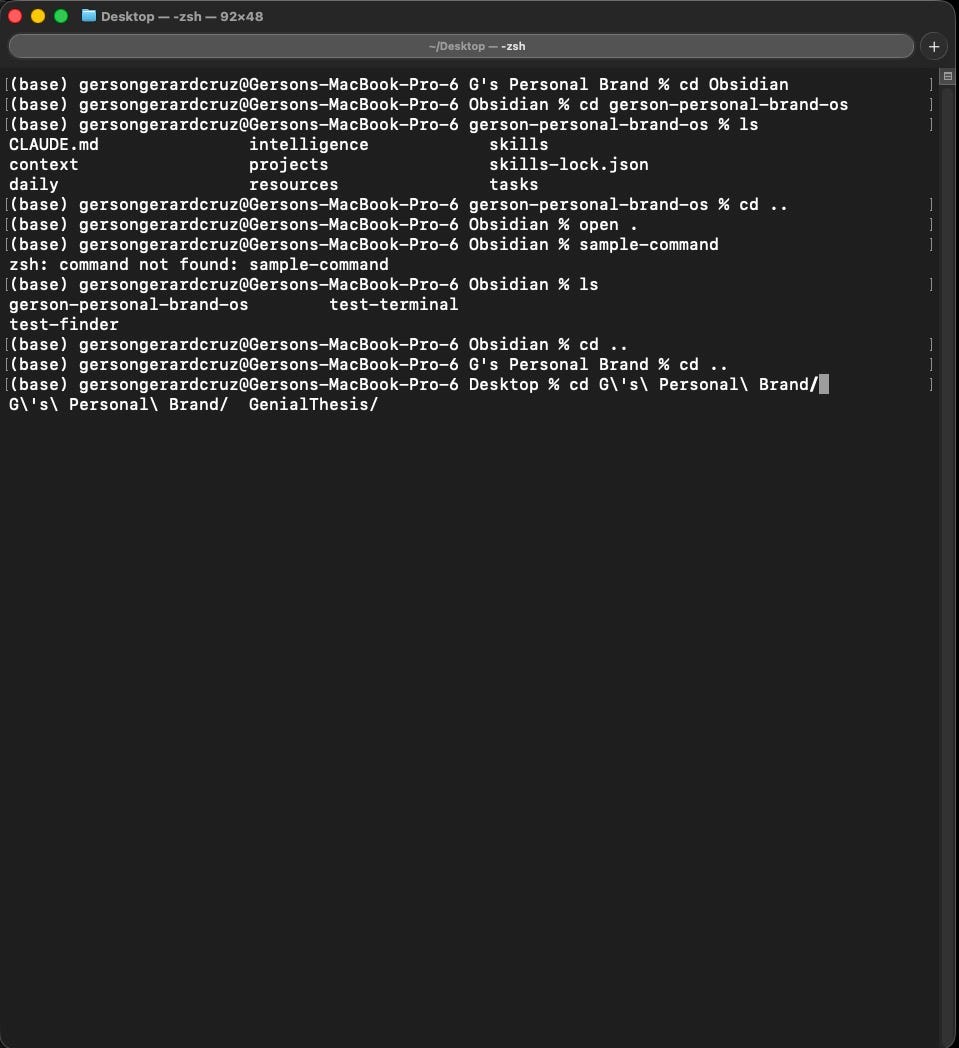
Emphasizing this quick tip again. When multiple folders have the same starting letter, type the first letter and press Tab to see. Press Tab again to shift through until you get to the right folder.
For me, it means when I type cd G at the Desktop and press Tab, the terminal figures out you mean cd G's\ Personal\ Brand and fills in the rest. Folders with spaces get a backslash before each space and Tab handles that automatically.
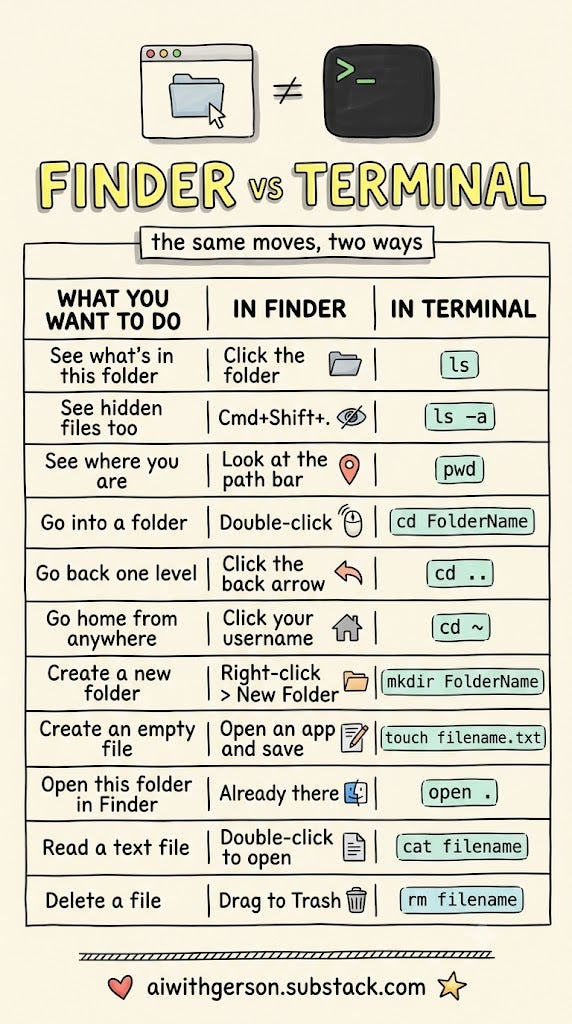
Quick reference
Here’s an infographic of the ten most commands I’ve been using for your reference. Remember that there are more commands, but these should cover the basics for you.
Did you realize it now? You just learned the terminal.
ᕙ( •̀ ᰜ •́ )ᕙ
Claude Code lives in a folder.
Specifically, your folder of choosing.
Because now you know what the terminal is, I can more easily say: Claude Code lives in the terminal.
When you open Claude Code, it starts wherever your terminal is sitting. The terminal is the room. Claude Code is the conversation you have in that room. And the room is a folder you already own.
You know where it lives, but what exactly is it?
What Claude Code is, and how it’s different from chat
I see Claude Code more as a minion. It’s a minion that you can tell what to do, and it will come back to you with a draft that you will approve.

I say minion because you can have multiple minions doing your tasks but instead of being like Gru, who uses them to conquer the moon, you can use them to automate/reduce friction on multiple aspects of your life, and you’re the one in the middle.
That’s how I see Claude Code. It’s a minion that does things for you in the environment you set up for it.
The difference between Claude Code and Claude Chat is easiest to see in a real example.
Before Claude Code, I wanted to summarize YouTube videos so I could consume them more efficiently. What I would do with Claude Chat is:
Go to a platform like NoteGPT to get the transcript
Go back to Claude Chat to prompt it to summarize it
Save that transcript to a file
Review the file
I had four different steps in different tabs, different environments.
Claude Chat is great for one-off questions, but it has its drawbacks when you’re looking to build systems for yourself.
Because after I’d installed Claude Code, I just asked it: “Hey, are you able to take a YouTube video link, get its transcript, summarize it for me and save it to a file? Can you give me a plan for it?”
And it said yes, and here’s how I will do it.
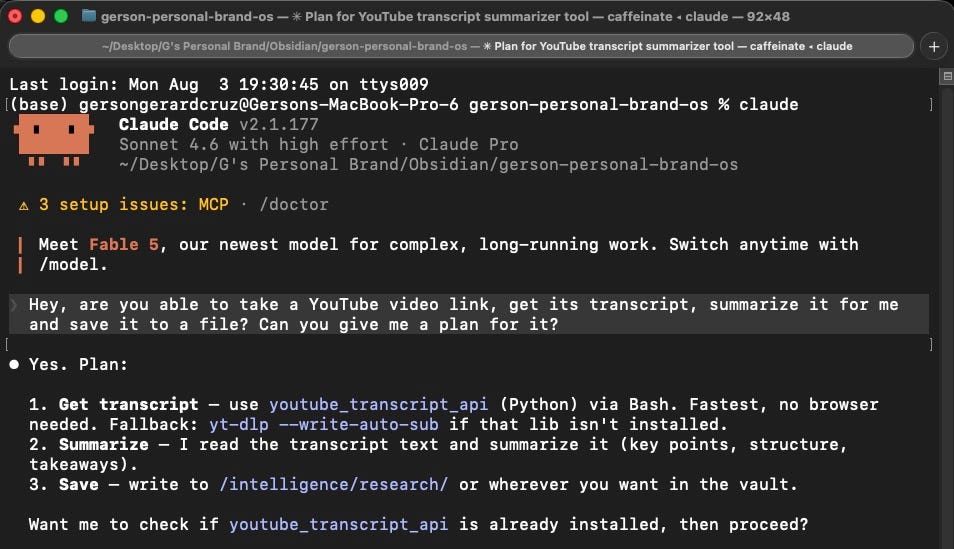
All I had to do was approve it. I was really amazed by that because I was still making the judgment but the tools to use are now just waiting for my approval. I still have to say whether we use this tool or not, but to have it laid out in front of me that quickly was so good.
It really shifted the way I look at tasks. Now I’m looking at everything from the perspective of:
How much time can I save?
Installing it
My first install 3 months ago took a lot more than 30 minutes because I had watched a YouTube video on how to install Claude Code and didn’t know what the simplest path was. Today, Anthropic has changed the game and made install much much easier.
Now I think it could take less than ten minutes if you follow these steps correctly. I’ll also detail them here.
Disclaimer: If you’re using Windows, the instructions are found in the hyperlink. Don’t worry, it’s still an easy install thanks to Anthropic’s native installation update.
For Mac, it’s ……
one command. That’s the whole install.

curl -fsSL https://claude.ai/install.sh | bashLet me explain this command. curl is the terminal’s way of downloading something from the internet, like clicking a download link in your browser, but through text.
The -fsSL are flags that means be quiet about errors, don’t show progress bars, and if this URL redirects, follow it.
The | (called a pipe) hands what you just downloaded directly to the next command. bash runs it.
The whole thing in plain English: “Download the Claude Code installer from Anthropic and run it immediately.” You only do this once.
While it’s running and installing, feel free to grab a coffee/tea or stretch a little. I know you’ve put in some good work. When you come back, we’ll start your first session.
Running your first session
Once it’s installed, navigate to the folder you want to work in. Remember cd? That’s your main command here.
Then type claude and press Enter. Claude opens right there, in that folder.
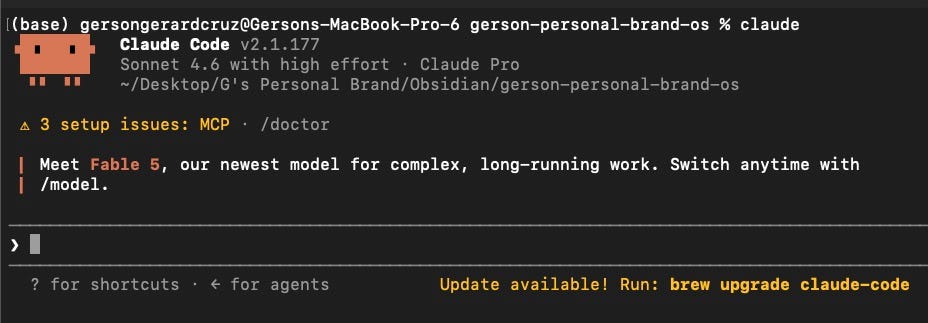
When you see this, congratulations! You’ve just successfully installed Claude Code.
Next, we’ll go over the fundamentals and what you need to keep track of.
The permission system
First things first, because Claude Code is your minion, you gotta keep it in check. That’s why permissions exists. And it’s a thing you must never forget.
The first time Claude Code asked me for permission, it asked for access to my Desktop folder. And I was so hesitant because I didn’t want it to access the entirety of my folders because who knows what it could do, right?
But I clicked yes and then I realized that it only asks access for the specific folder it needs. When it says Desktop folder, it doesn’t mean it’s going to go through your entire Desktop.
No. It’s just going to go through the relevant files. And you still have control because you can specify: “yes, but only in this specific folder”, “yes, but do not access this folder.”
You still have control here, and it’s up to you to decide where you give it access.
By giving it access, you’re basically automating your initial clicks to folders in order to get to the place where you want to do the set action. That’s all it is.
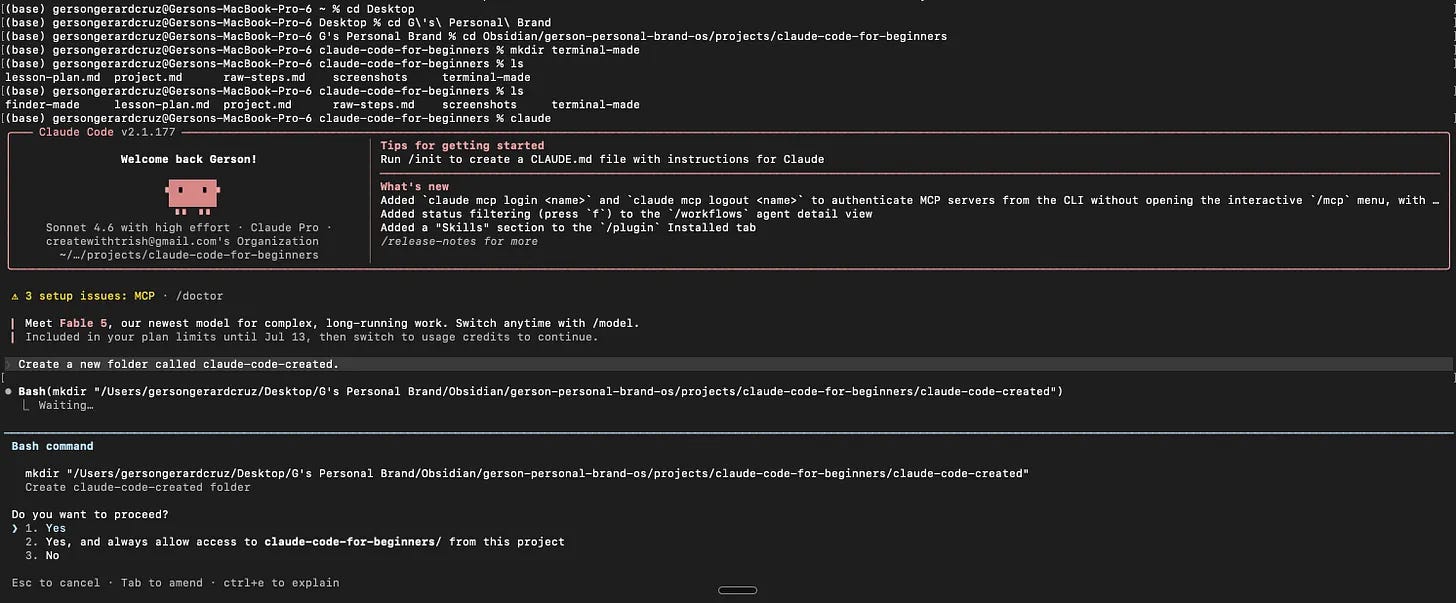
Claude Code will ask you for permissions unless you tell it not to. Do not ever take permissions lightly. You have to remain in control.
Three ways to work with and when to use each
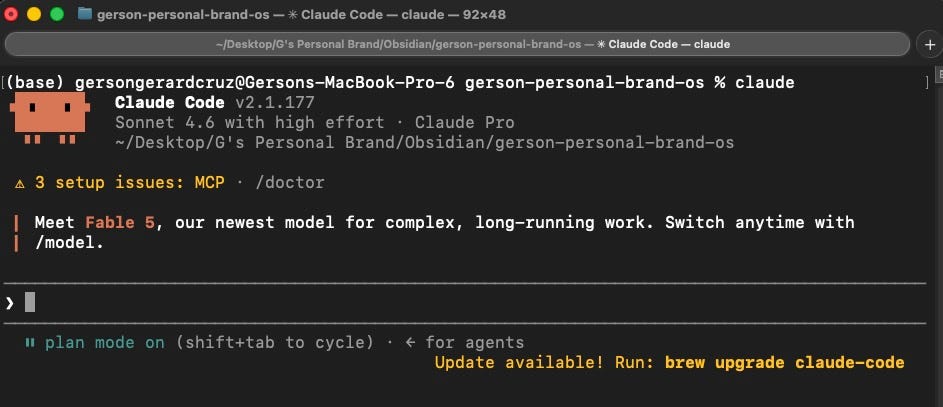
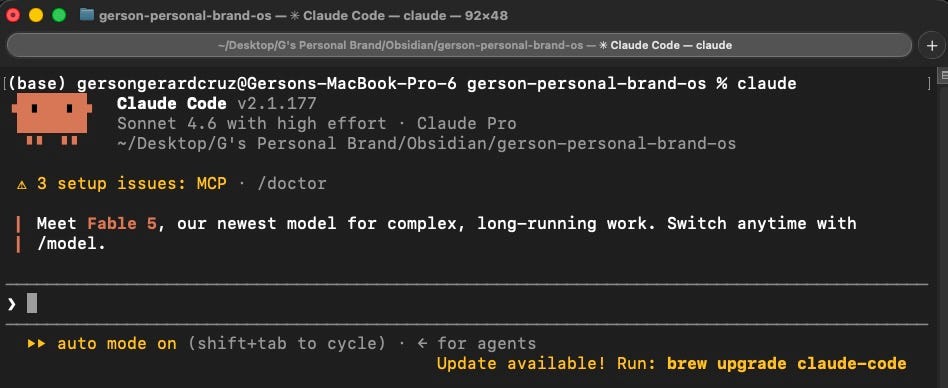
When Claude Code is open, there are three modes:
Default (Accept Edits)
Auto-accept
Plan Mode
You switch between them depending on what you’re doing.
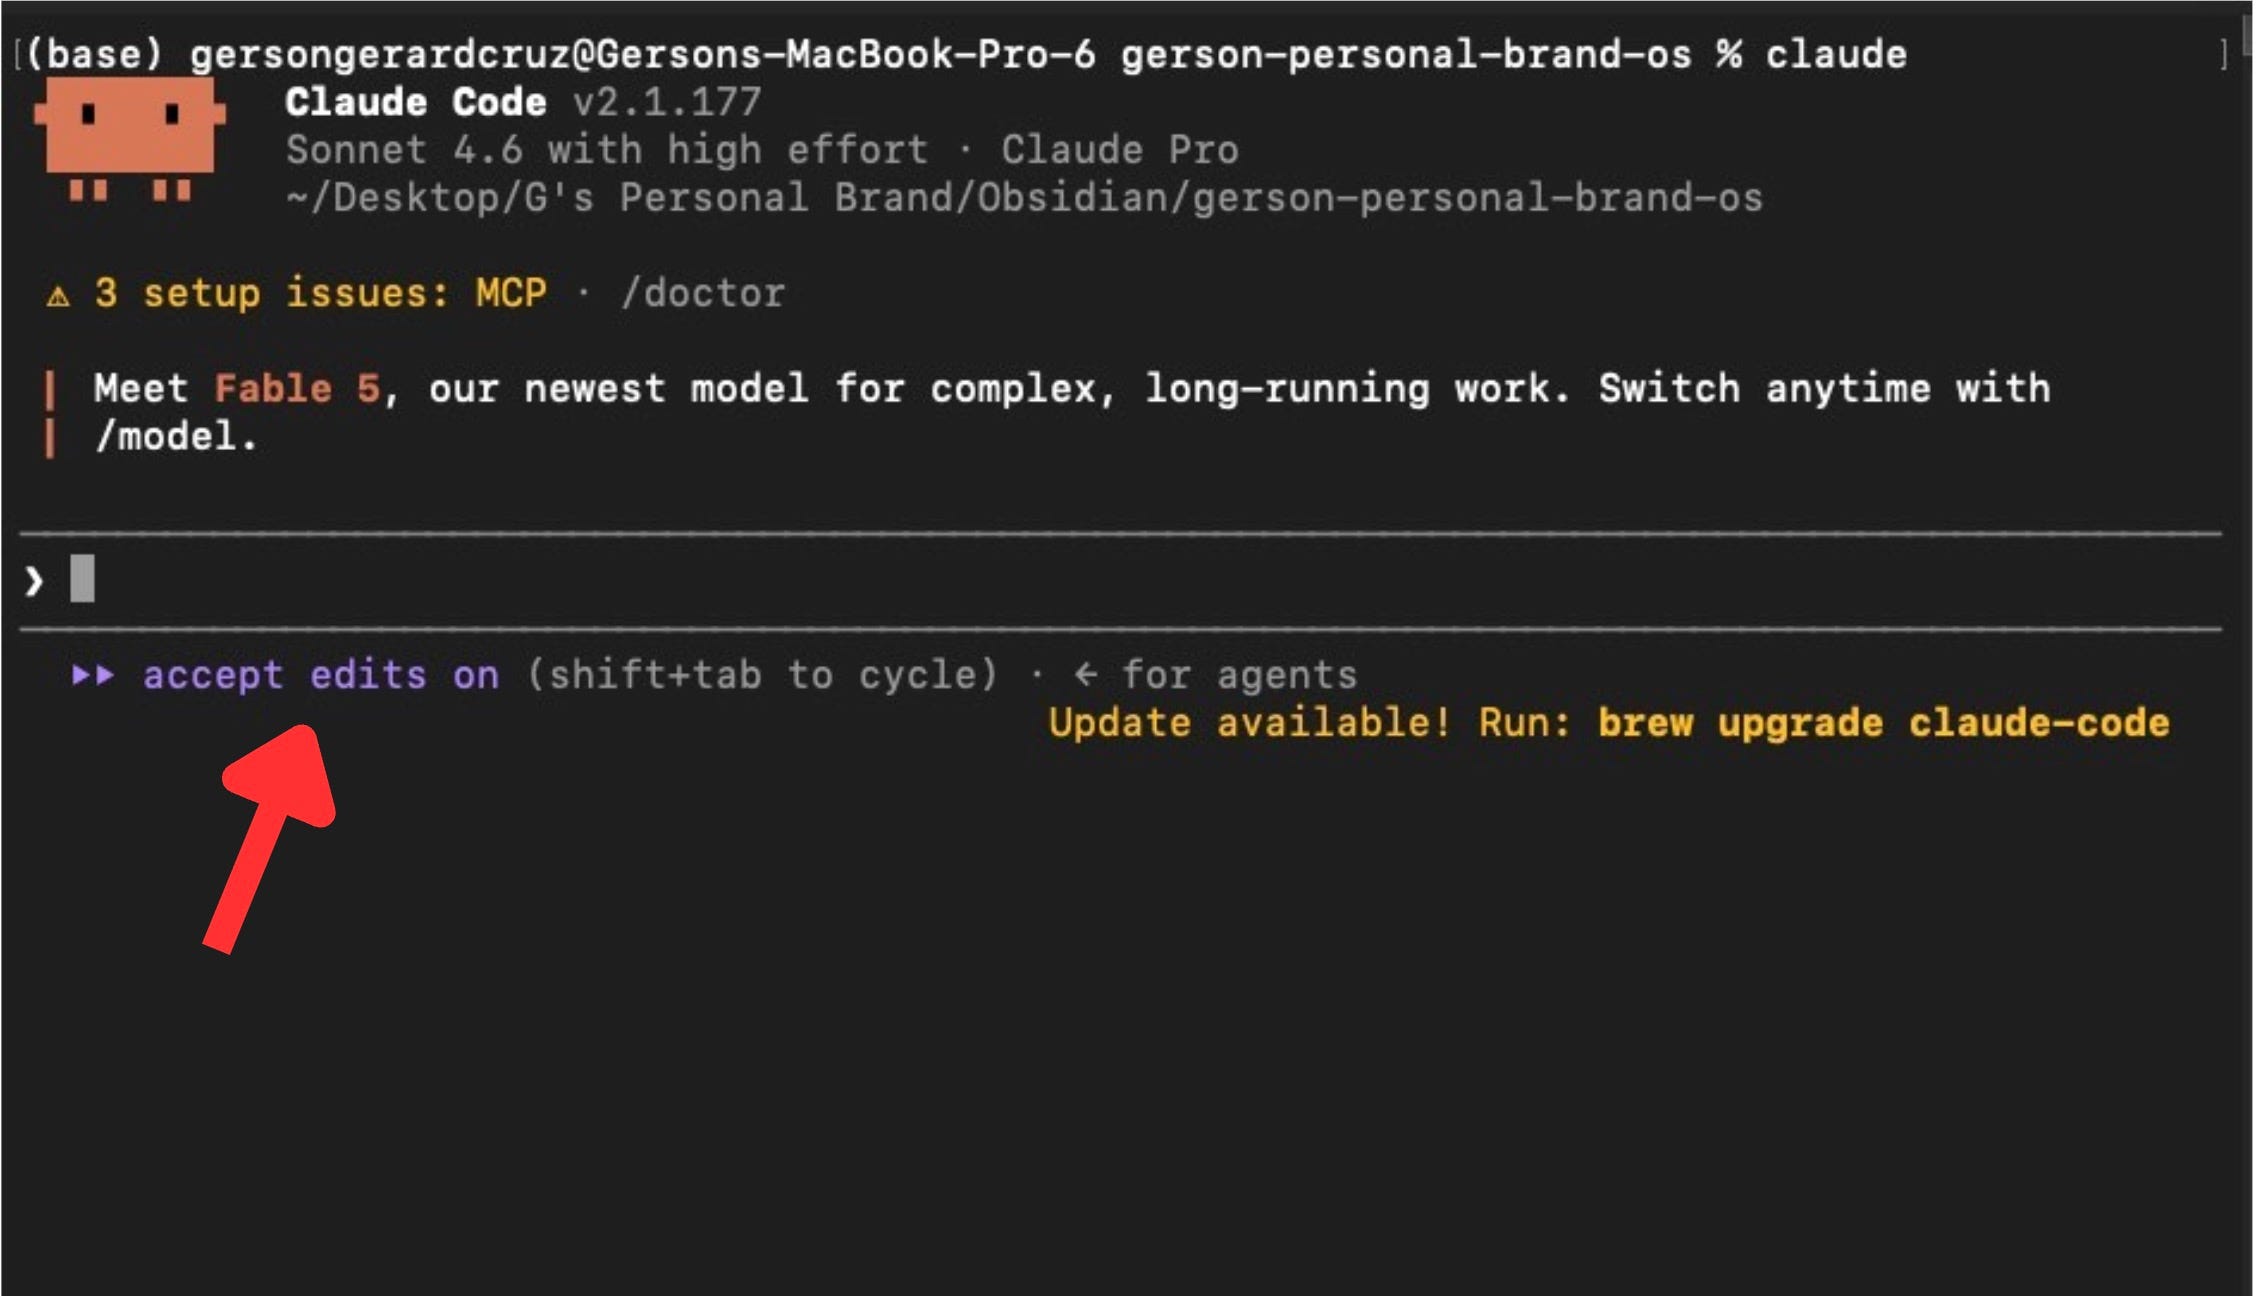
To switch between modes, press Shift+Tab. Each press cycles to the next mode.
The default: Claude asks before anything
I always stay in default mode when it’s the first time I’m doing a task. I recommend you do the same.
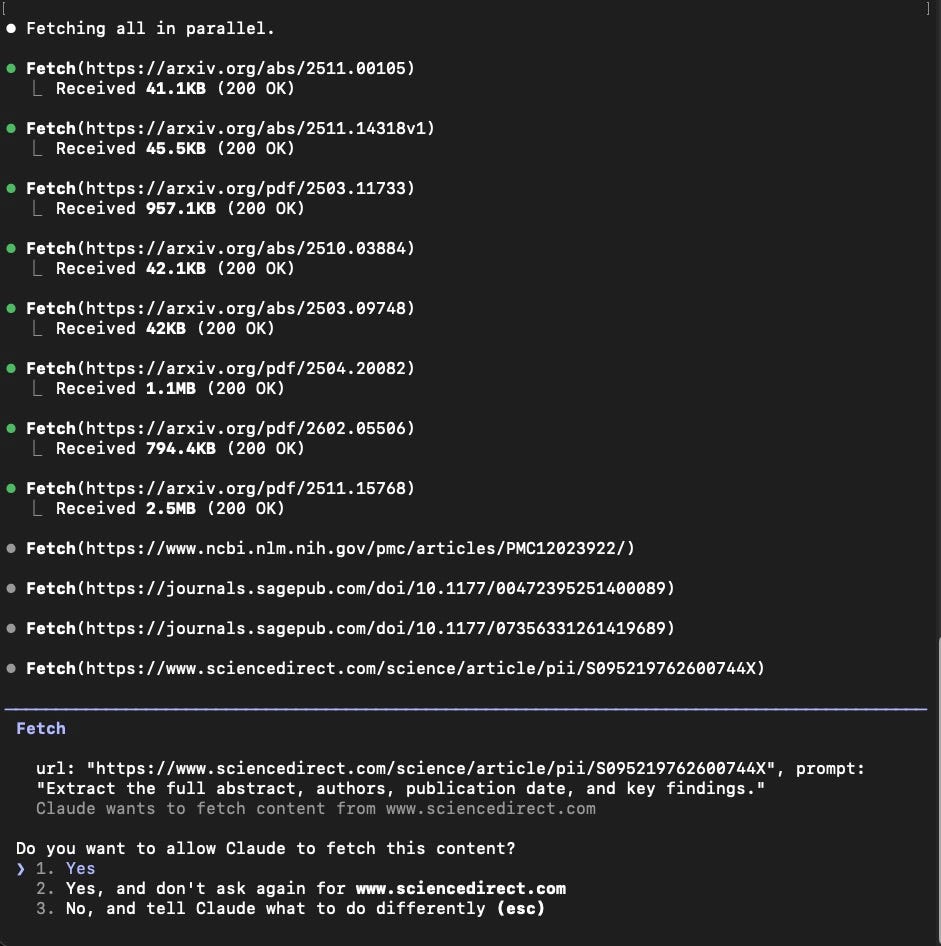
Here’s an example. I wanted Claude to do research on current trends for AI in education: grab research, and then per article, fetch the contents, summarize it, and give it to me in a research brief.
It kept asking: “Can I fetch from this website? Can I fetch from this blog?” I think that entire session had more than 20 to 30 approvals. And it was essential, because I didn’t know what Claude was going to do.
I didn’t know what sites it was going to scrape. I needed to check the credibility of each site to make sure it actually is a legitimate source for academic articles or strong valid opinions, and not just some scam site out there, which we have a lot of now.
Another task: I wanted to take a bunch of data from CSV files and create a monthly report for my financial budgeting. There, I would make sure it was checking the right file and performing the correct analysis. I would always approve before it could access any file, because these files contain sensitive data and I intend to protect that.
If it’s a new task you haven’t done before, pay utmost attention to it. Because you never know what these agents can do, and it lies with you to be responsible for whatever output and process the agent will take.
Auto-accept: let it run
Once you are familiar with the process and you’ve done it a couple of times, then you can move to auto-accept.
For me, in the research phase, once I determined which websites are legitimate, I would simply tell Claude: search these websites for these articles, and for this session only, auto-accept all fetch and crawl commands from these websites. Or you can activate the auto-accept mode.
But this only is recommended because I had already done it before. From previous experience, the results were good, so I would expect them to be the same and then I could just focus on reviewing the output instead of babysitting Claude every step of the way.
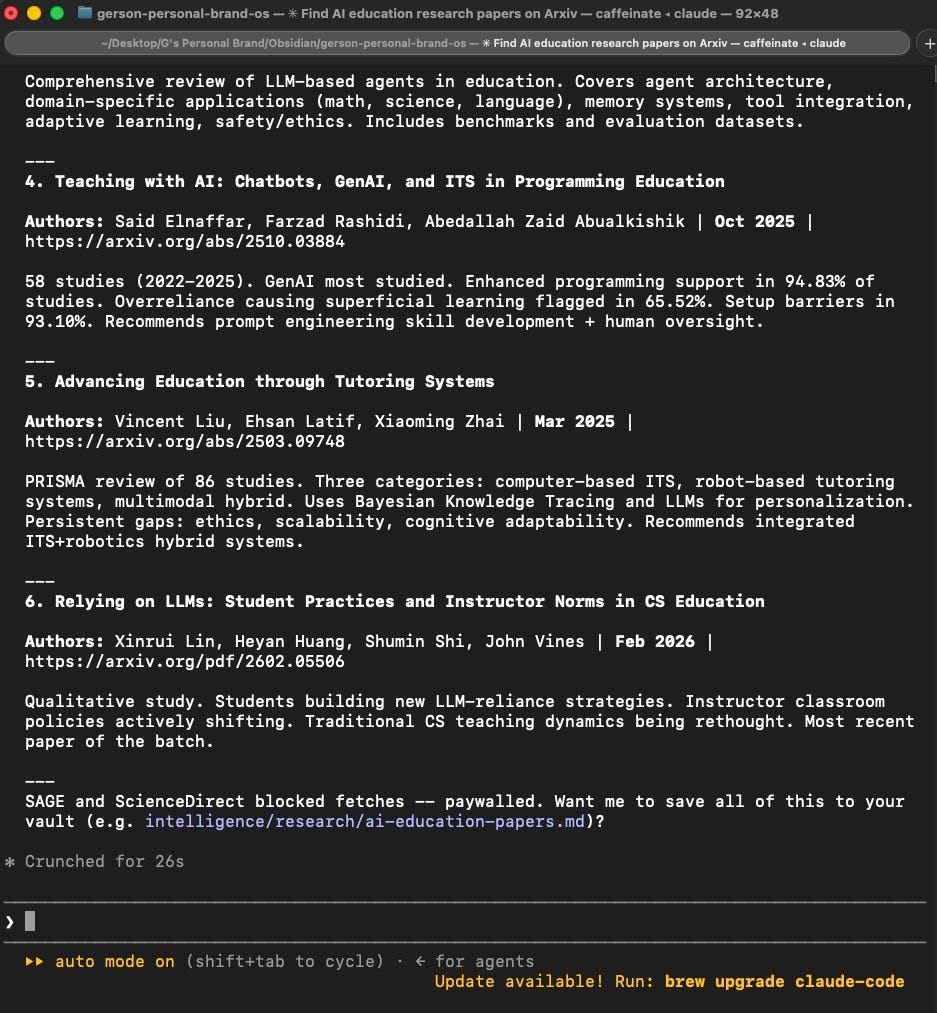
That’s the only time I use auto-accept: when I’m already familiar with the process. I’ve done it myself before, I’ve verified the claims. Then you can auto-accept. Otherwise, default mode.
Plan mode: show me what you’ll do first
Plan mode is one of your best aides for using Claude Code.
What it does is put Claude in this project manager plus researcher plus analyst plus so many other hats to present you a plan that you will then approve.
Your goal is to give Claude the output you want, the inputs you want, and the process you want to take and tell it to come up with a plan for your approval.
Here’s a sample below. It’s a workflow that requires a data collection, data processing, and then data presentation phase, a minimum of 3 phases.
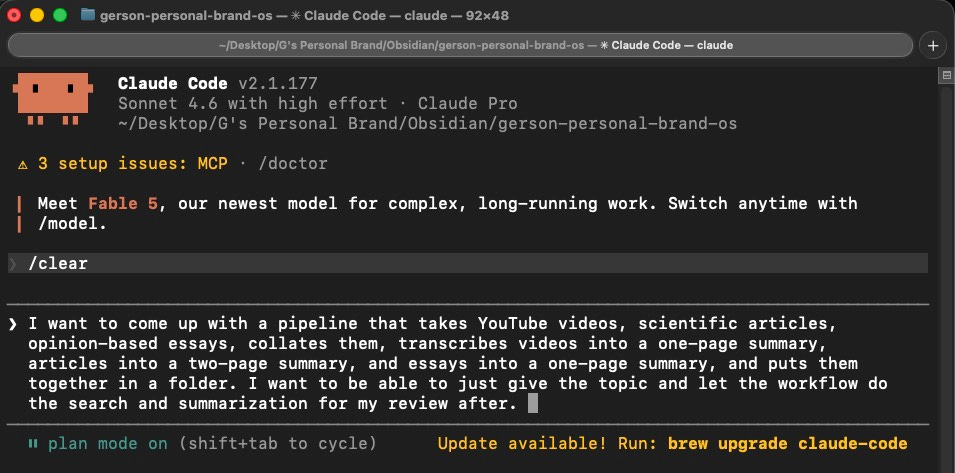
Here’s the plan it came up with:
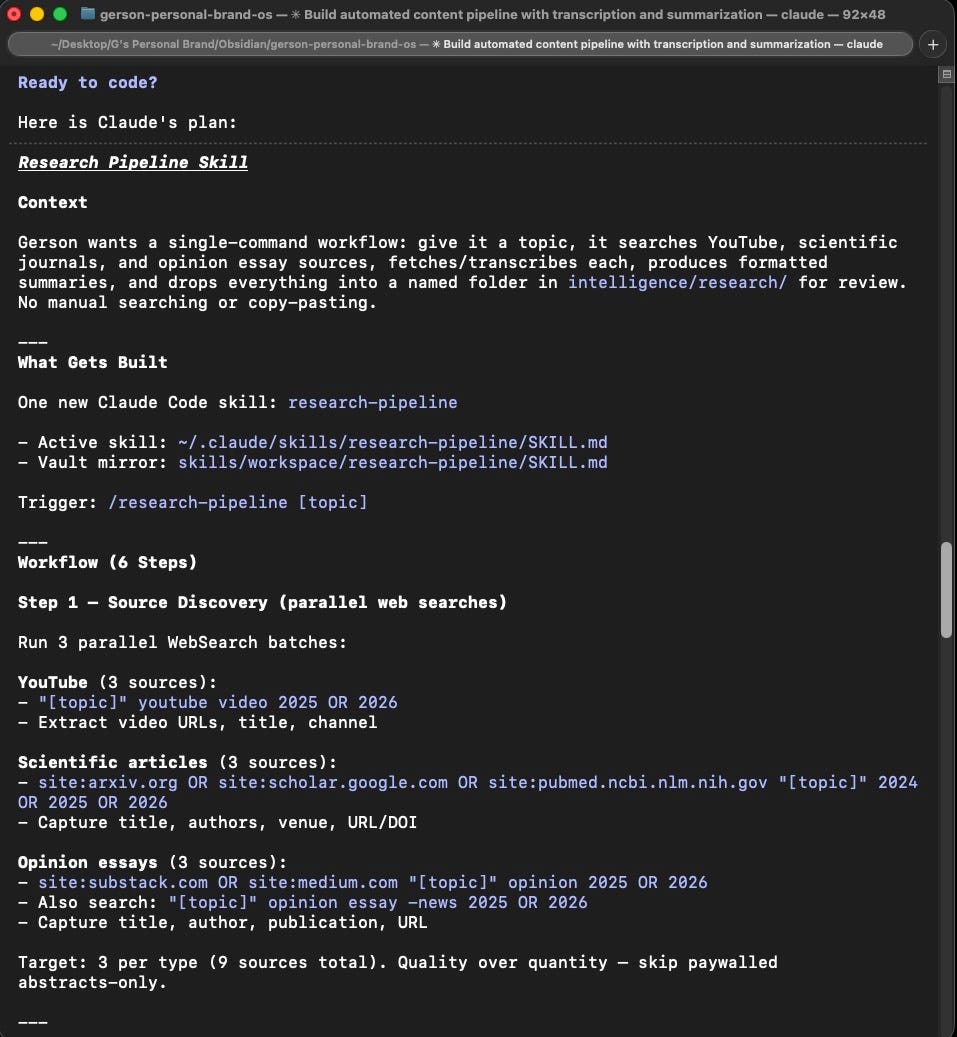
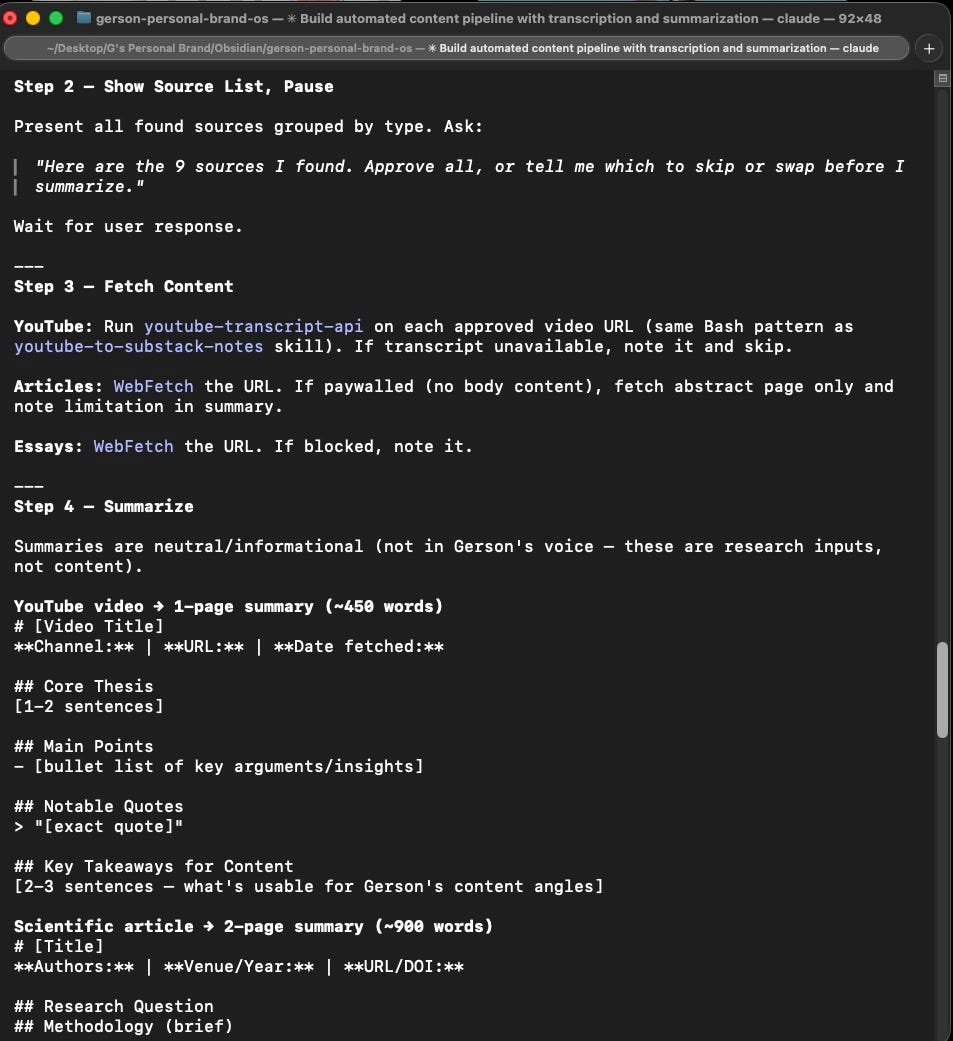
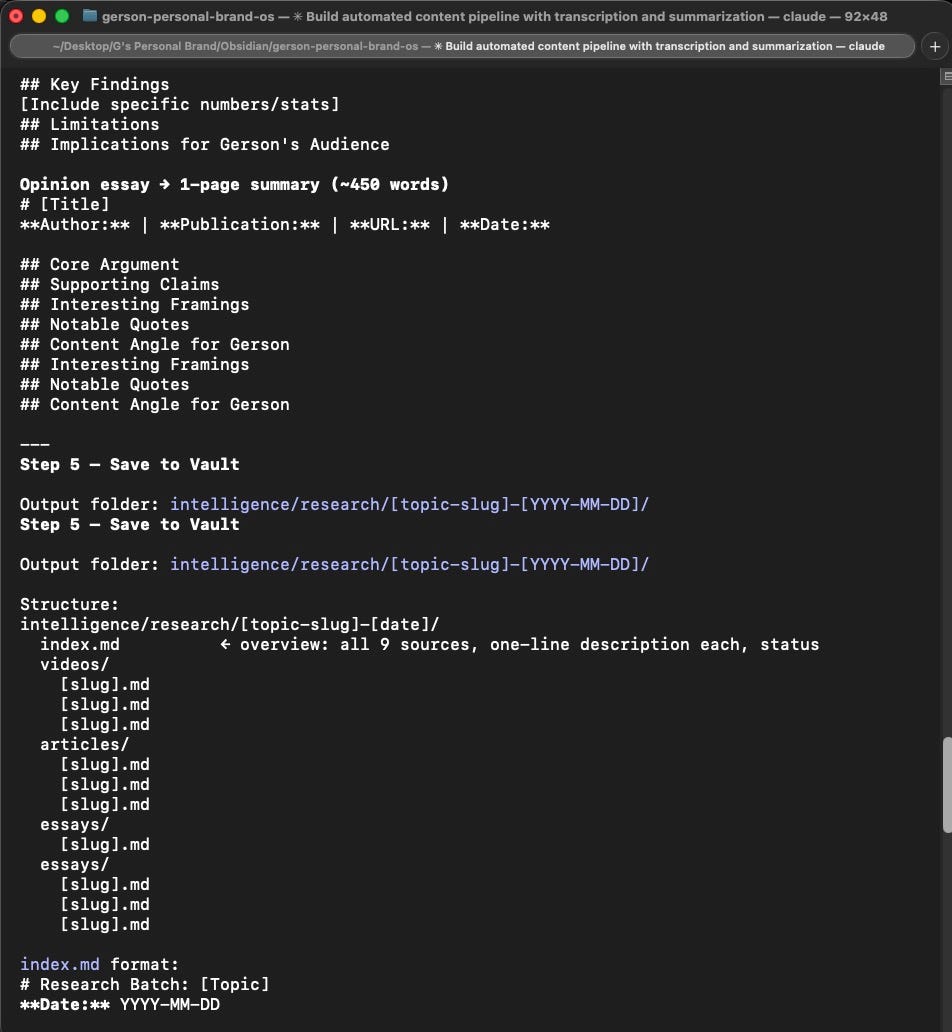
Isn’t that pretty freakin amazing? It’s a complete plan that you can now review, make edits on, and then approve after. What would have taken at least 30 minutes to an hour minimum took less than 5 to craft.

So, use plan mode for complicated tasks. Another example: you want to set up an automation system that researches academic papers, summarizes them, saves them to a database, and sends them to you by email. If a task requires three or more components plan it because it’s going to be hard to do one by one, and you’ll lose track of the process fast.
My honest advice
Always go with default mode if it’s something new. Take permissions seriously. If it’s something you’re used to, go with auto-accept. And if it’s something complex, plan it out first before building, so you find structure in the complexity of the project.
Give Claude a memory
Being able to plan workflows and systems is awesome, right? But it gets tiring if you repeat prompts everytime.
Think about it. If you work on a project, it’s probably not gonna finish in one sitting. So on you next sitting, you have to re-brief Claude again about everything you went through. Such a hassle!
This is where memory comes in, and specifically, what we call CLAUDE.md files
Picture a Michelin-star chef trainee who shows up to work at your restaurant every morning.
She’s extremely skilled and ready to go. But she’s got no clue what to do yet because she hasn’t been briefed. Instead of spending 30 minutes going through the day’s plan with her face-to-face, you write it all down. You leave a document on the kitchen counter.
Everything they need: the goal, the rules, the preferences, what not to touch are there. Every morning, they read it before starting. Every morning, they’re immediately back up to speed.
That document is your CLAUDE.md.
It’s a plain text file that lives in your project folder. Claude reads it at the start of every session. You write it once and you never repeat it again (unless you need to make adjustments).
In my case, the first thing I put in my CLAUDE.md is myself.
I put my own mission. I put the desired audience I want to help specifcally beginners, non-technicals who find that AI is overwhelming and complex for them. I put my writing style: the words I love to use and the words I absolutely will never use. I also put in the person I believe myself to be, who is someone who is warm, approachable, loves to help, and still remains professional.
This makes my outputs immediately closer to what I had in mind.
And instead of prompting AI every time with the same information, you just tell it to check your CLAUDE.md for the information that concerns that task. This saves you a lot of time and a lot of context.
But what is context, exactly?
Context is the amount of information the model you’re talking to can hold before it can’t anymore. Think of it like a sticky note. A sticky note can only hold so much writing. What happens when it’s full? You can’t write anymore or if you write on a place that already has writing, you won’t be able to understand it.
The same is true for context. If your context is overflowing, you have to give up some of it. If you have too much, nothing gets understood. Your prompts and files need to be clear and concise. To check how much context you have left, use the context command.
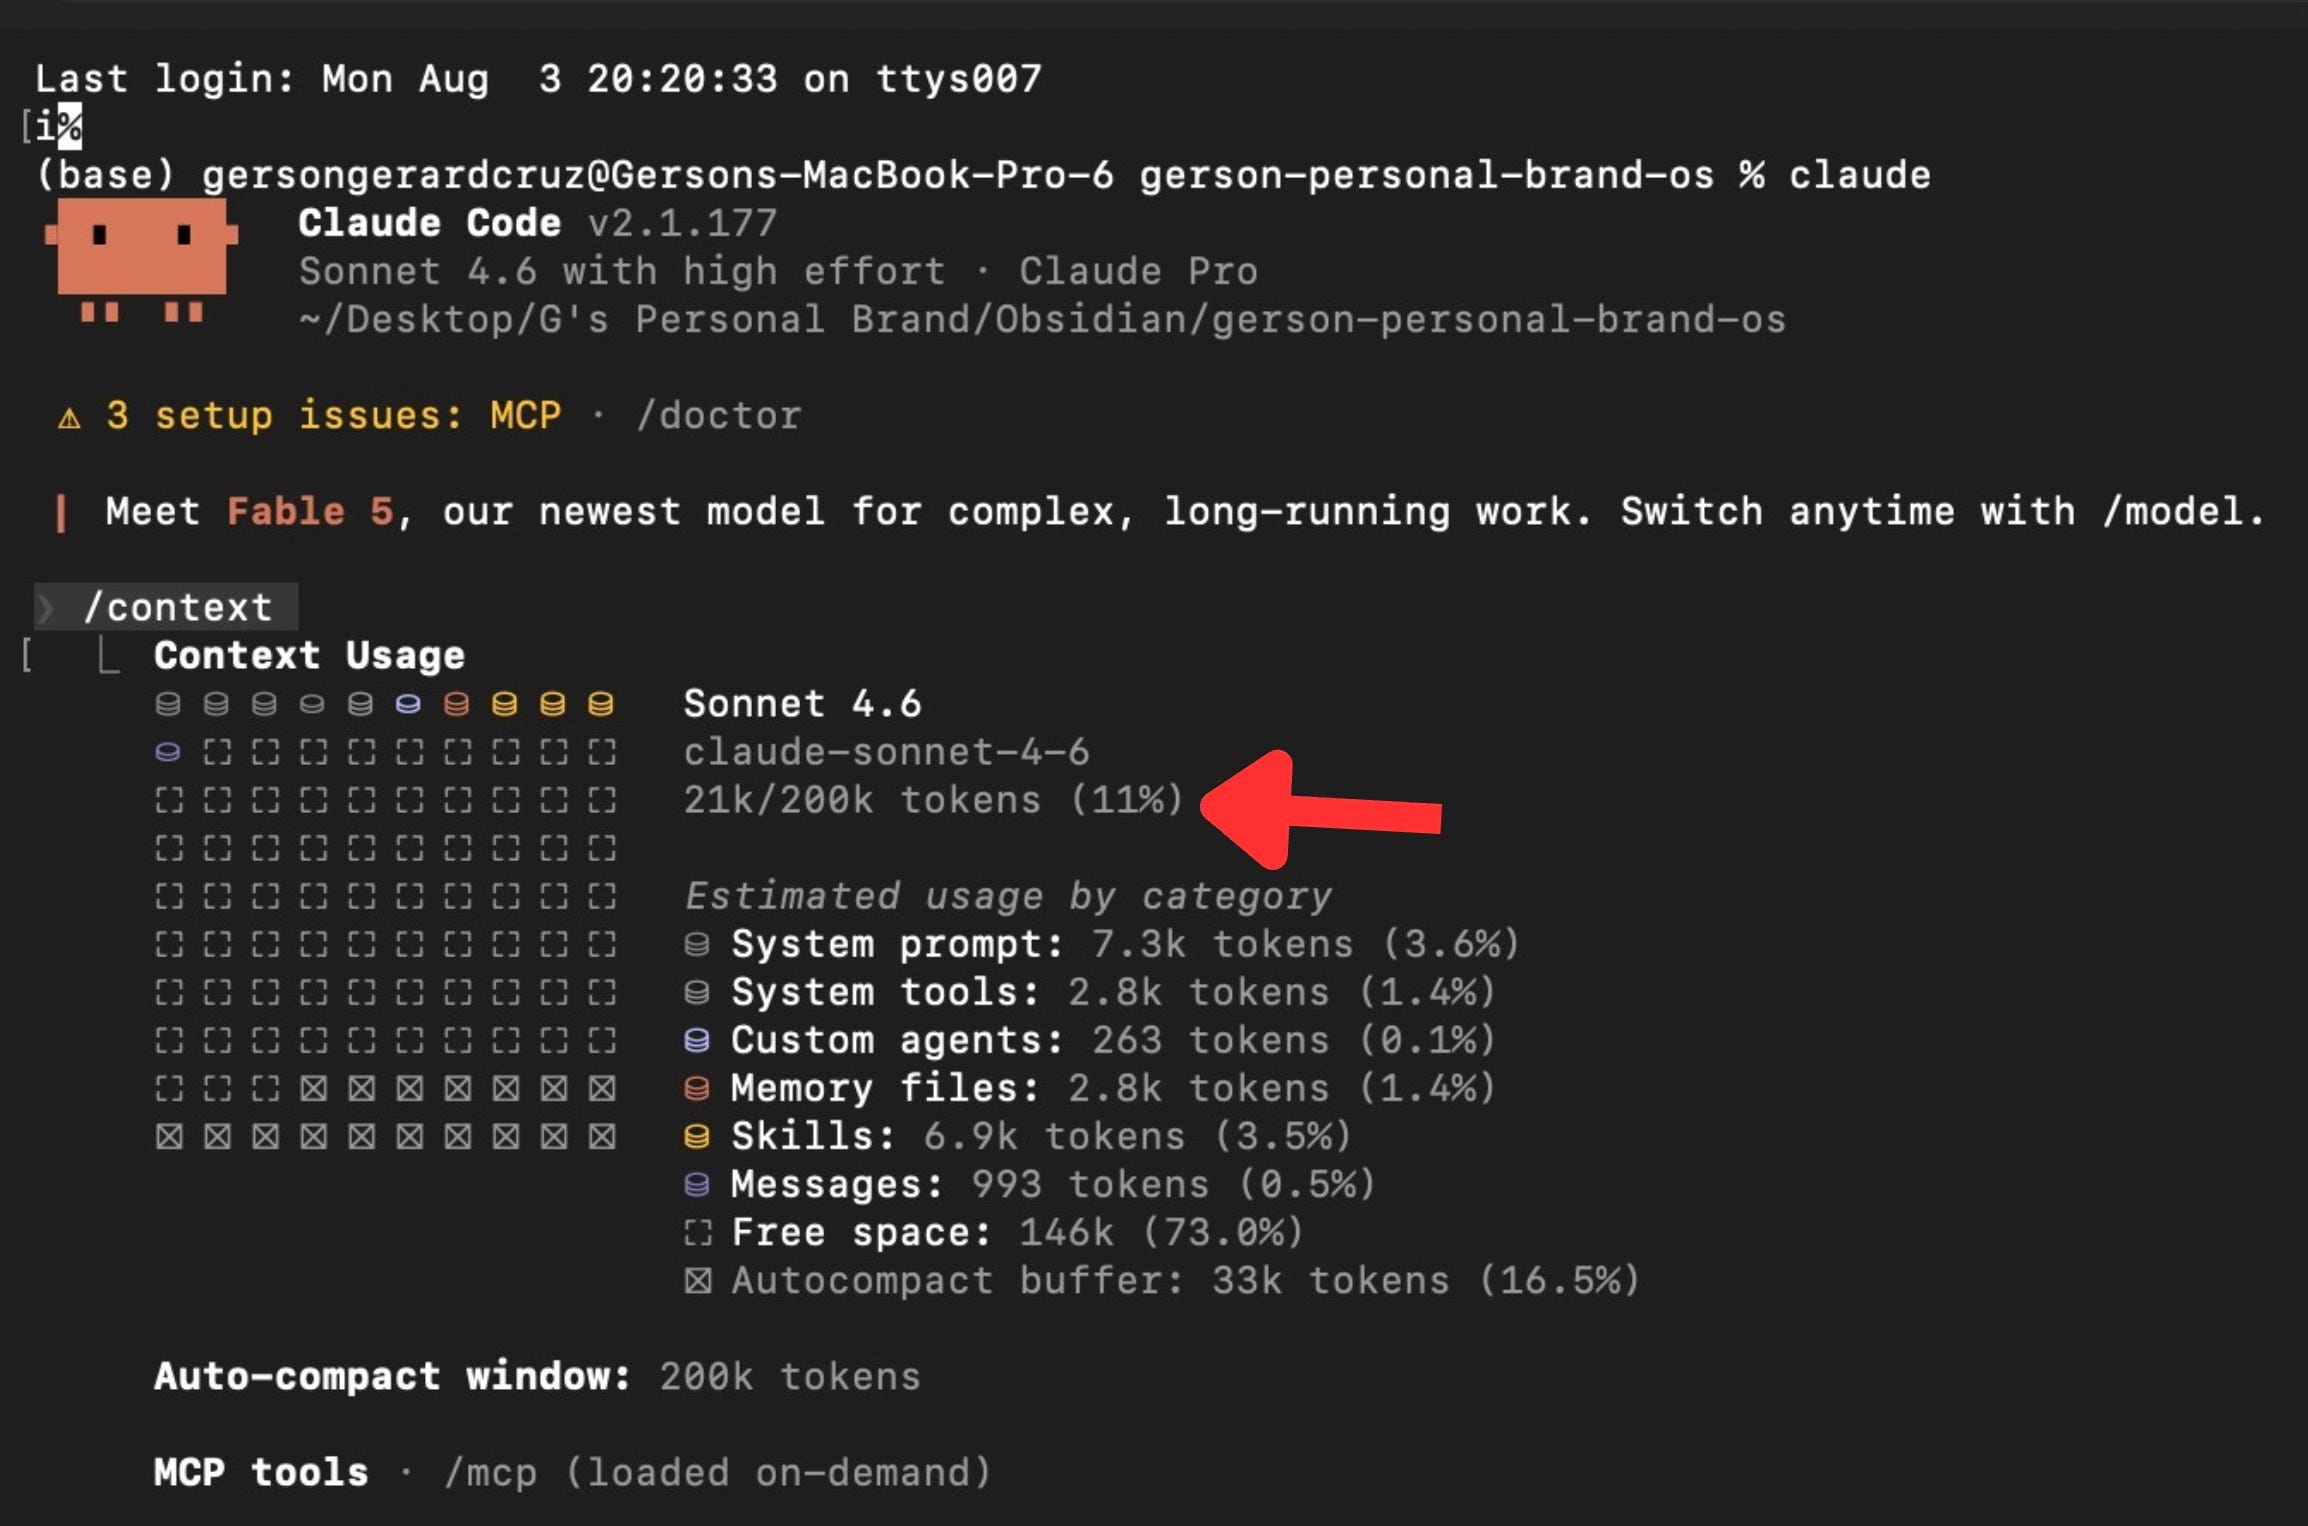
Here you see that the Sonnet model can hold up to 200k tokens (tokens are the unit of measurement for AI) It’s like the milliliters in glasses. Your models can only hold so much in the same way that glasses can only hold so much water.
This was so important for me in the beginning. When I was creating my branding and starting out, I would always tell Claude what brand I wanted to be in every prompt. It would make my prompts sometimes 800 to 1,200 words long because 600 of those words would just be the CLAUDE.md content repeated manually. It’s a lot of memory wasted.
With CLAUDE.md, the savings in context and time typing would be immense, check the image below to see a represented difference in prompt length.
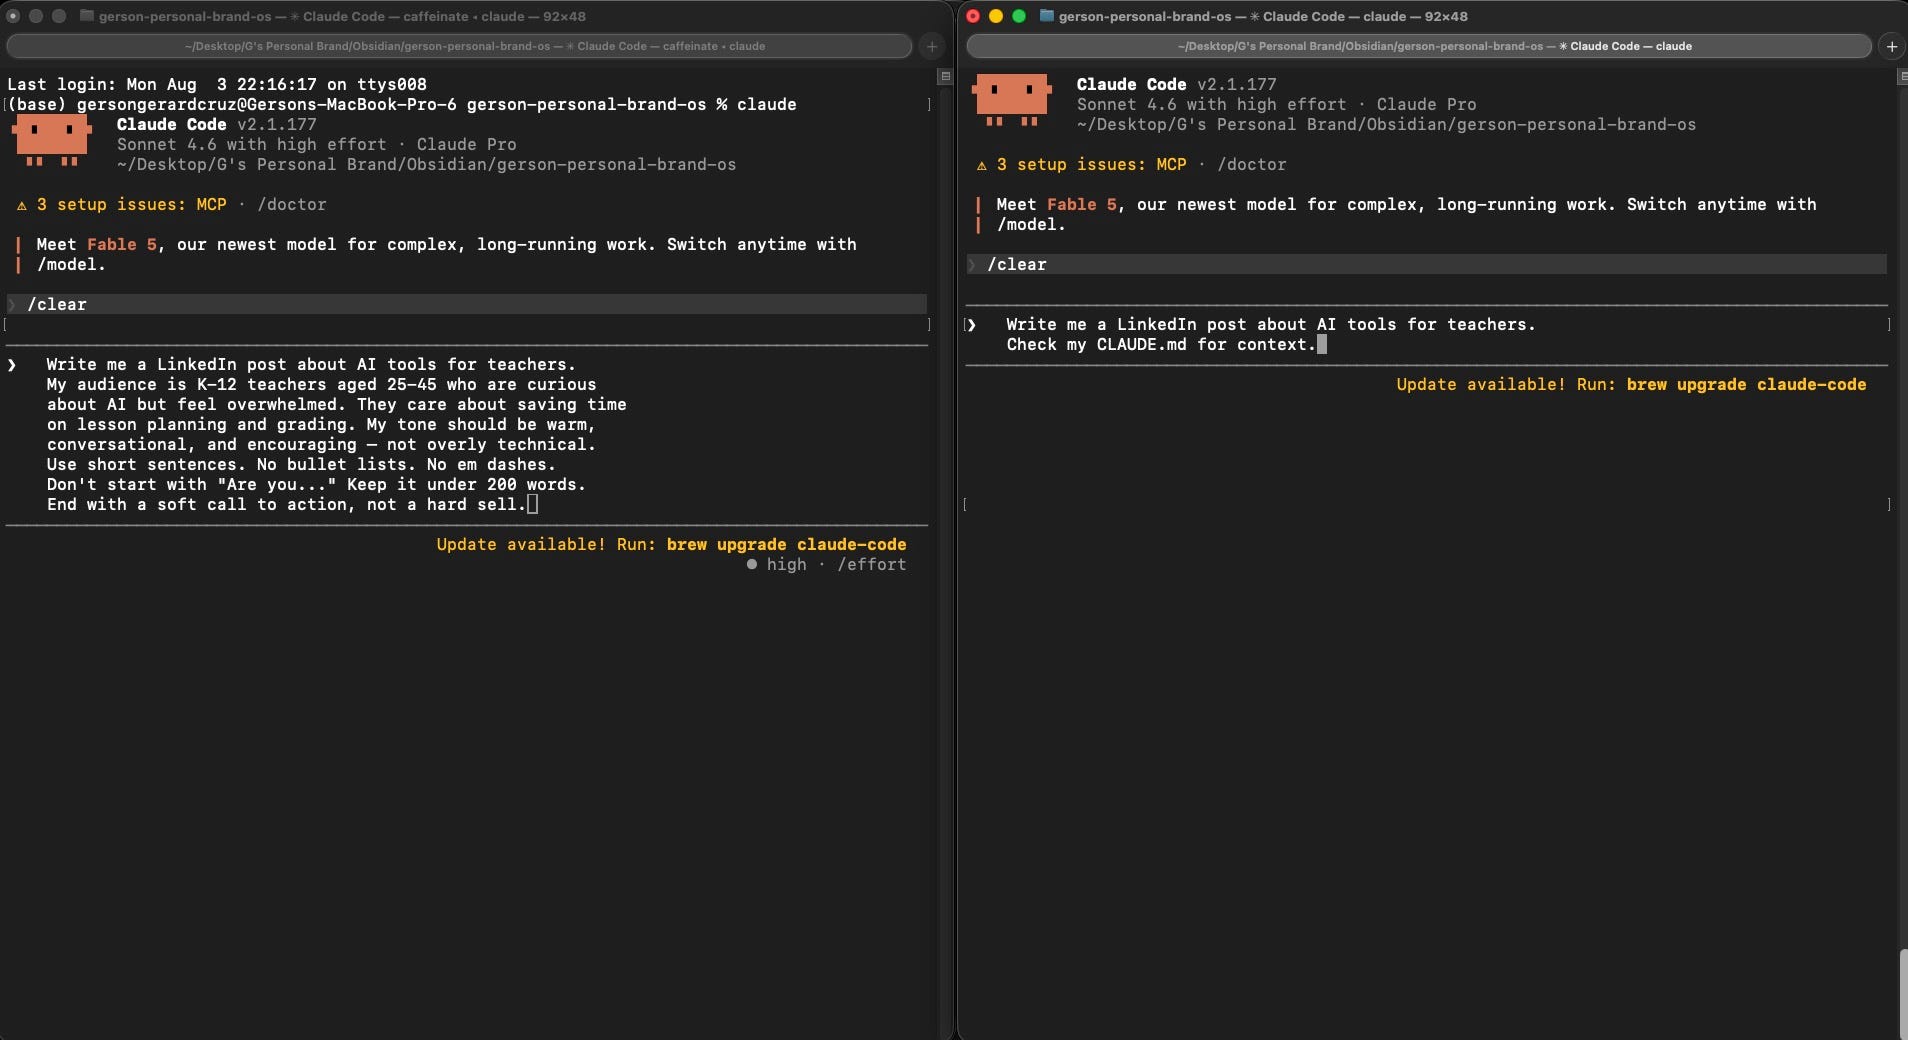
Typing out the left prompt takes 1-2 minutes. Typing out the right one takes 10 seconds. That’s at least 83% shorter, and that’s a lot of time savings.
What to put in these files
It’s simple. Anything you’d otherwise have to repeat is worthy of being put in .md context files. A few examples to get your brain going:
Rules on file naming conventions: “This is a research project on educational psychology. All file names should be lowercase with hyphens.”
Rules for data storage: “Never delete files. Move them to an /archive folder instead.”
Formatting rules: “When suggesting citations, use APA format.”
Writing rules: “Always write in plain English. No jargon unless you explain it immediately.”
Your own context: “This is how I think <enumeration>, this is how I like to argue <explanation> …..” Put everything about you so Claude isn’t starting from zero when it executes.
Everything that is repeated across the tasks you do should be in your CLAUDE.md file.
In fact, the one thing I wish I’d put in CLAUDE.md earlier is everything I had repeated in all the tasks I had done before. Because it just saves so much time.
Here’s a sample snapshot of my CLAUDE.md for my second brain.
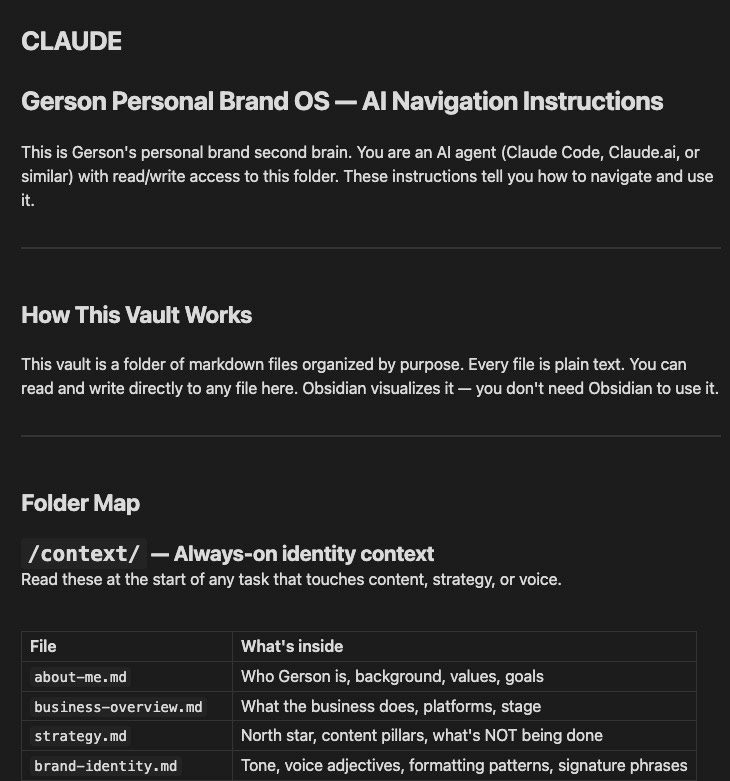
You see how the file is like the entire manual of the setup? It contains the directory, the persistent instructions, and makes it easier for future tasks to execute.
There are two kinds of CLAUDE.md
Claude looks for a CLAUDE.md in two places, in this order:
Global: ~/.claude/CLAUDE.md. This applies to every project. Good for your general preferences, your voice, things you always want Claude to know.
Project-level: a CLAUDE.md in your project folder applies only to that folder. Good for project-specific context and rules.
Claude reads both of these and the project-level one takes priority if there’s any conflict.
Here’s an example directory for this:
~/ (your home folder)
├── .claude/
│   └── CLAUDE.md        ← Global: applies to every project
│
└── Desktop/
    ├── research-paper/
    │   ├── CLAUDE.md    ← Local: only applies here
    │   ├── notes.md
    │   └── sources/
Global ~/.claude/CLAUDE.md could have:
My name is Gerson. I am an educator.
Always write in plain English. No jargon without an analogy.
Never delete files -- move them to an /archive folder.
Use bullet points for lists, not paragraphs.
Local research-paper/CLAUDE.md:
This is a research paper on AI in education.
All citations must follow APA 7th edition format.
Save all source files to the /sources folder.
Flag any claim that needs a citation with [CITE NEEDED].
Whenever you work on a project, these files will provide relevant context. Amazing, right? That’s not the coolest thing even yet because ….
You can have more than one CLAUDE.md file
This is the cooler thing because you can customize on a project level.
When you’re doing your homework in school, you can have a CLAUDE.md that is more academic because it requires a level of academic rigor to respond to.
But if you’re drafting your own opinions and need a helping hand, you can have a more casual approach in a separate file.
You can even have multiple files for different workflows: a CLAUDE.md for when you are doing analysis and writing, and a different CLAUDE.md for when you’re doing infographic designing.
For example, let’s extend the directory from the previous section:
~/ (your home folder)
├── .claude/
│   └── CLAUDE.md        ← Global: applies to every project
│
└── Desktop/
    ├── research-paper/
    │   ├── CLAUDE.md    ← Local: only applies here
    │   ├── notes.md
    │   └── sources/
    │
    └── lesson-planning/
        ├── CLAUDE.md    ← Local: different rules for this project
        └── drafts/
Voila! Now you can think of creating systems with each component having its own individual instructions. The concept is one CLAUDE.md per task or group or category of tasks you want to do.
Owning this concept will make you an effective builder/creator down the line.
Skills: teach Claude a repeatable job
This might be my favorite part of this tutorial.
Here’s a situation you’ll hit eventually. You ask Claude to do a task, it does it well. A week later you’re re-explaining everything from scratch. It’s similar to CLAUDE.md files, but focused on actual execution now.
It gets tiring to repeat the same thing over and over. That’s what skills are for.
Let me explain what a skill actually is first.
A skill is something you are confident you can do repeatedly. It only becomes a skill if you know you can do it at a certain level, consistently.
You say you’re skilled in basketball when, I don’t know, you can shoot 10 free throws and make 7 out of 10 every time.
You’re skilled at a game if you’re able to consistently beat the boss character.
You’re skilled at drawing if you can keep on creating drawings with a good mix of texture, shape, and color.
That’s what a skill is: a repeated set of steps you can continuously and predictably do to achieve a goal.
And if there’s anything I can tell you about AI, they’re the perfect minions for doing repeated tasks we don’t want to do.

A real example: carousel writing
Here’s a moment where I call a skill instead of re-explaining from scratch.
Take the creation of a carousel. My old process: draft up an idea, go to my notes app, write “slide one, this is what it should contain, slide two, this is what it should contain” up until the last slide. It’s a very a manual process.
Even before that, I would go to my Notion, take all the ideas I have, and draft them up. So it went: research, reading through research, drafting, then formatting into Canva.
So I created a social carousel writer skill, which reduces the load on research, drafting, and formatting. To access skills, type the / command, and it should appear. Here’s what my social-carousel-writer looks like:

Now I just say “draft up a carousel about this topic,” and the relevant files and research already uploaded in my Notion get fetched automatically. It gives me slide one, slide two, slide three, slide four, slide five, complete with the screenshots I need to put in.
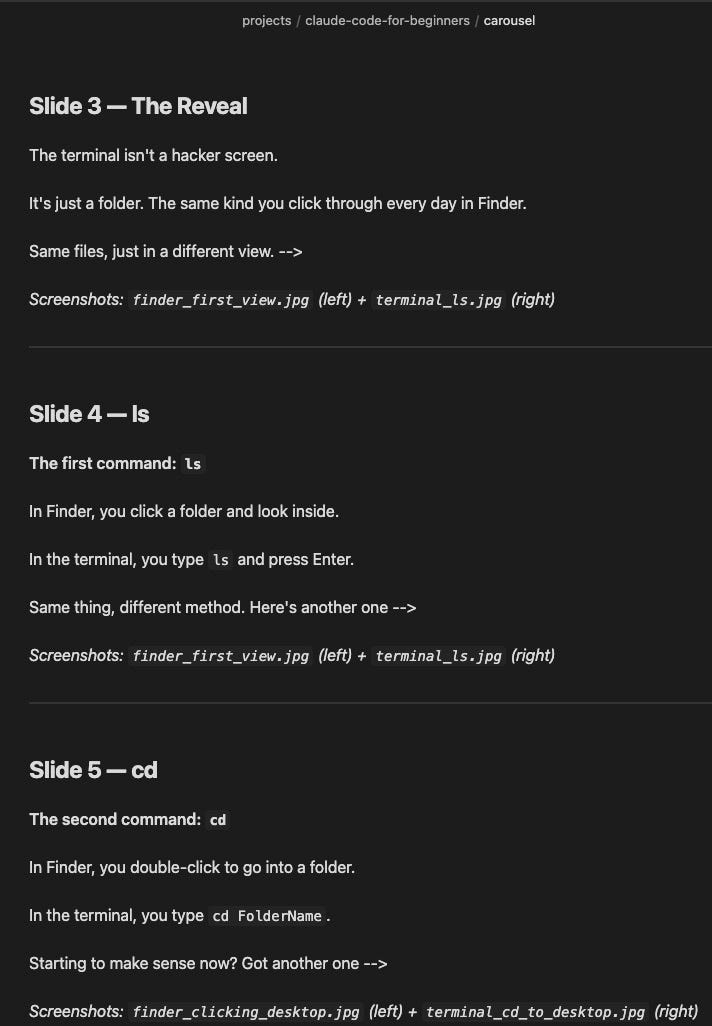
The first draft is bad, but then I just edit.
Instead of doing all those steps myself, I have AI front-load most of the work, and I just focus on editing. That’s the power of skills. It saves you time every time (pun intended).
How to create your own skill
Good news, it’s so simple to create a skill because Claude’s got a built-in skill-creator command. Simply prompt Claude Code to add the official plugin and it will install it for you:
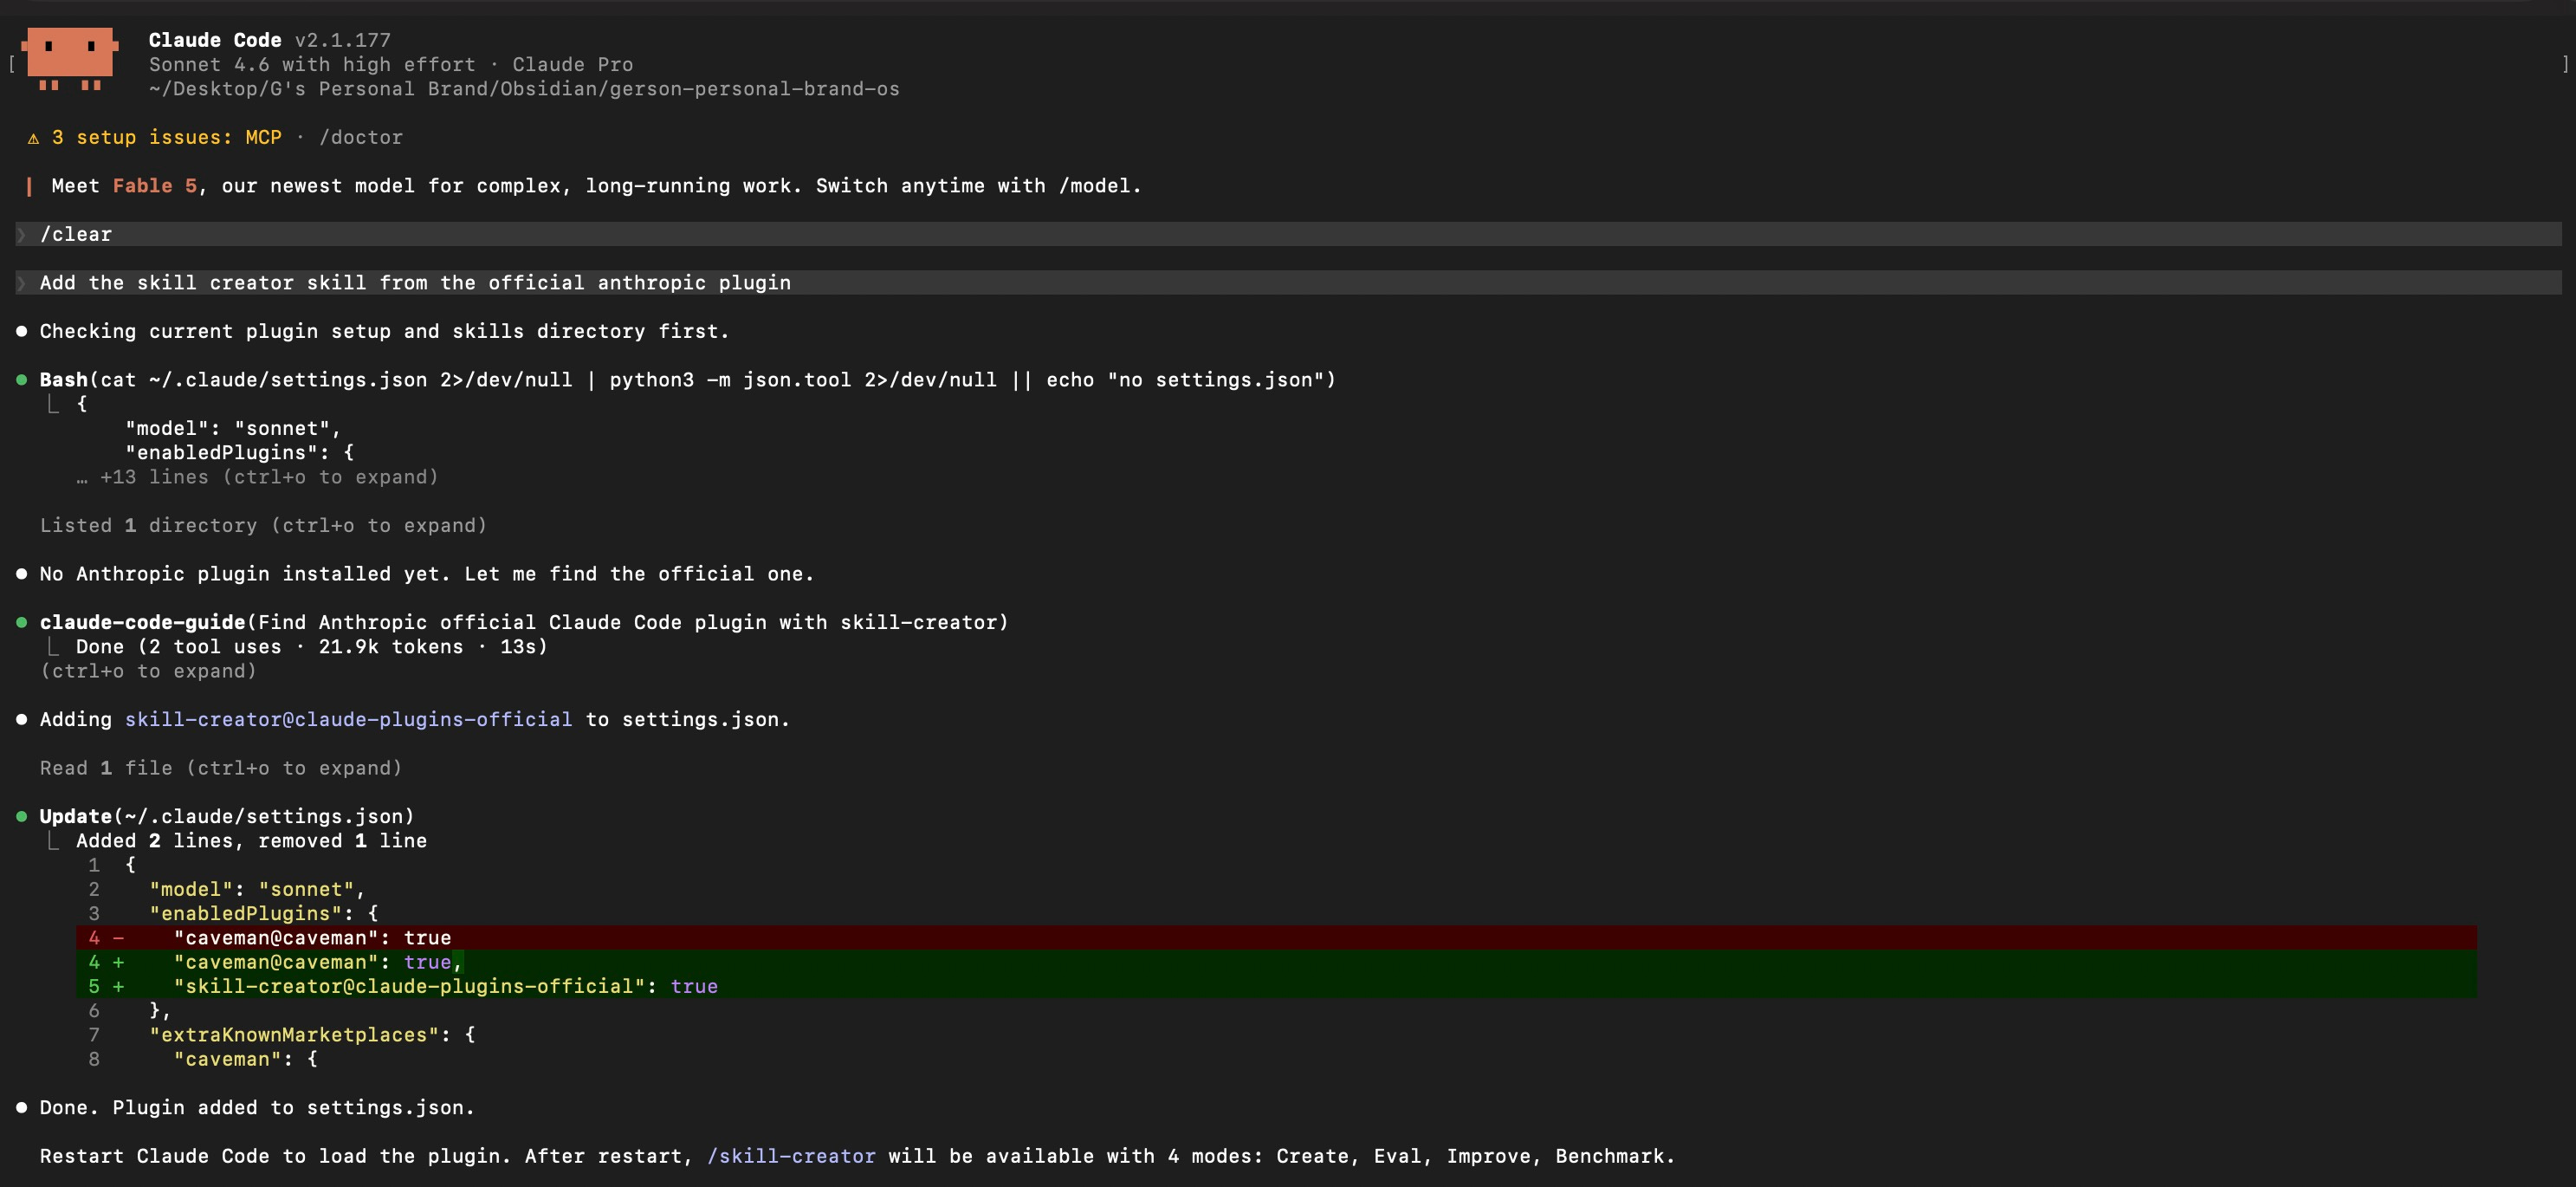
Then, run the skill-creator and answer all the questions Claude has for you.

It will interview you for the specifics, so be as clear as possible here. Then, you’ll have the skill you wanted for trial and editing after.
But what if I don’t want to use the skill-creator?
Valid question! Well here’s a cool tip: open a new session, do the task you wanted to do in that session, and at the end of it, say “turn this into a skill.”
It’s that simple. In this approach, you did the task first, and you can take all the context and memory from that session to turn it into a skill.
So remember, anything you repeatedly do, there’s probably a skill you can create for it.
My honest evaluations of skills
As much as you can, create skills for tasks you do. Because skills save you time and they save you headspace. By creating a skill for a task you repeatedly do every week, you’re freeing yourself up for other tasks that are more important or more critical less tedious formatting work, more work on what actually matters.
Connect Claude to the world via MCP servers
Hold up hold up, don’t get scared about this new term, Model Context Protocol (MCP). An MCP server is basically what I call a remote.
When you’re watching television and you want to switch channels, you click the remote. That remote is performing the action of an MCP because what an MCP does is connect your AI chatbot to external applications or services:
Your mailbox in Google
Your Notion database
Your Google Sheets worksheet
Your Microsoft Word.
It does the function of a remote by allowing you, the user, to access different stations, different channels, even if you’re just staying right where you are. Where? In your chair or in Claude’s case, in the terminal you’re working on.
The first one I connected
The first MCP server I connected was Notion.
I was having a hard time moving inspiration posts and videos into Notion, because what I would do is copy and paste to Notion every time I found something new. Then to analyze them, I would go back to Notion, click through every page, open each page in the table, copy and paste it back out. That took about five different steps.
So I connected an MCP server from Notion to Claude, so I could just tell Claude: “Hey, please access my database and give me the most recent insights from the last 10 posts I’ve seen.” Boom, done.
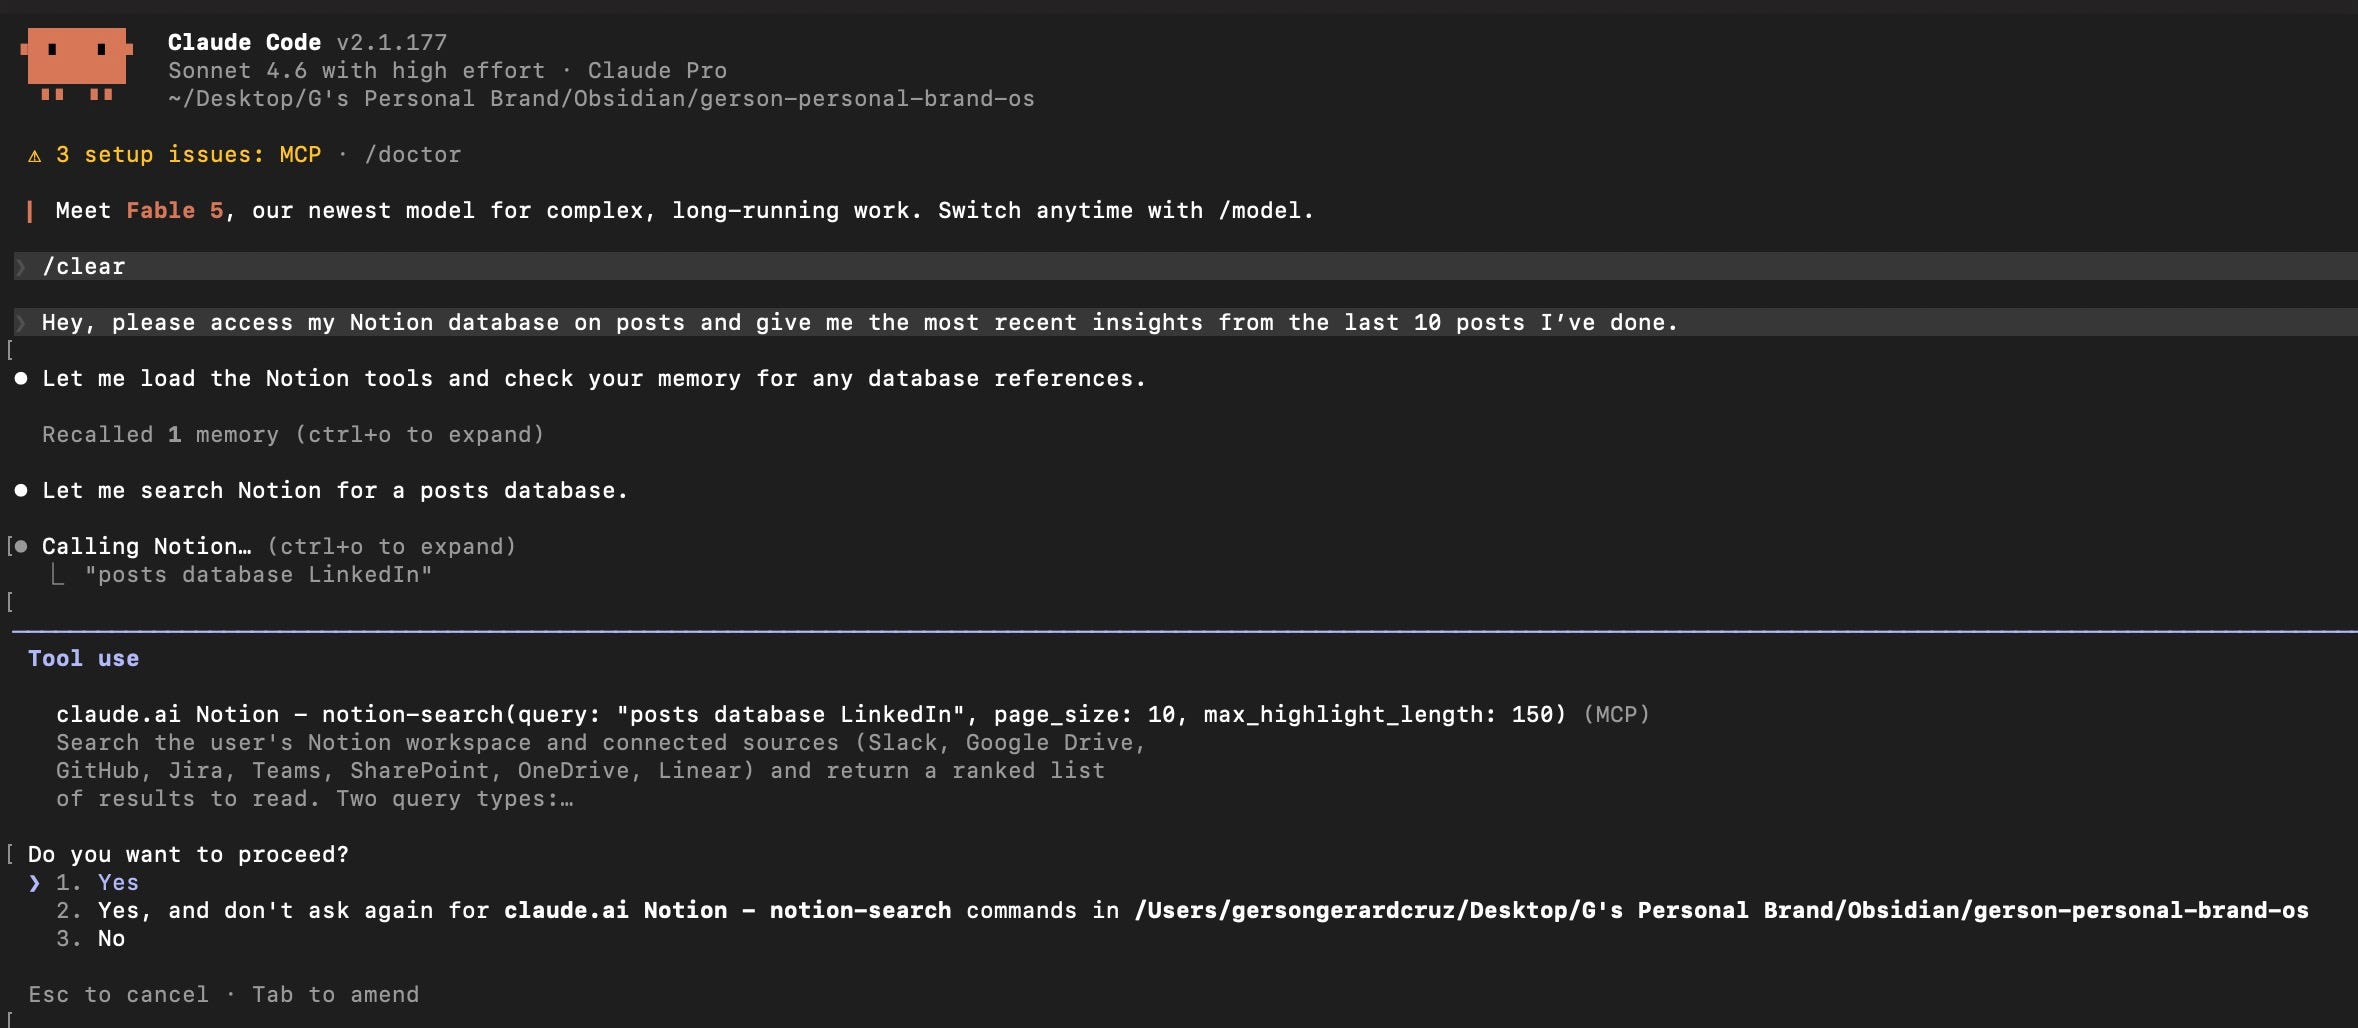
By allowing Claude to connect to Notion, I removed the manual labor of opening a new tab, typing Notion, going to the database, going through every page, copy-pasting. That’s a lot of time saved.
How do you connect to your external apps?
The simplest way is to tell Claude Code:
Connect me to my Gmail account via MCP.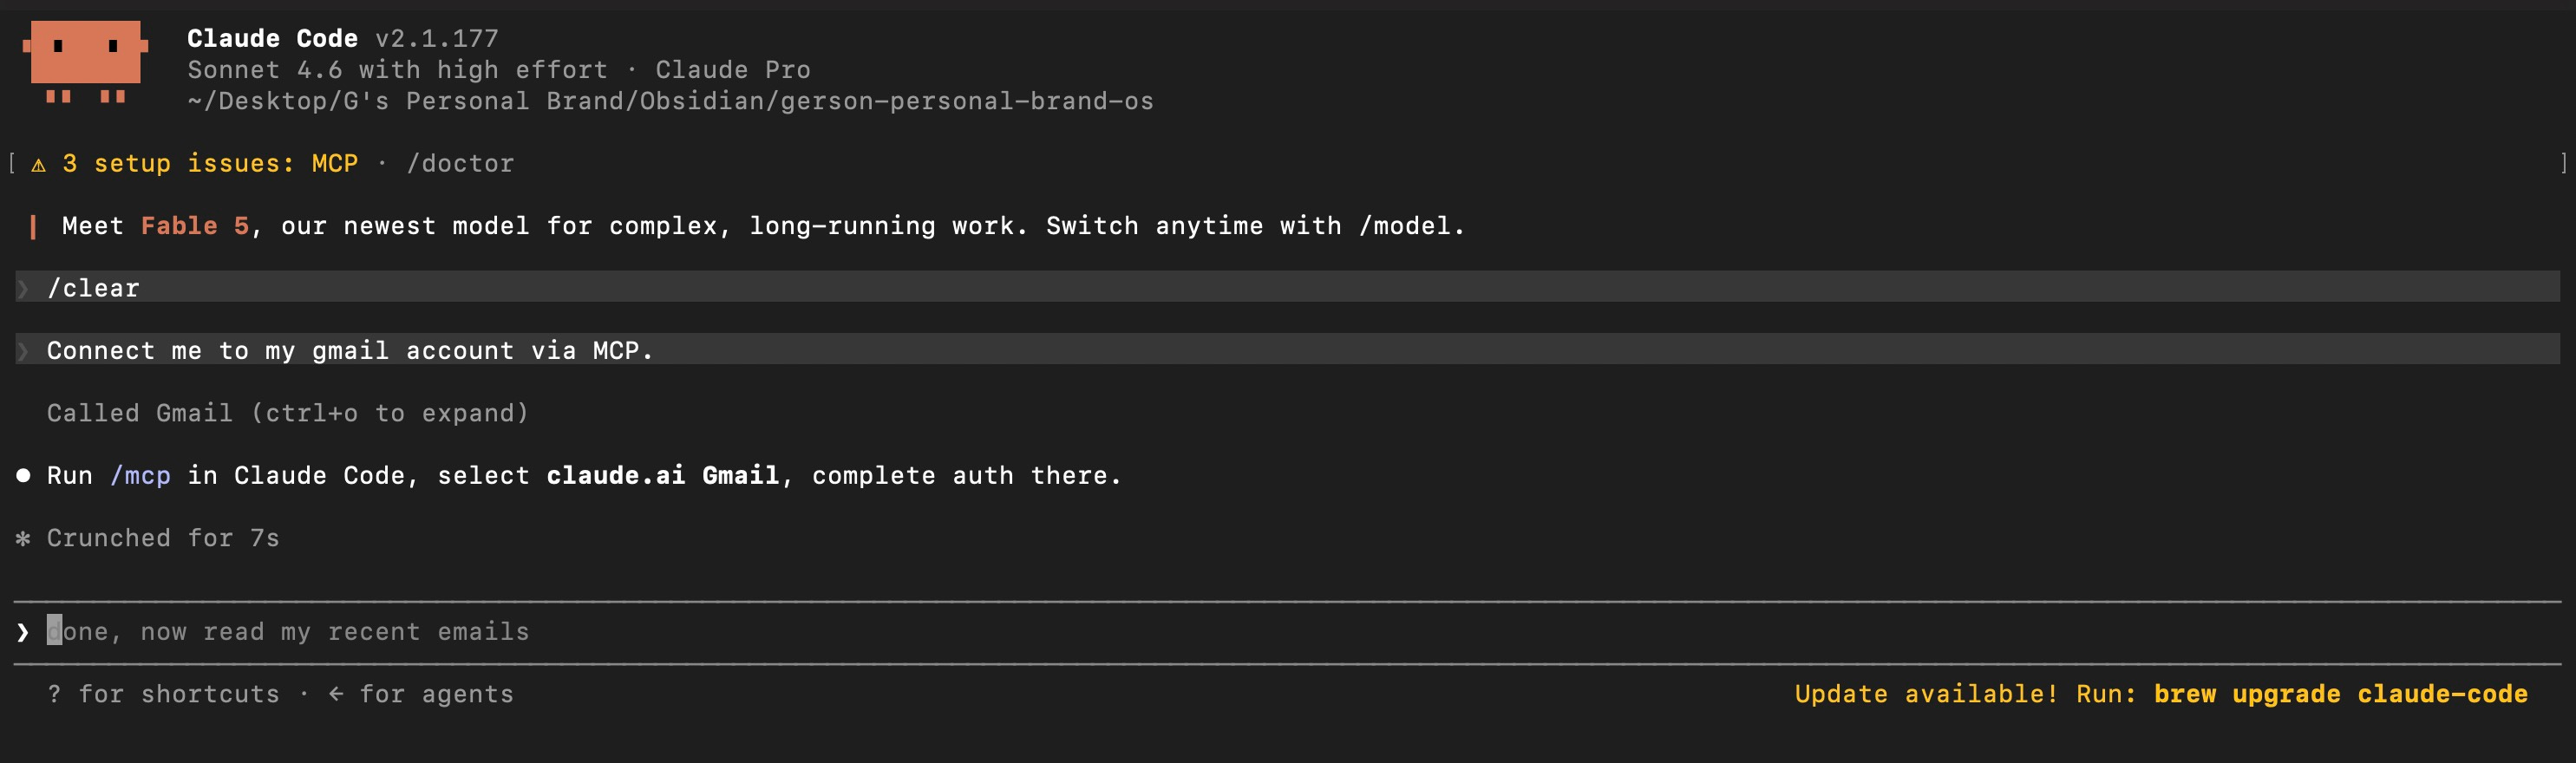
Then, follow the instructions Claude Code gives especially for authenticating.
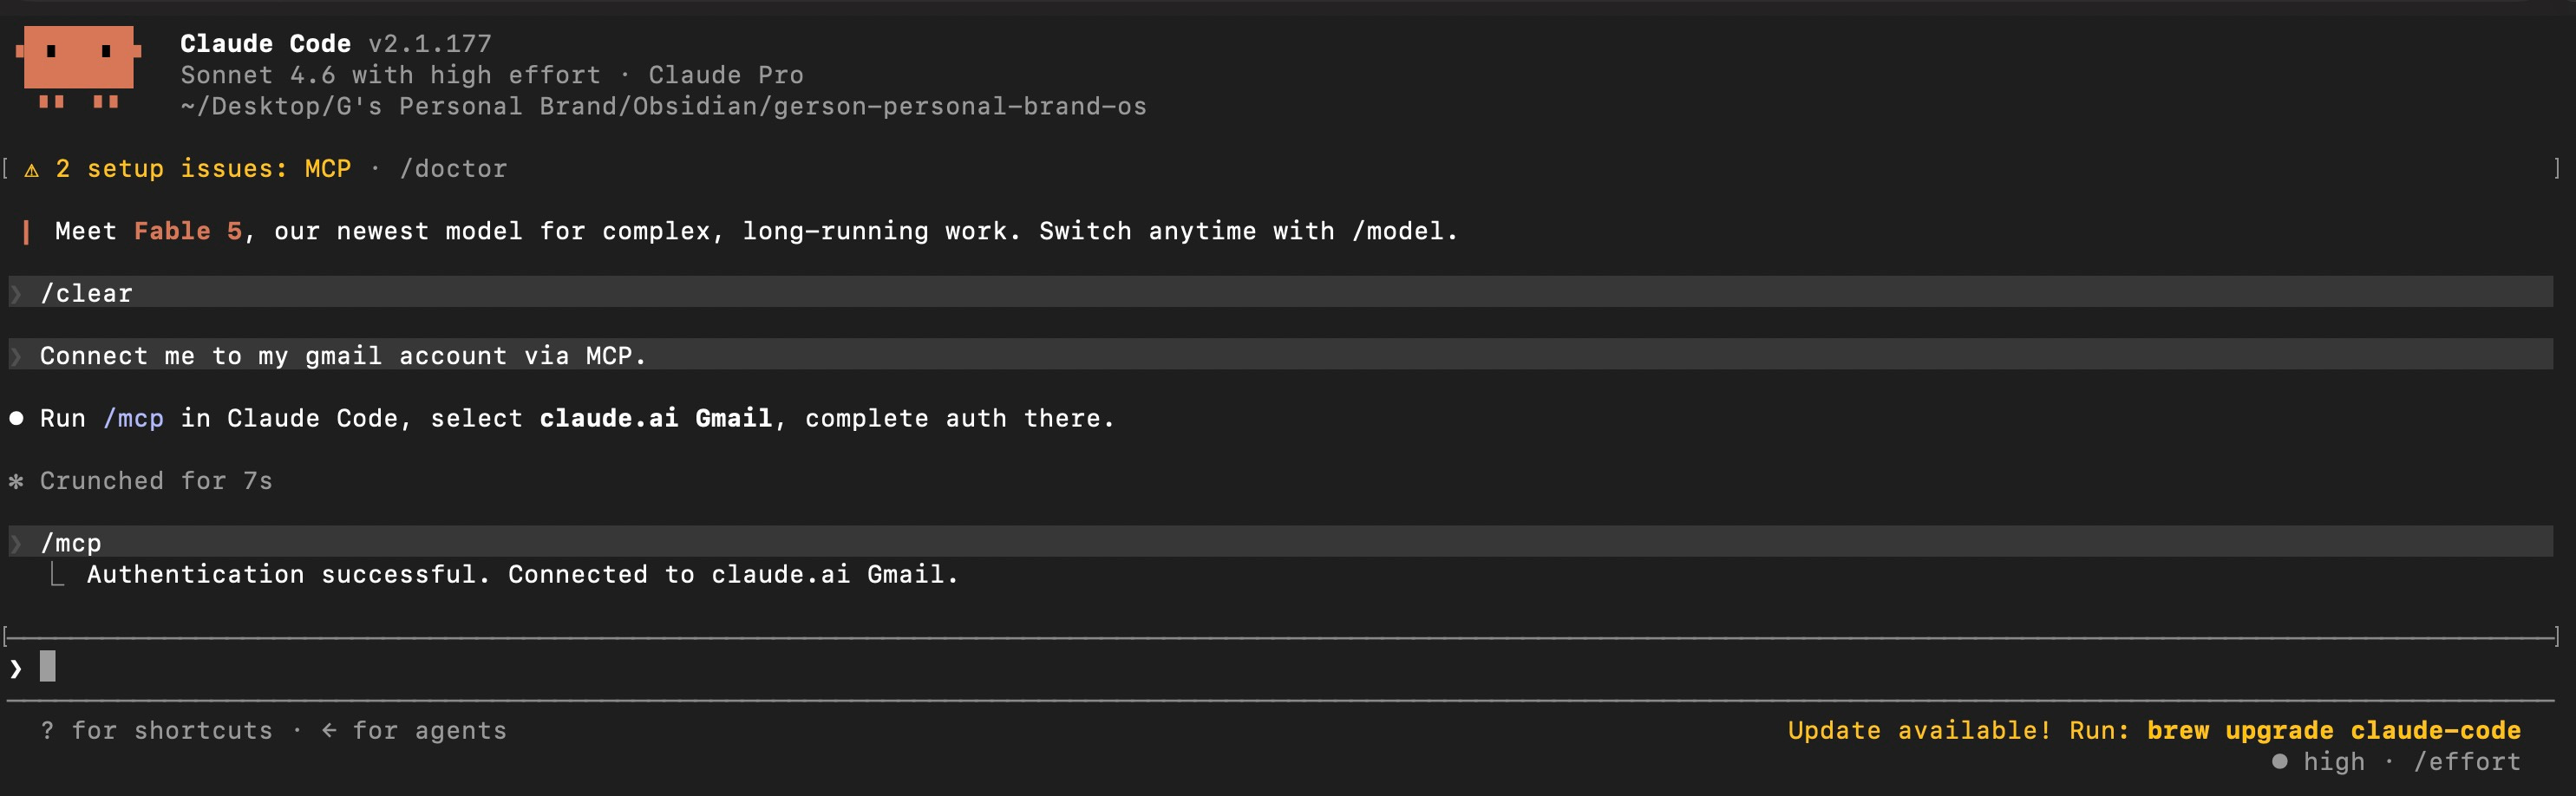
Once you’re connected, you now have a Minion who can check your chosen MCP server and do tasks for you.
Here’s something fun I do with it: I connect it to Gmail promotions, and I say, scan through my last fifteen emails in the promotions tab and tell me if there’s any deal worth looking at meaning at least 50% off, because I want to save like that.
I’m still Asian.
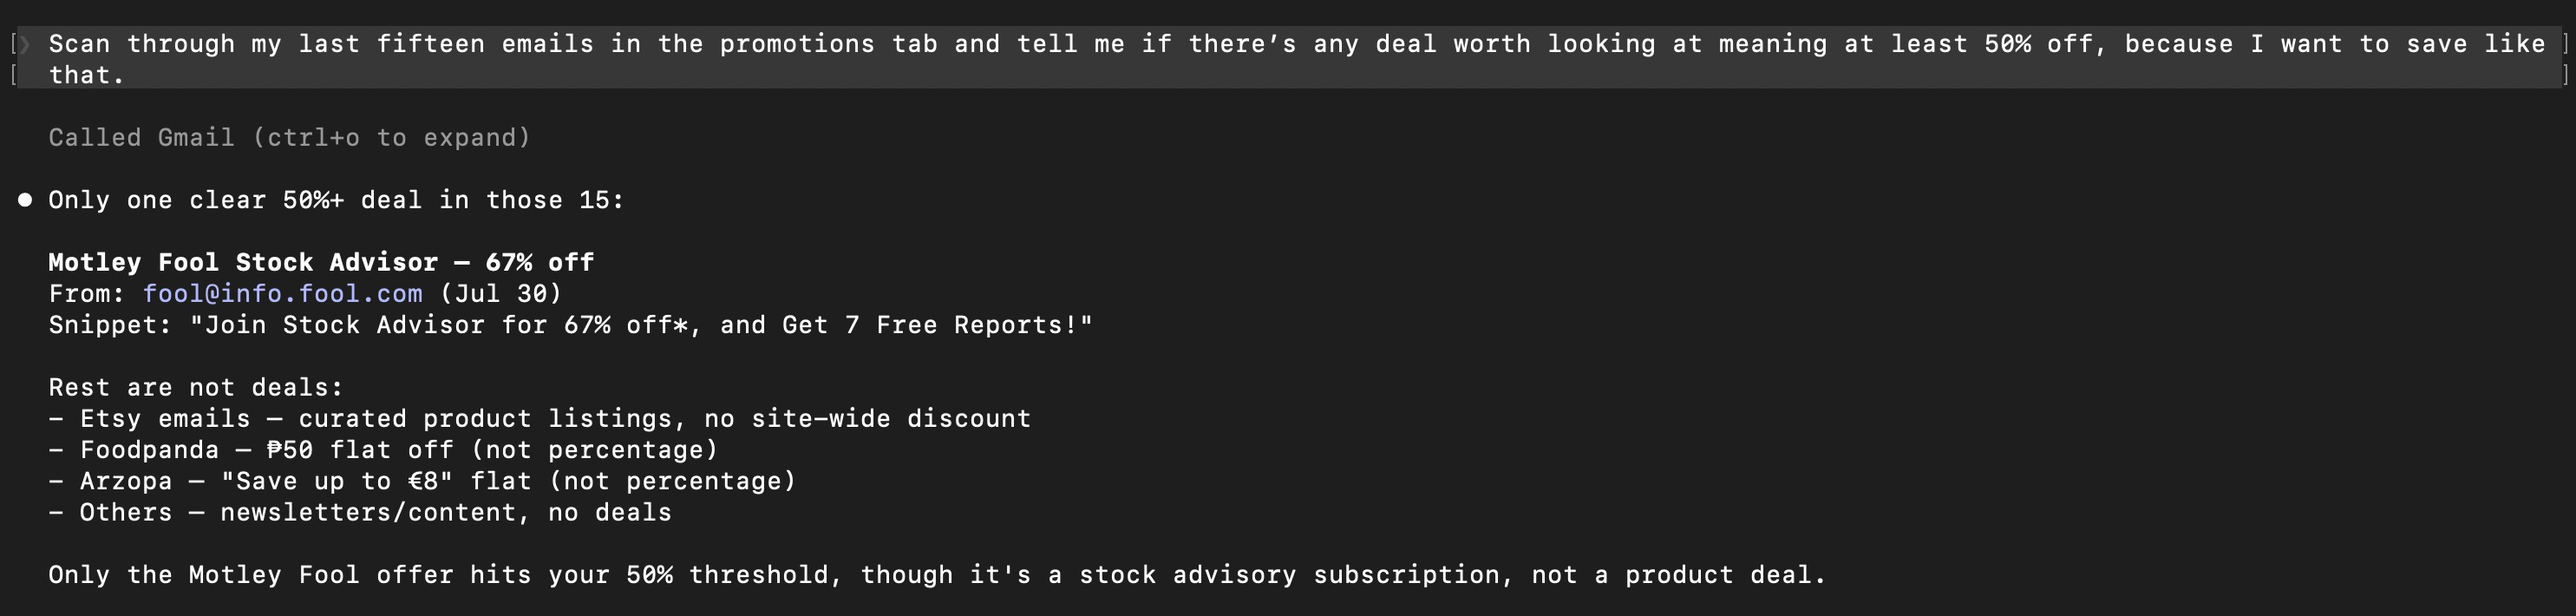
Unfortunately, no good deals right now.
(╥﹏╥)
There’s so much more you can do with MCPs, for example:
Have Claude Code scan your emails and tag them based on which you need to respond to as soon as possible and which you can disregard.
Connect it to your Google Drive, and make it scan files and propose a directory structure to keep your files organized.
Use the Slack MCP to access your team’s 100+ messages and find the tasks that you need to pay attention to.
The idea remains the same. MCPs connect you to external tools. You still figure out what to do with them. See a trend here?
Claude Code is a tool that helps you get to where you want to get faster. It equips you with better wheels, a faster engine, but you are still the one driving.
What you can actually use this for
I’m all for practicing implementation after consumption, so here are a set of mini-projects you can do in less than 30 minutes each with Claude Code.
Because you’ve got the pieces now, the terminal, the three modes, CLAUDE.md, skills, MCP servers, let’s get to building. Claude Code is awesome at that. The output is a real file you can open and use later, whether that’s a webpage, a PDF, a dashboard, or a document sitting in your folder when it’s done.
I’ll walk you through four of them. Each one is a full workflow you can copy step by step, using exactly what you set up in the earlier sections, and each one ends with something real in your folder.
Build a mock-up webpage you can open in your browser
I’m putting this one first on purpose, because it’s one of my favorite use-cases since nothing made the “oh, this is actually different” feeling click for me faster than watching a full webpage appear from a single prompt.
Say you want a simple one-page site for your study group, your class, or a workshop you’re running. Here’s the structure if you want to prompt Claude Code to recreate it:
landing-page/
├── CLAUDE.md            ← the rules for this task
└── output/
    └── index.html       ← the webpage it builds
Then, here’s what you can do:
Make a project folder for it and open Claude Code inside it.
cdin, typeclaude, press Enter.Ask for it plainly: “Build me a one-page landing site for my study group. Include a headline, a short description, the weekly schedule, and a signup section. Save it as
index.htmlso I can open it in my browser.”When it’s done, type
open index.html. Your browser opens the actual page, live. Here’s what mine looked like:
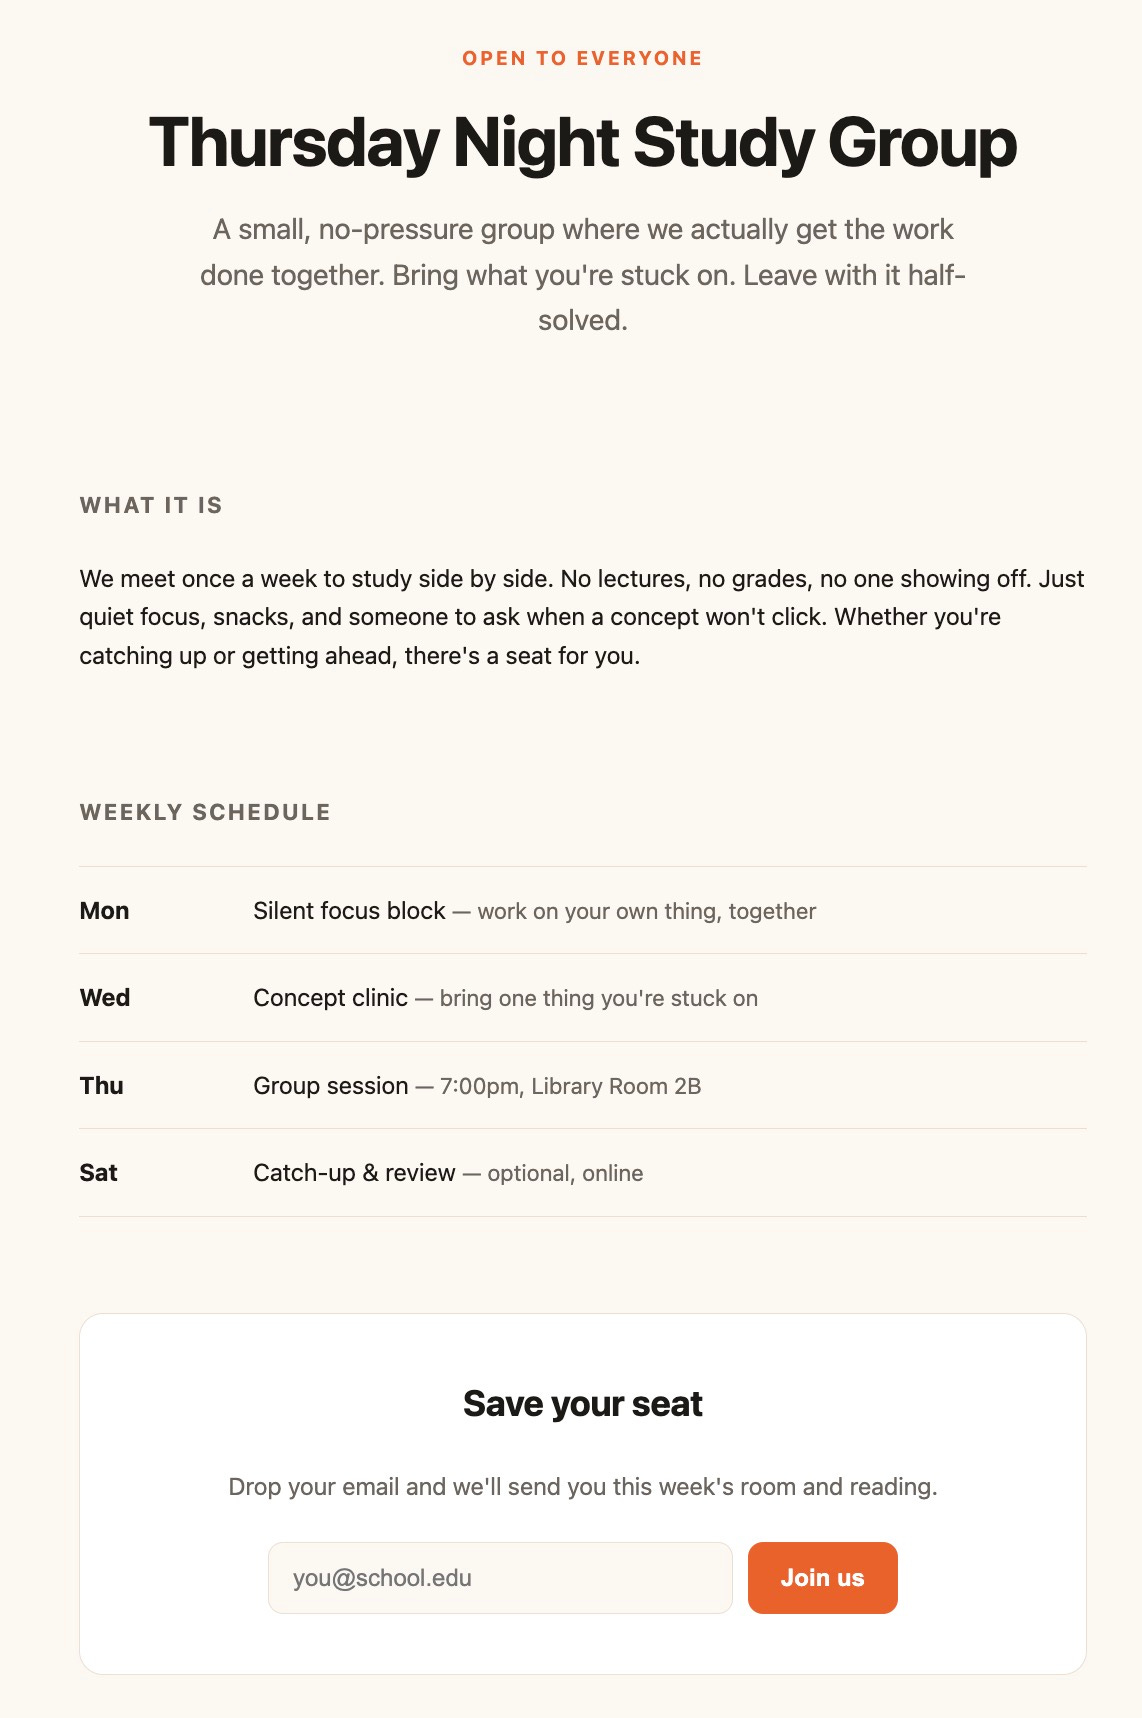
Isn’t that pretty rad? In less than 5 minutes, you get an acceptable mock-up. Don’t like the color, the wording, the layout? Just tell it. It edits the file, you refresh, it’s different.
The output here isn’t a description of a website. It’s index.html, a real webpage sitting in your folder that you can open any time or send to someone.
Love this for spinning up quick proof of concepts and refining ideas visually.
Turn a stack of papers into one research brief (a PDF)
When you’ve got so many papers to read through and little time, the old way would be to chug an energy drink and brute force your way through. Now, you can ask Claude Code for help.
Here’s the structure:
research/
├── CLAUDE.md
├── papers/              ← drop your 5 PDFs here
│   ├── paper1.pdf
│   └── ...
└── output/
    └── brief.pdf        ← the research brief it writes
Then, here’s a set of steps you can follow:
Make a
papers/folder inside your project and drag all five PDFs into it from Finder.Open Claude Code in that project in the terminal, stay in default mode since it’s a new task.
Prompt it: “Read every PDF in
papers/. Write a research brief covering where they agree, where they conflict, and what question none of them answer yet. Save it as a PDF inoutput/, in plain language.”It reads all five and writes the brief to
output/. You open the PDF and read to verify, not to synthesize from zero.
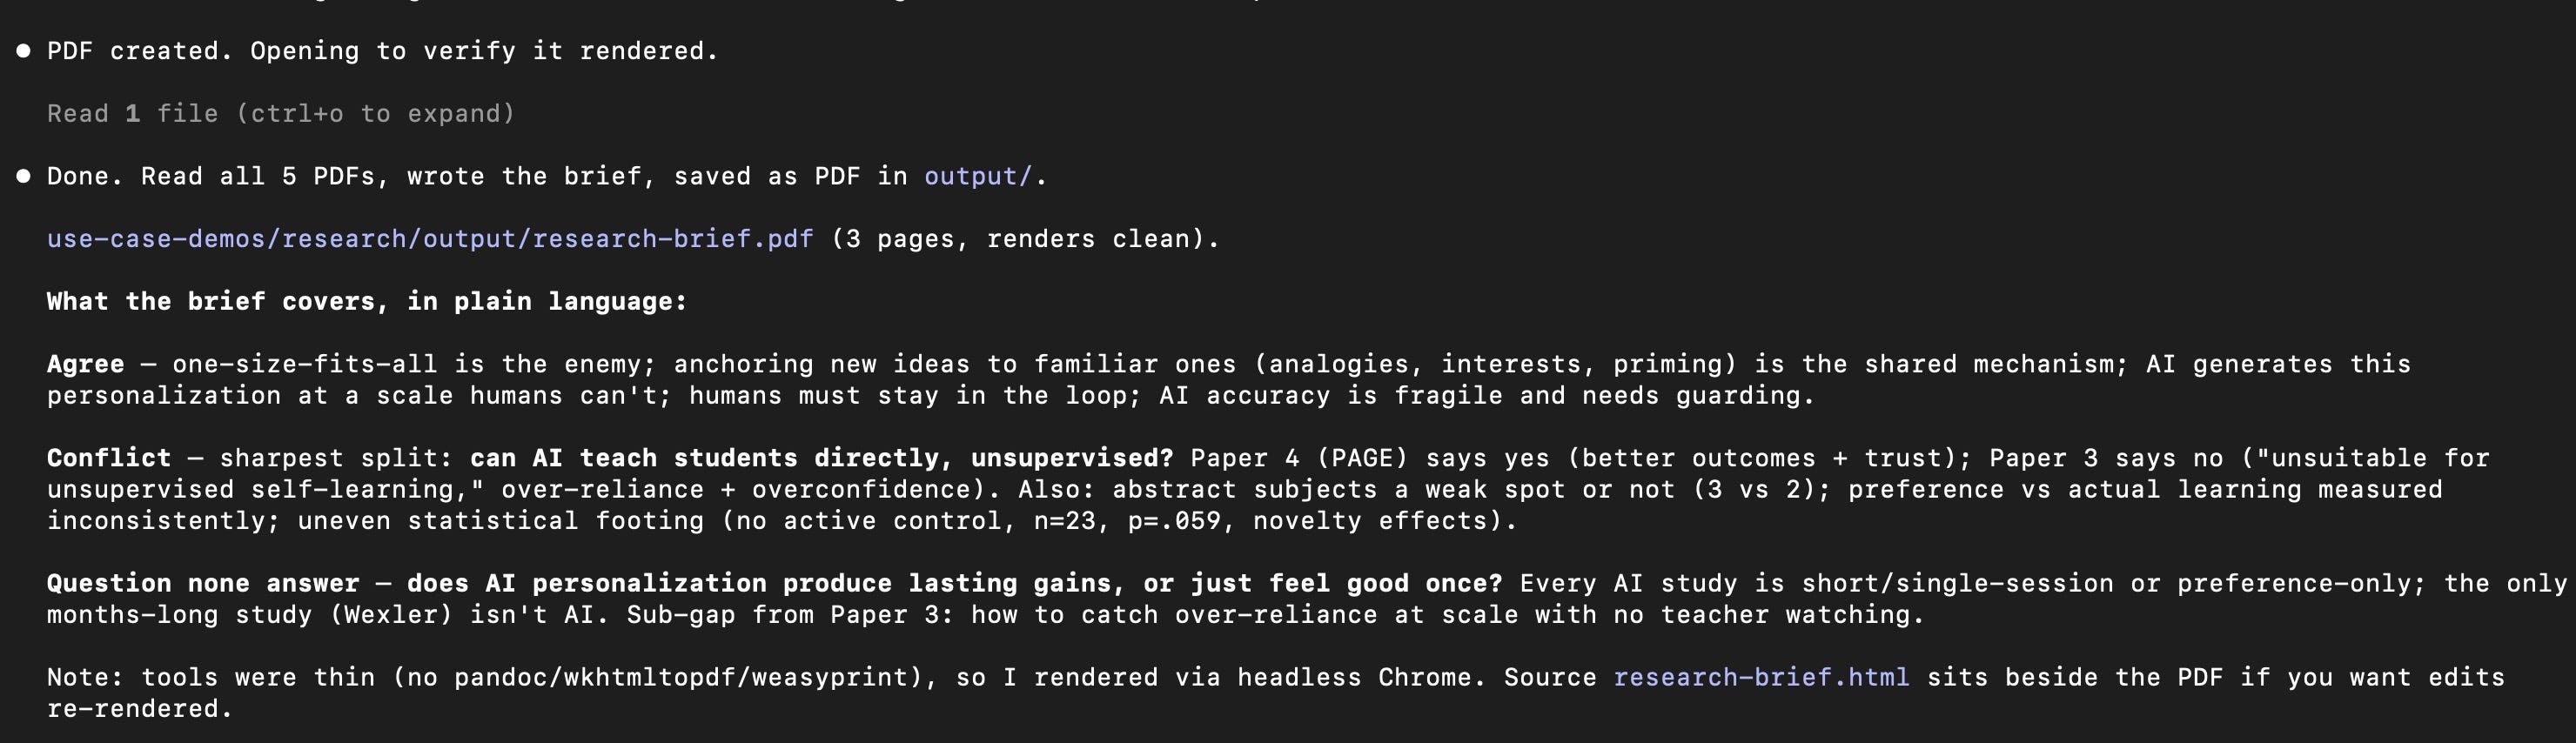
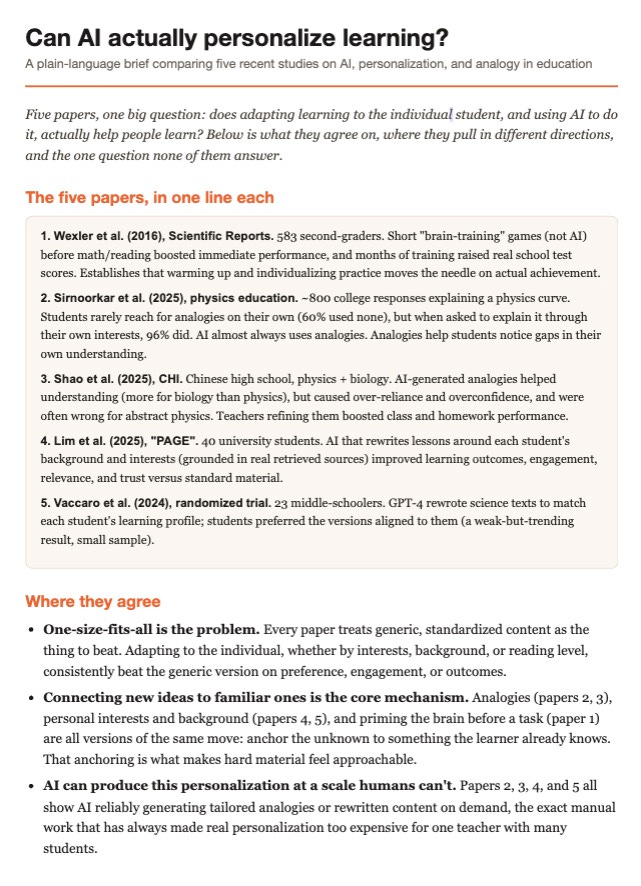
That looks pretty slick, right? Next step, review the papers, and decide whether you need to fully read each one. The bulk of the tedious work is cut down for you, but you’re still doing the thinking.
Talk to your data and get a dashboard back
I used to work with spreadsheets a lot which meant pivot tables and formulas and crying a little when the numbers get overwhelming. Today, we can get a better view of the data, and more visually at that.
Here’s the structure:
sales-dashboard/
├── CLAUDE.md
├── data/
│   └── sales-trends.csv/your-data.csv   ← data goes here
└── output/
    └── dashboard.html     ← the interactive dashboard
Here are the steps for you to follow:
Drop the CSV into a
data/folder in your project.Open Claude Code there with default mode on so you can watch it read the right file.
Prompt: “Read
data/sales-trends.csv. Build me an interactive dashboard showing the revenue trend per product, which ones are rising or declining, and any regional patterns worth flagging. Save it asoutput/dashboard.htmlso it opens in my browser.” Edit the prompt based on what you want to see visualized.It reads the file and builds an actual dashboard. Charts, not formulas. Then you type
open output/dashboard.htmland click through it. Here’s what mine looked like:
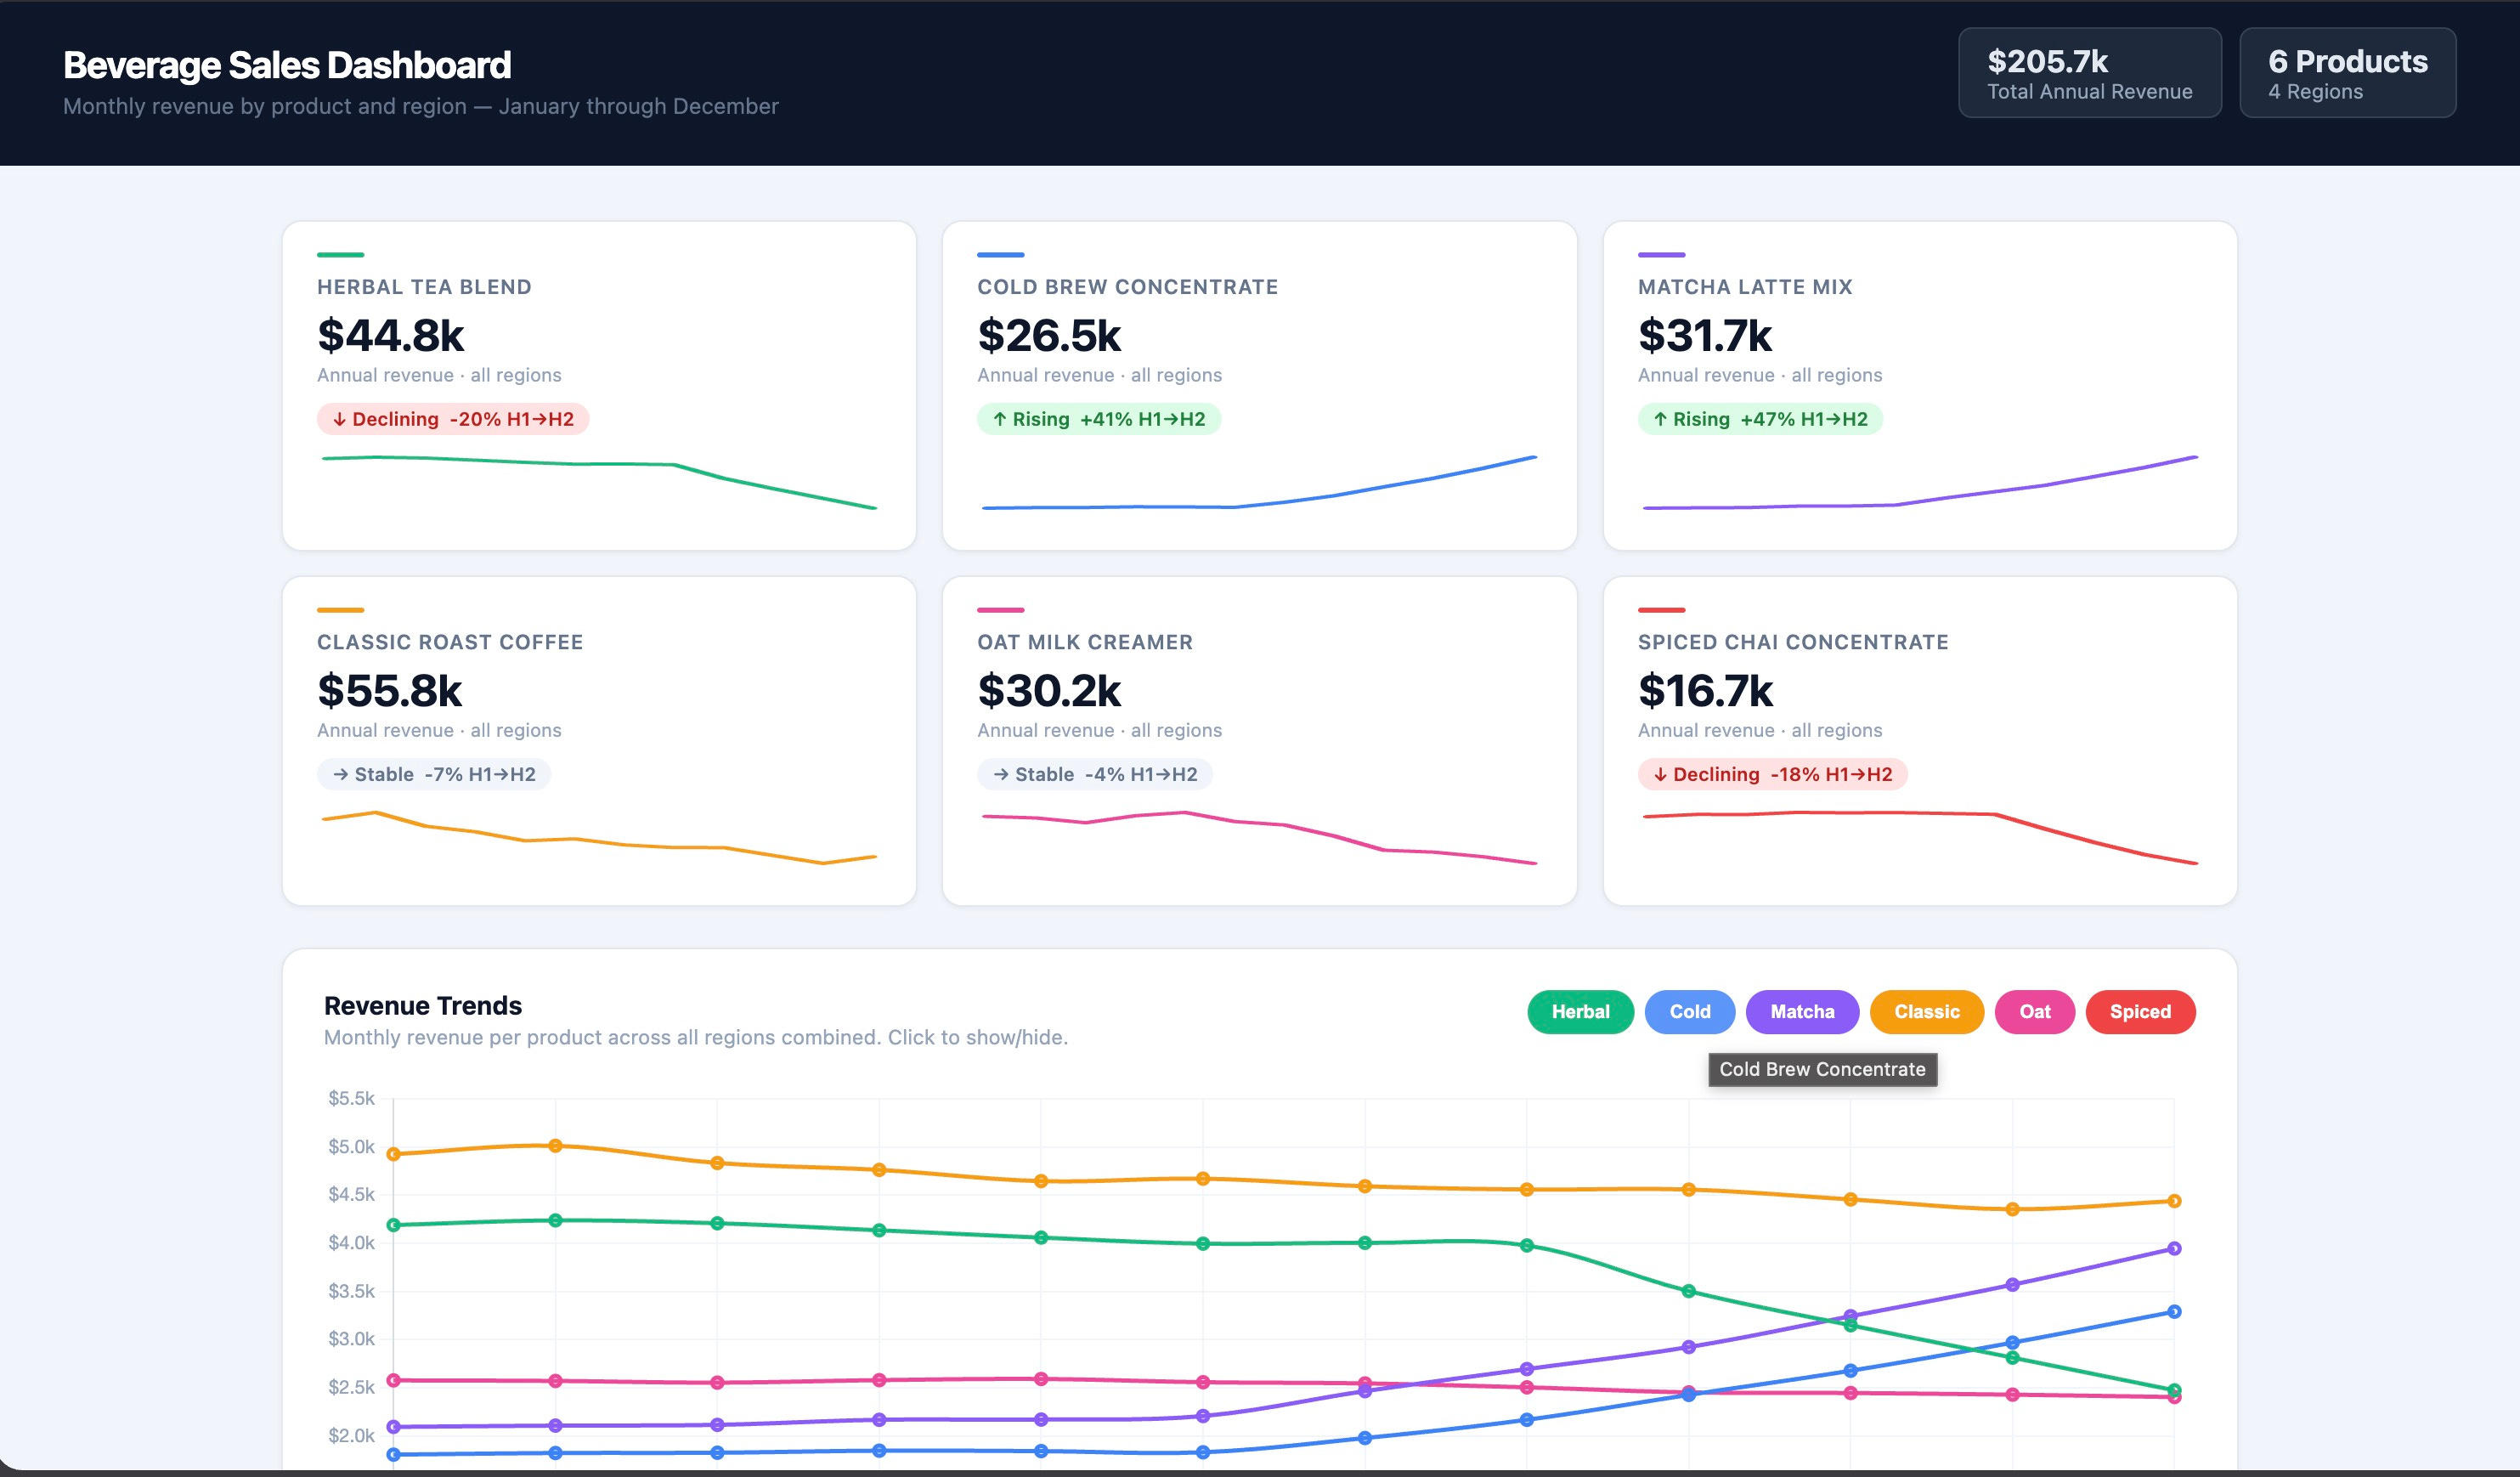
It’s absolutely amazing that this was created in less than 10 minutes! It’s even interactive and you can click the type of beverage. It’s a working dashboard you can open and click.
That’s the power of Claude Code for ya.
Build a four-week lesson plan as a finished document
Lessons plans are one of the most tedious things to create as educators. It takes time to plan out the entirety of a lesson. Thankfully, Claude Code can now help with that.
Here’s the structure:
lesson-planning/
├── CLAUDE.md            ← your reading level + lesson rules
└── output/
    └── lesson-plan.pdf  ← the finished plan

Feel free to add an inputs/ folder containing previous materials for added context.
Here are the steps for you to follow:
In your lesson-planning folder, put the rules you never want to retype into CLAUDE.md: the reading level, what every week needs (objective, activity, materials), and where to save the file.
Open Claude Code in that folder.
Ask: “Build a four-week lesson plan on climate change for 15-year-olds who’ve never taken a science class. Each week needs a learning objective, one hands-on activity, and the materials needed. End with a final project brief. Save it as a formatted PDF in
output/.”It writes the whole plan, formatted the way you told it once, and saves the PDF. You open it, cut what doesn’t fit your class, print it. Here’s the output for me:
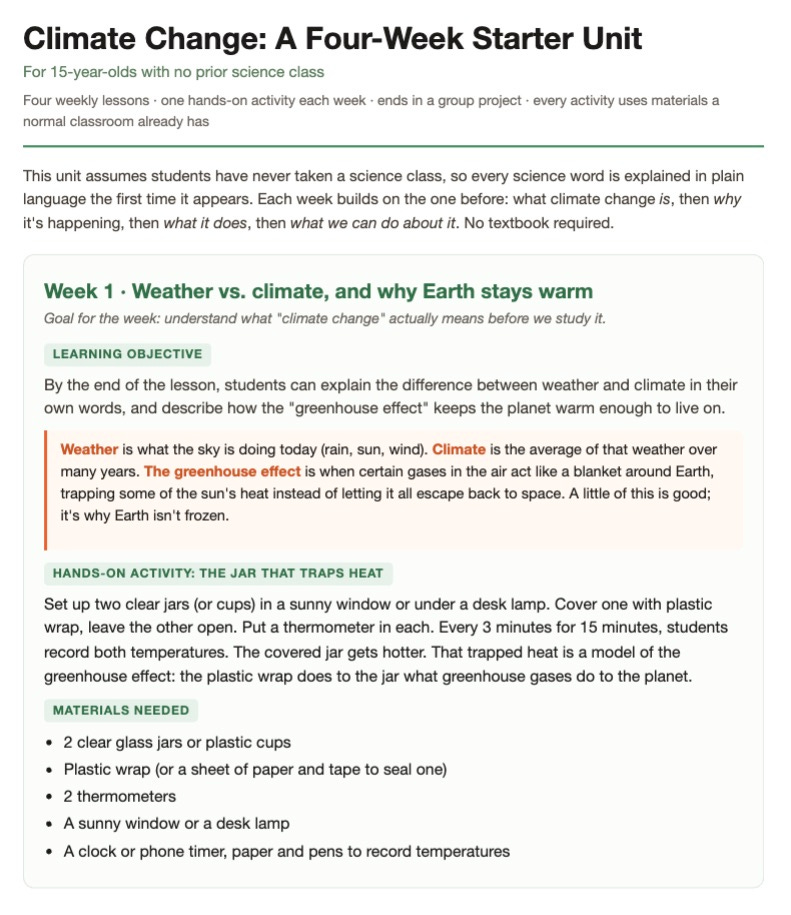
What would have taken days to format, is now available to you in less than 10 minutes. Remember, the content ideas should still be yours, with minor assistance of AI, but it helps so much in getting a product out, and that’s where you can get feedback much much quicker.
My final reminders, tips, and tricks
Congratulations for making it here! I hope you’ve learned a lot. I’m leaving you with a short set of reminders for the last bit. These are the things I always tell myself, and I’m so happy to share them with you as well. I’ve also added it some tips and tricks for you to follow next time.
Read what you approve. This is so important. You need to at least know what the agent is doing before it executes it. Remember: you are still the one who holds control over Claude Code. It’s a great executor, but you are the thinker, the evaluator, the judge.
When in doubt, plan mode. When you don’t know what to do or you have no clue, use plan mode so Claude gives you its suggestions, and you review them. Check all the resources Claude gives you. That’s when you do the Google searches. That’s when you figure out what you should actually use.
Turn everything you repeatedly do into a skill. This will give you so much time back.
Use CLAUDE.md heavily for every project. Every project should have a CLAUDE.md file that contains all the instructions for that project. When you go to that project, just say “use this CLAUDE.md file”, it has all the data you need to be immediately onboarded.
Fail fast, but learn faster. Make your first artifacts quickly in the ugliest way possible so you can immediately iterate and get feedback on what you need to improve.
Scope Claude to a project folder first. Everything you do sticks into that project folder. If it’s good, you can turn it into a skill after.
Default mode, always, unless you’re already familiar. Auto-accept is only for tasks you’ve done before and trust. Default is the rule. Auto-accept is the exception.
Be wary of putting in personally identifiable information. If you’re working with anything sensitive like financial numbers, account numbers tell Claude explicitly, or put it in your CLAUDE.md: never take my user IDs, my passwords, my bank numbers, my account numbers. Put that in to protect your information.
After a task finishes, ask Claude: “What would you do differently next time?” I love this tip because it gives you an evaluation of how that task went and immediately gives you feedback on how you can improve it. Over time, this compounds, and you’re using AI’s billions of knowledge to work for you instead of against you.
You still might be scared of Claude Code. That’s totally fine.
But, you’re way more equipped now. Before you started reading this, you might have known only 10-20% of what we covered. Now, ou know what the terminal actually is. You know how Claude Code lives inside it. You know the five most common terminal commands, the three permission modes, the CLAUDE.md, the skills, the MCP servers.
You know how this system works. And you’ve (hopefully) even build a mini-project already by following the step-by-step guides.
If I could go back and tell my past, intimidated self one thing, it would be this: the fear doesn’t have to go away completely. You just have to be willing to start anyway.
I hope you’ll keep trying to start and learn more and more. That’s what we need more today.
See you in the next one,
Gerson 🧡
P.S. If you found this tutorial useful, subscribe, restack, or drop a comment. These signs of support mean the world to me. I know it’s all free for you to do, but it signals a huge accomplishment for me already and I’m really thankful for it.